

Facing the 0x8007112A Error when moving or deleting folders in Windows?
![[FIX] 0x8007112A Error when Moving or Deleting Folder](https://www.saintlad.com/wp-content/uploads/2021/05/error-0x8007112a-1.png)
It makes absolute sense to delete or move folders from your PC when you don’t want your system to be scanned by an intruder in your absence. But imagine not being able to do so when you need it the most, all because of a frustrating error that keeps popping up on your screen.
If you are reading this right now, the chances are that you are going through a similar situation on Windows.
We had a look into this matter and discovered that the error at hand is mainly caused due to app conflicts, faulty updates, and folder permission issues. Luckily, we have listed some of the easiest methods that will help you resolve the problem in no time.
Let’s get started.
1. Run File and Folder Troubleshooter.
If your screen displays the 0x8007112A error when moving or deleting folders, then the first thing you should do is run the File and Folder troubleshooter.
There are times when you are unable to move folders around because of the lack of necessary permissions. In this case, running the File and Folder troubleshooter can fix the error.
Here is what you need to do:
- Download Windows File & Folder troubleshooter using your search engine.
- Once the file is downloaded, open it and click on Yes in the User Account Control. Doing so will grant administrative privileges to the troubleshooter.
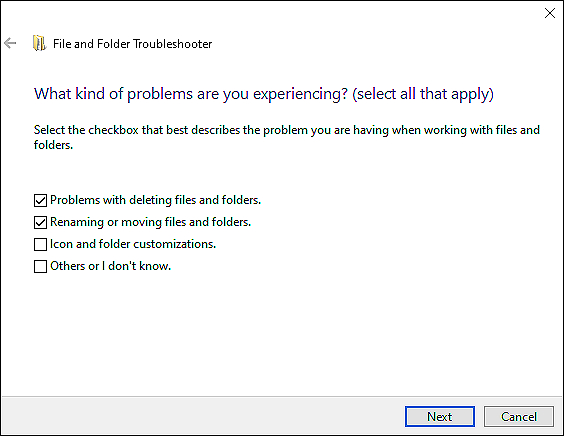
- Inside the troubleshooter window, select Advanced and checkmark the box against Apply repairs automatically.
![[FIX] 0x8007112A Error when Moving or Deleting Folder](https://www.saintlad.com/wp-content/uploads/2021/05/windows-and-files-troubleshooter.png)
- Now click on Next to start scanning.
- After the troubleshooter has completed initial scanning, checkmark the boxes against Problems with deleting files and folders and Renaming or moving files and folders.
- Once the scanning is complete, check if the troubleshooter resolved the issue. If it did, restart your PC. However, if the error persists, proceed with the 7th step.
- Press Windows + R keys simultaneously to open a Run dialogue box.
- Inside the text field of the dialogue box, type ms-settings:troubleshoot and hit Enter.
![[FIX] 0x8007112A Error when Moving or Deleting Folder](https://www.saintlad.com/wp-content/uploads/2021/05/windows-troubleshooter-1.png)
- Locate Shared Folders and click on it.
- Select Run the troubleshooter to scan your operating system.
![[FIX] 0x8007112A Error when Moving or Deleting Folder](https://www.saintlad.com/wp-content/uploads/2021/05/windows-troubleshooter.png)
- After the initial scanning is complete, the troubleshooter will display another window. Paste the network location of the faulty folder inside the text field of the newly opened window and hit Enter.
- Wait for the process to complete, and then restart your PC.
Hopefully, your PC will no longer display 0x8007112A errors when moving or deleting folders.
2. Perform DISM and SFC Scans.
If the File and Folder Troubleshooter did not resolve the issue on Windows, then you can try using other built-in troubleshooting utilities within Windows to resolve the issue.
In this method, we will use Deployment Image Servicing and Management (DISM.exe) and System File Checker (SFC). These tools scan through the operating system files, detect issues, and attempt to automatically resolve them.
Here is how you can run SFC and DISM scans on your PC:
- Type cmd in the search bar and click on Run as administrator to open Command Prompt with administrative rights.
- In elevated Command Prompt, type the command listed below and hit Enter to execute it.
sfc /scannow
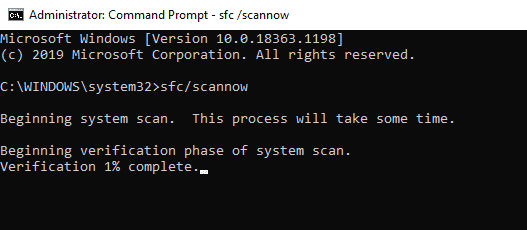
- Once the command is executed, restart your PC and check if the error is resolved. If not, then open the elevated Command Prompt again.
- Type the command mentioned below and hit Enter.
Dism /Online /Cleanup-Image /RestoreHealth
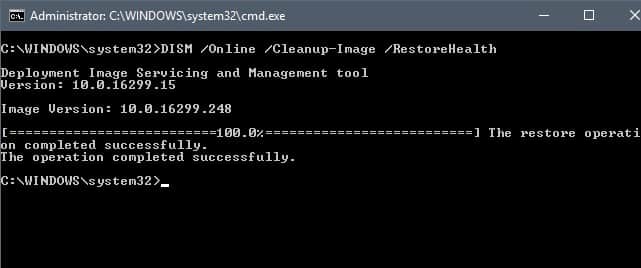
- Finally, restart your PC again.
If a corruption error within the system was causing the issue, performing the scans mentioned above will resolve it.
3. Restore a Previous Working Version of Windows.
If the 0x8007112A error code started occurring after you installed a new update or downloaded a new program, then there is a high chance the new installation is corrupt.
Luckily, Windows allows you to revert the changes and restore a previously working version of Windows.
If your Windows troubleshooting tools have failed to resolve the issue and you do not want to try out more methods, we recommend that you restore a previous working version.
Once the previous version has been restored, you should be able to move and delete the folder without any issue.
4. Try Using CleanMyPC.
In case you haven’t deep cleaned your PC and removed the junk system files in a long time, then now might be the right time to do so because the unwanted files can be causing the issue at hand.
Identifying and deleting junk files is not an easy task and can waste your energy and time. The easiest way to do it is by using an efficient PC cleaning application, and if you are looking for a suggestion, we highly recommend using CleanMyPC.

CleanMyPC is a reliable tool that scans through your PC, identifies the issues, and fixes them with little to no user input. We personally love this tool, as it has made cleaning the PC and increasing the space so much easier. We also noticed a significant increase in the performance level of our PC!
CleanMyPC comes with a wide range of system-maintenance tools that can take care of everything from your PC’s slow speed to privacy issues.
All that you need to do is install the tool and run a scan. The rest will be taken care of!
5. Reinstall Windows.
If none of the methods mentioned above works for you, this implies that the issue is not in the folders but the operating system itself.
In this scenario, we recommend reinstalling Windows on your PC.
Don’t worry; reinstalling Windows is entirely safe and will not delete your essential files unless you do not explicitly choose to delete them. However, this might be a lengthy process, which is why we recommend doing it when you are not in a hurry.
This should resolve the issue once and for all.
This brings us to the end of our guide on fixing the 0x8007112A Error when moving or deleting folders. We hope that one of the troubleshooting methods did the trick for you and the issue is resolved by now. If you still have any questions, please let us know in the comment section below.
If this guide helped you, please share it. 🙂
