

Tired of Airpods audio issues on Windows 11?
AirPods are undoubtedly one of the greatest additions to the Apple ecosystem due to their efficient battery life and innovative noise cancellation technology. But are these enough to consider them the best wireless earbuds, especially when it comes to non-Apple systems?
Windows, in particular, has always posed unknown errors when it comes to Bluetooth audio devices. In Windows 11, the primary reason for these includes audio tasks being managed using Advanced Audio Coding. Although Windows 10 used SBC and aptX Bluetooth codecs instead, users still had to face similar problems.
With the update, we hoped the issue would have been resolved, but unfortunately, users are still finding a workaround. If you’ve landed on our page for the same reason, you’ll be relieved to hear we’ve got all that you need.
So what are you waiting for? Let’s start right away!
1. Restart Bluetooth Service.
Restarting the Bluetooth service on Windows will put everything back to default and hopefully get your Airpods working again. This should be the first step when facing Airpods audio issues on Windows 11.
To do so, follow the instructions below:
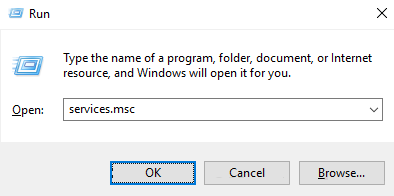
- To start, press the Windows key + R on your keyboard to open the Run dialog box.
- Type ‘services.msc’ and press the Enter key.
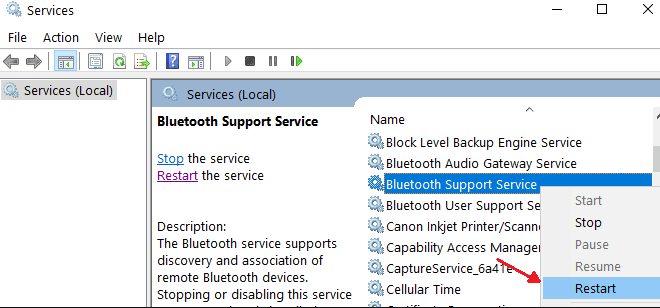
- Now, look for the services named Bluetooth Audio Gateway Service, Bluetooth Support Service, and Bluetooth User Support Service_NNNNN. Right-click on each, one by one and choose Restart from the context menu.
Afterwards, reconnect your AirPods and see if the issue resolves or not.
2. Reconnect Your AirPods.
Sometimes, your AirPods may have a hard time connecting to Windows 11 as it’s already paired to another device. In that case, you will have to manually unpair your AirPods from the connected device and pair it with your PC.
You may do this by following these steps:
- Long press the Setup button at the back of the AirPods case with the lid open.
- Let go once a flashing white light appears.
- Now, open the Action Center on your PC by pressing Windows key + A from your keyboard.
- Turn on the Bluetooth, if not already.

- Next, right-click on Bluetooth and select Go to Settings.
- When the window opens, click on Add device.
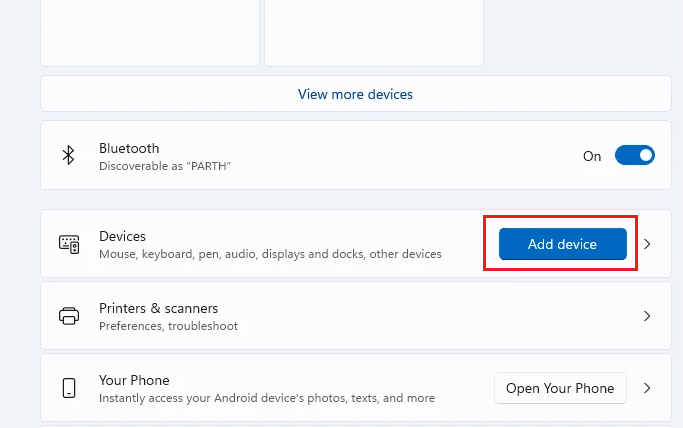
- From the options, go to Bluetooth.
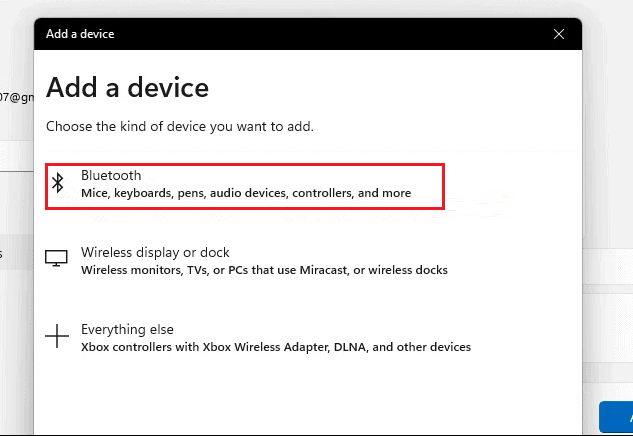
- Finally, click on your AirPods to connect to them.
3. Set AirPods As Your Default Device.
When connecting to AirPods on your system, make sure it is set as the default audio device. This will help your computer choose the preferred audio output. Having an external monitor set as default may cause no sound to be received through the AirPods.
Here are the steps you must follow:
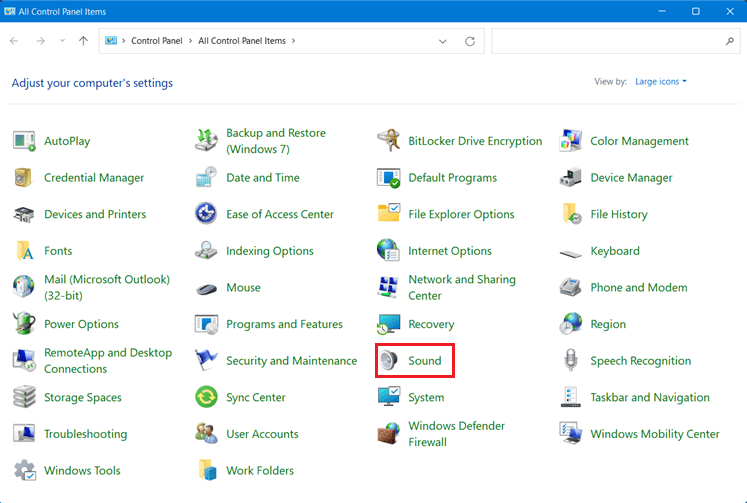
- To begin, type ‘control panel’ in the Search bar and click on Open from the right pane.
- Click on the Category drop-down arrow next to View by and choose Large icons.
- Then, click on Sound.
- On the pop-up box, go to the Playback tab.
- Ensure there’s a green checkmark next to your AirPods, indicating they are enabled. Select your AirPods, then click on Set Default.
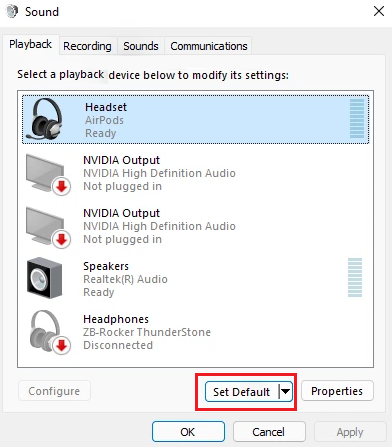
- Now go to the Recording tab. Again choose your AirPods and click on Set Default.
- Click on OK to save these changes.
If you still face AirPods audio issues on Windows 11 but on some specific apps, check the in-app settings and ensure you have selected AirPods as the primary audio input and output device.
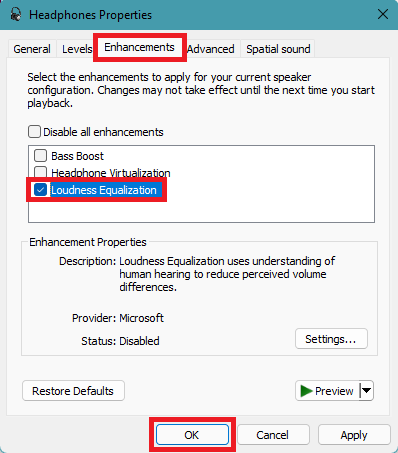
4. Enable Loudness Equalization.
Multiple users have reported that they were able to fix AirPods audio issues on Windows 11 by enabling Loudness Equalization. The feature either improved the audio quality or completely brought it back to normal.
If you want to do the same, follow these steps:
- Open the Control Panel on your computer and choose View by: Large icons.
- Then, go to Sound.
- Now, click on the Playback tab.
- Next, select your AirPods and click on Properties.
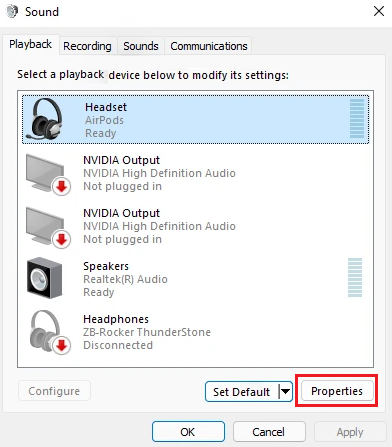
- Once the Headphone Properties window opens, go to the Enhancements tab.
- Finally, check the box next to Loudness Equalization and click on OK to save the changes.
5. Use An EQ App.
If none other method seems to be effective, consider taking help from an equalizer software. It is an audio filter that isolates frequencies and boosts the gain on your Airpods. Although it may require some effort from your end, you will be able to fix low audio quality or volume issues by utilizing filters, noise compressors, etc.
You’re recommended to use the OEM app from your manufacturer, especially if you use a pre-built system. For instance, ASUS laptops offer Sonic Audio for various audio enhancement options.
However, if your computer does not have a dedicated program, you can use a third-party app instead. One of the best third-party EQ is Equalizer APO. Being a completely free program, it is a reliable option considering the services and features that it offers.
6. Reset Your AirPods.
Before continuing with this method, understand that this may be quite a chore as you’ll be required to re-pair your device with all the connected devices. However, it may be worth all the effort since your AirPods will start afresh. This time, connect them to Windows 11 first so that everything works smoothly as intended.
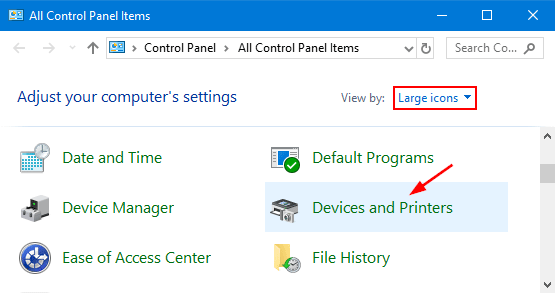
Before starting, you will need to remove your AirPods from both the Control Panel and the Device Manager. Here’s what you need to do:
- First, open the Control Panel and choose View by: Large icons.
- Then, go to Devices and Printers.
- From there, right-click on your AirPods and select Remove device.
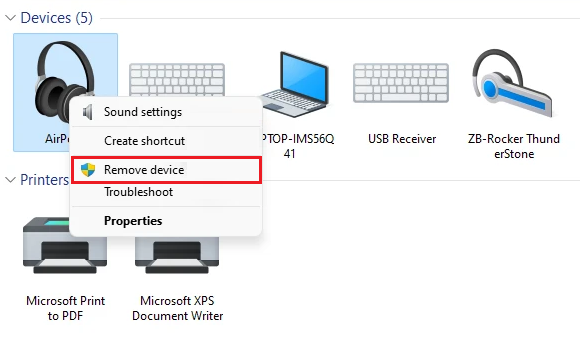
- Click on Yes to confirm your action.
- Now, press the Windows key + X from your keyboard and choose Device Manager.
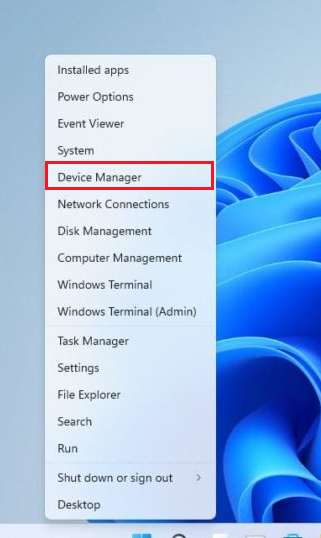
- When it opens, click on View at the top and choose Show hidden devices.
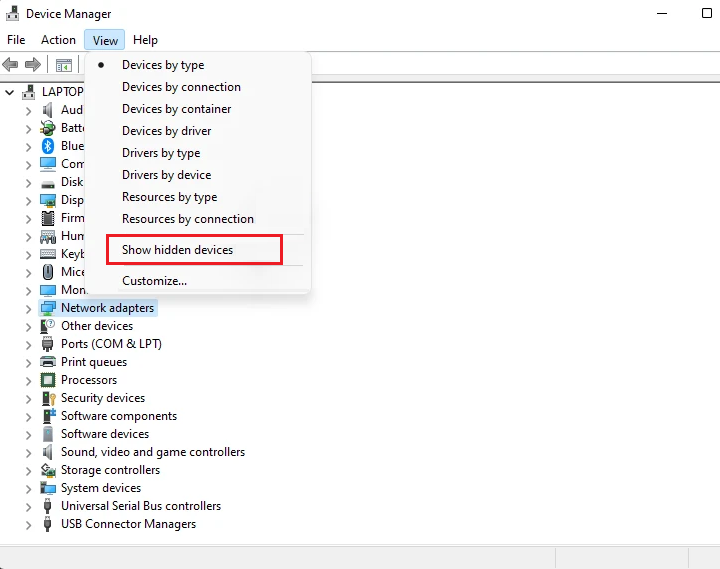
- Expand the list for Bluetooth.
- Right-click on AirPods and its related entries one by one and choose Uninstall device.
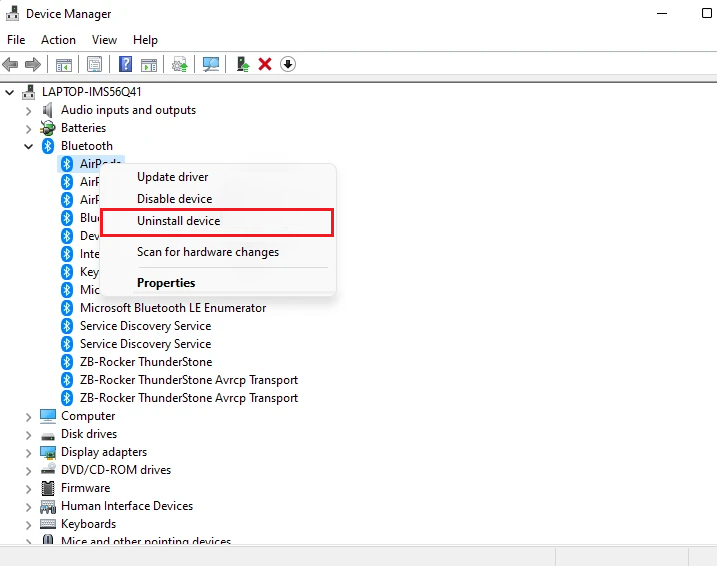
- Again, click on Uninstall for confirmation.
- Once done, open the AirPods case lid. Press and hold the Setup button at the back for almost 15 seconds.
- When you see the amber and white light flash, enter the pairing mode and reconnect your AirPods with your PC by following the steps mentioned earlier.
7. Set Disable Absolute Volume Value.
Windows 10 came out with a new audio feature known as Absolute Volume. With the help of this feature, users can enable the volume slider to manage the volume of speakers, headphones, or AirPods connected to the PC.
The value of DisableAbsouleVolume DWord Registry is set to 0. This value indicates that it is turned on. If you change the value to 1, the Absolute Value will be disabled. This method can fix AirPods audio issues on Windows 11.
Here’s what you need to do:
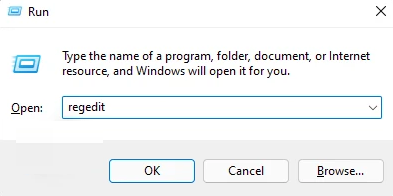
- Launch the Run command box by pressing Win + R from your keyboard.
- Next, type in regedit and click OK.
- After that, paste Computer\HKEY_LOCAL_MACHINE\SYSTEM\ControlSet001\Control\Bluetooth\Audio\AVRCP\CT into the address bar located at the top.
- Now, double-click on the DisableAbsoluteVolume.
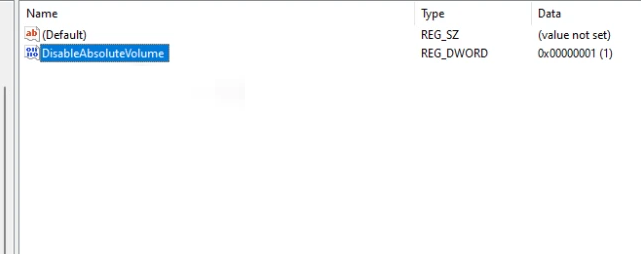
- Type 1 in the Value data box and click on OK.
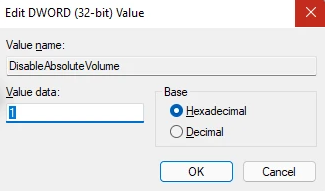
Once done, make sure you connect your AirPods and check if they work or not.
8. Update BT Driver.
Apple releases new updates once in a while for all of its products to get rid of any bugs and enhance the user experience. Similarly, the BlueTooth driver on your computer also receives driver updates regularly. This ensures that the AirPods firmware and BlueTooth driver are running on the latest updates and are compatible with each other.
Another reason for your AirPods audio issues may be an outdated BT driver. You can check for the driver updates within Windows 11 by following the steps below:
- First, open Settings by pressing Win + i from your keyboard.
- Click on Windows Updates from the left pane.
- Now, select Advanced Options.
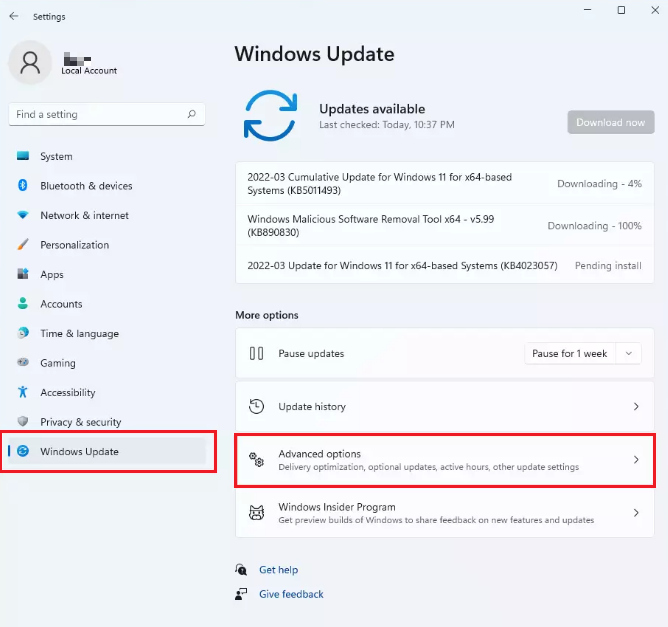
- Then, head to Optional Updates.
- Look for new updates under Driver updates.
- Lastly, select the updates you wish to install on your computer and then click on the Download & install button.
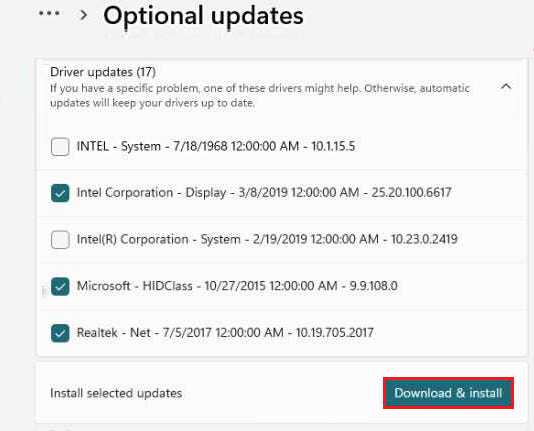
After the BT driver updates, connect your AirPods to the computer to find out whether the audio issue resolves.
This brings us to the end of our guide on how to fix AirPods audio issues on Windows 11. Hopefully, after trying any of the ways listed above, you were able to get your AirPods to work properly in Windows 11. If you still have more questions, feel free to let us know in the comments section below. We’ll try our best to provide further assistance.
If this guide helped you, please share it. 🙂
