

Are you experiencing an issue with your AirPods having no notification sounds on iOS 14?
The release of Apple’s iOS 14 has been surrounded by controversies as it has led to outrageous iPhone issues. Issues like screen time not working properly, timer not showing up on the lock screen, and even iPhones freezing a lot has been topping Apple’s discussion community.
But it’s not only the iPhones that are having issues in iOS 14. In fact, AirPods and AirPods Pro are also getting some buzz. One of these issues is the AirPods having no notification sounds on iOS 14. Some users complained that they are no longer getting any notification sounds when using their AirPods, which they previously have before updating to iOS 14.
If you are one of those troubled users, you are in luck! We have compiled a list of things that you can do to fix this issue, hoping this will be of great help to you.
Without any further ado, let’s jump right in!
1. Clean Your Speaker.
Some users claimed that they were able to fix the issue after cleaning their iPhone’s speaker. But how can you clean them?
First, you can use a soft-bristled toothbrush to scrub the speaker gently. Then you can also use canned air to blow the debris out of the speaker. Finally, you can use any kind of adhesive tapes to remove any small particles or dirt that is trapped inside or around the speaker, causing it to clog.

Now, check if your AirPods are still having no notification sounds on iOS 14. It is of utmost importance that you clean them at least once a month to prevent any clogging of sorts.
2. Turn On Reduce Loud Sounds.
Another popular method that users found to have fixed their issue is by tweaking some settings under the ‘Sounds & Haptics’, like the ‘Reduce Loud Sounds’. According to some users, turning on this setting restored the notification sounds.
The ‘Reduce Loud Sounds’ setting allows you to adjust your AirPods’ maximum volume for music and videos to protect your hearing. By turning this on, you can also adjust the maximum decibel level for your AirPods’ audio.
Here’s how you can turn on ‘Reduce Loud Sounds’ on iPhone 7, 7 Plus (and so on):
- First, open up your iPhone’s Settings app.
- Now, go to Sounds & Haptics.
- Next, select Headphone Safety.
- After that, turn on Reduce Loud Sounds.
- Finally, drag the slider to 90 decibels or higher, depending on your preference.

Here’s how you can turn on ‘Reduce Loud Sounds’ on iPhone 6 (or earlier):
- First, open up your iPhone’s Settings app.
- Now, go to Sounds.
- Next, select Headphone Safety.
- After that, turn on Reduce Loud Sounds.
- Finally, drag the slider to 90 decibels or higher, depending on your preference.
With that out of the way, check if you are still experiencing the issue. We are crossing our fingers that this will resolve your issue, just like what happened for some users.
3. Turn Off Change With Buttons.
If, however, you still don’t have any notification sounds after cleaning your iPhone’s speaker and turning on ‘Reduce Loud Sounds’, you may try to turn off ‘Change With Buttons’. Just like the previous methods, some users stated that turning off this setting restored the notification sounds.
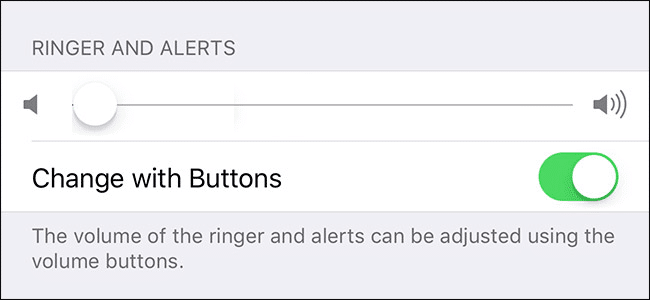
Turning off ‘Change With Buttons’ will allow you to lock the ringer and alert volumes in the settings. Doing this will prevent your AirPods from having no notification sounds on iOS 14.
Here’s how you can turn off ‘Change With Buttons’ on iPhone 7, 7 Plus (and so on):
- First, open up your iPhone’s Settings app.
- After that, go to Sounds & Haptics.
- Finally, turn off Change With Buttons.
Here’s how you can turn off ‘Change With Buttons’’ on iPhone 6 (or earlier):
- First, open up your iPhone’s Settings app.
- After that, go to Sounds.
- Finally, turn off Change With Buttons.
Now, test to see if your AirPods will now receive notification sounds. Hopefully, this will resolve the issue for you, but if not, don’t fret as we have more on our list that you can try!
On the other hand, this will also resolve ringer volume issues on your iPhone, so it’s worth a try!
4. Try A Restart Or Force Restart.
After trying out our previous suggestions, now is the right time to restart your phone. It is always recommended to perform a restart after changing some settings on your iPhone. This will also ensure that the settings have been properly set.
If, and only if, a single restart did not work, you may try it again (and again) to make sure that your iPhone has been restarted properly. You never know, so try it, then try again!
Here’s how you can restart your iPhone:
- Start by pressing and holding down the Side or Power button for a few seconds.
- Once a prompt with a red slider showing ‘slide to power off’ appears, drag it to turn off your iPhone.

- Lastly, press the Side or Power button again until you see the Apple logo. This will turn your iPhone back on.
In case you have restarted your iPhone a few times but the issue remains, you can try performing a force restart next. Some users also claimed that this had resolved the issue for them.
A force restart is what you can also call a hard reset, as known by many. It is a hardware-level reset that physically stops your iPhone’s battery from connecting to your phone in order to turn it off. The process differs for every iPhone model, so make sure you only follow the instructions for your specific model.
Here’s how you can do a force restart on iPhone 8, 8 Plus, SE (and so on):
- Start by pressing and quickly releasing your iPhone’s Volume up button.
- Now, repeat the same for the Volume down button.
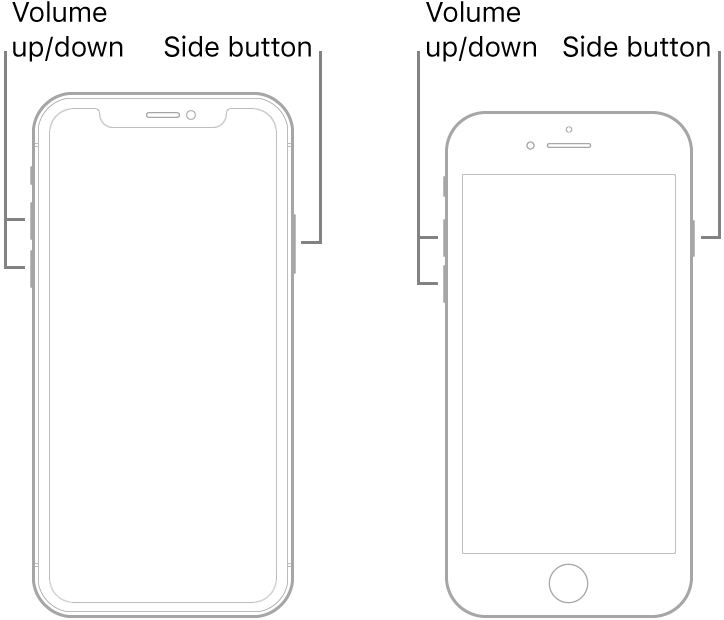
- After that, press and hold the Side button until your iPhone turns off.
- Lastly, wait for a few minutes until the Apple logo appears before releasing the Side button.
Here’s how you can do a force restart on iPhone 7 and 7 Plus:
- Start by pressing and holding down both your iPhone’s Volume down and Sleep/Wake buttons simultaneously to turn it off.
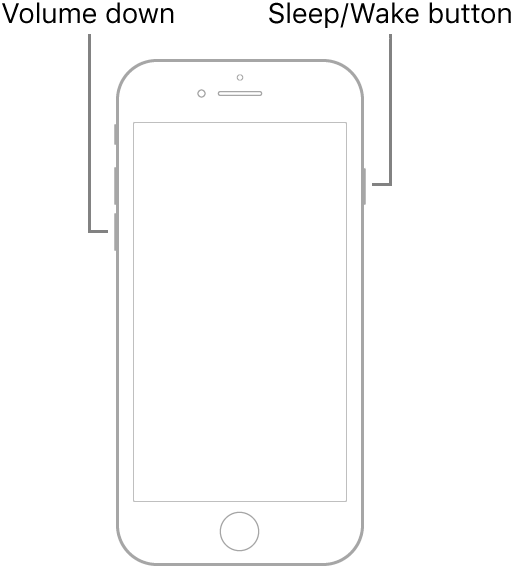
- Now, wait for a few minutes until the Apple logo appears before releasing both buttons.
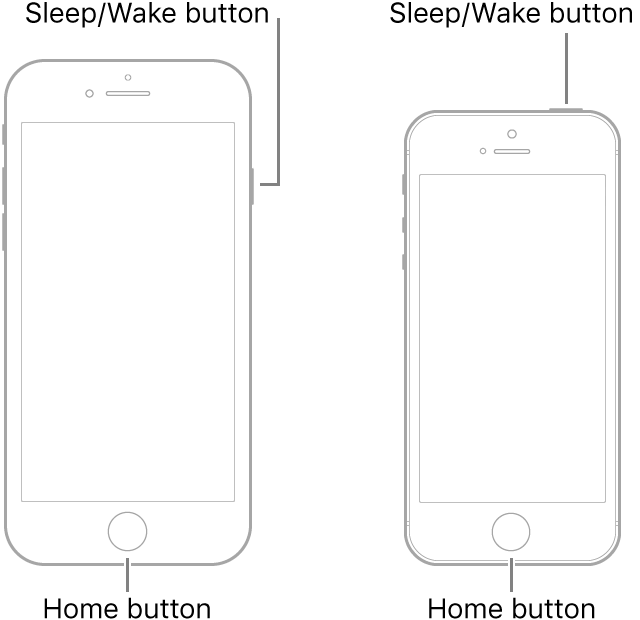
Here’s how you can do a force restart on iPhone 6 (or earlier):
- Start by pressing and holding down both your iPhone’s Sleep/Wake and Home buttons simultaneously to turn it off.
- Now, wait for a few minutes until the Apple logo appears before releasing both buttons.
Once you are done with all of that, check if your AirPods still have no notification sounds on iOS 14. Let us know what will happen by commenting below!
5. Put Your iPhone In Recovery Mode.
If the force restart did not save you from this irksome issue, you can put your iPhone in ‘Recovery Mode’ and restore it using your Mac. It may not be a popular choice amongst users, but most of the time, this fixes a lot of issues as it allows iTunes to fix any corrupted system components in your iPhone or iPad.
But before anything else, make sure that your Mac or iTunes application is updated to the latest version. It will also save you time when the need arises.
Here’s how you can put your iPhone 8, 8 Plus, SE (and so on) in ‘Recovery Mode’:
- First, connect your iPhone to your Mac.
- Now, open Finder (if you are on Catalina) or iTunes (if you are on Mojave or lower versions).
- Then press and quickly release your iPhone’s Volume up button.
- Next, do the same for the Volume down button.
- Then press and hold the Side button until you reach the ‘Recovery Mode’.
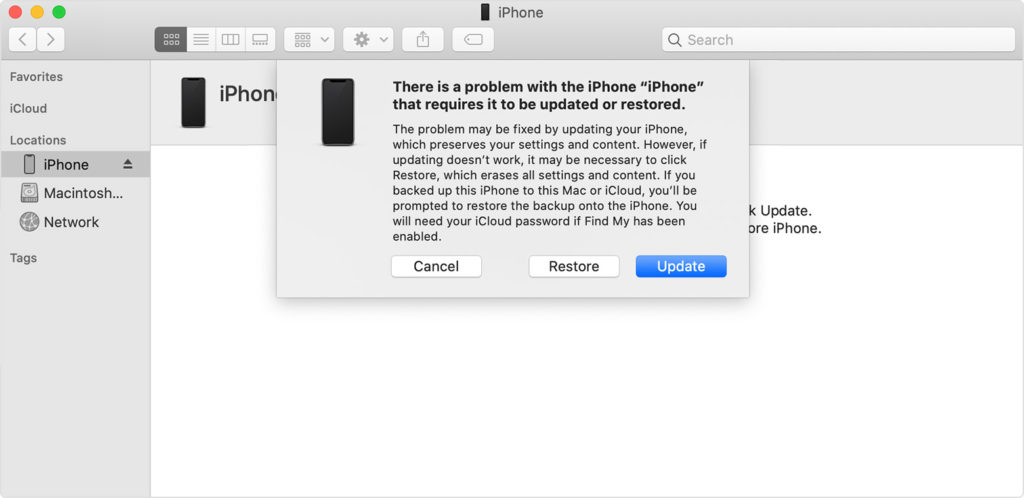
- Now, a window should open up on your screen asking you to choose between Update or Restore. Select Update.
- Lastly, wait for a few minutes until the update has been finished.
Here’s how you can put your iPhone 7 and iPhone 7 Plus in ‘Recovery Mode’:
- First, connect your iPhone to your Mac.
- Now, open Finder (if you are on Catalina) or iTunes (if you are on Mojave or lower versions).
- Then press and hold the Top (or Side) and Volume down buttons simultaneously.
- After that, keep on pressing and holding both buttons until you reach the ‘Recovery Mode’ screen.

- Then a window should open up on your screen asking you to choose between Update or Restore. Select Update.
- Lastly, wait for a few minutes until the update has been finished.
Here’s how you can put your iPhone 6 (or earlier) in ‘Recovery Mode’:
- First, connect your iPhone to your Mac.
- Now, open Finder (if you are on Catalina) or iTunes (if you are on Mojave or lower versions).
- After that, press and hold the Top (or Side) and Home buttons simultaneously.
- Next, keep on pressing and holding both buttons until you reach the ‘Recovery Mode’ screen.
- Then a window should open up on your screen asking you to choose between Update or Restore. Select Update.
- Lastly, wait for a few minutes until the update has been finished.
With that out of the way, check if you are still seeing the issue. Fortunately, the issue will no longer reoccur.
6. Use Dr. Fone.
Are you tired of doing all these suggestions? Do not worry because Dr. Fone is here to save the day!
Dr. Fone has a ‘System Repair’ tool that fixes iOS (or even iPadOS and Android) system problems. Aside from that, it also has other tools for transferring data between your phone and PC, or your old to your new phone, so you never have to worry about losing any of your data.

On top of that, Dr. Fone has been established in the market as it has been providing its service for over 17 years. Plus, it is being used by over 50,000,000 users worldwide, so it is trusted by a lot of users.
So what are you waiting for?
7. Update To The Latest iOS Version.
It would be appropriate to end our troubleshooting by updating your iOS to the latest. Although we know that iOS 14 started a lot of issues, it’s still not bad to try it out since Apple may release a fix sooner or later.
In order to prepare for the update, always connect your iPhone to a Wi-Fi network. Then have at least 50% battery life to prevent unwanted interruptions.
Here’s how you can update to the latest version:
- First, open up your iPhone’s Settings app.
- Next, select General.
- Now, go to Software Update and check for an update.

- After that, select Install Now to begin the update (if one shows up), which will take a few minutes to an hour, depending on your network.
- Lastly, wait for a few minutes for your iPhone to automatically restart once the update has been installed.
Now, you may observe if your AirPods will still render the same issue. And if it does not, cheers to that!
In the meantime, doing this will fix other sound issues on your iPhone or even your iPad that is already in iOS 14, so remember that it is not a waste of your time and effort.
We have reached the end of our article, and we hope that we were able to help. For any questions, remember to comment it down below!
If this guide helped you, please share it. 🙂
