

Wondering how to back up and restore the Registry on Windows 7, 8, 10, and 11?
If you always have wanted to get better control of your operating system, then you most likely already know about the Windows Registry.
Windows Registry is the heart of the way Windows works. It is like a large database that your operating system’s functions and other programs rely on to get relevant, essential information they need to perform their duties.
When a new program is installed on your operating system, a set of new instruction files are added to the Registry which your operating system can refer to, later. Similarly, when you change your desktop background, the changes are stored in the Registry Editor. And the changes you make to a particular file’s name – yep, they are stored in the Registry too.
If you wish to make some administrative-level changes in your operating system, Windows Registry allows you to do so. Fortunately, the entire process is quite simple, as we have discussed in several of our previous posts. However, since Windows Registry is an essential part of the operating system, even the slightest error can wreak havoc in Windows.
To ensure that you do not damage the Registry editor, it is best to create a backup. In this guide, we will show you how you can do so in Windows 7, 8, 10, and 11.
Let’s get started!
1. Export the Registry Hive.
Before we jump into the steps of exporting the Registry hive, it is important to know that your Registry is automatically backed up when you create a System Restore point.
Let’s say you created a system restore point a week ago and restored your system today. In that case, your Windows Registry will revert to the state it was a week ago.
If you want to create a Registry backup manually, here is what you need to do:
- Press Windows + R keys simultaneously on your keyboard to open a Run dialogue box.
- Type ‘regedit‘ in the text field of the dialogue box and hit Enter. This will open Windows Registry on your PC.

- Once you are inside the Registry Editor, click on Computer as shown below. This way, you will create a full backup of the entire Registry.
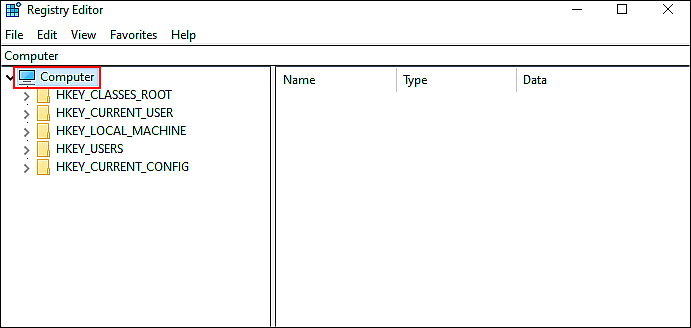
Note: In case you want to back up only a specific Registry key, then select it instead of selecting Computer.
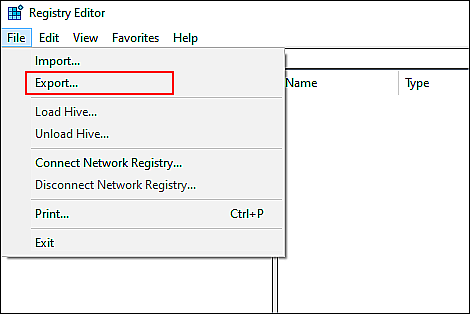
- Now click on File and then select Export from the list of options available. Make sure that the key you want to backup is selected while you do so.
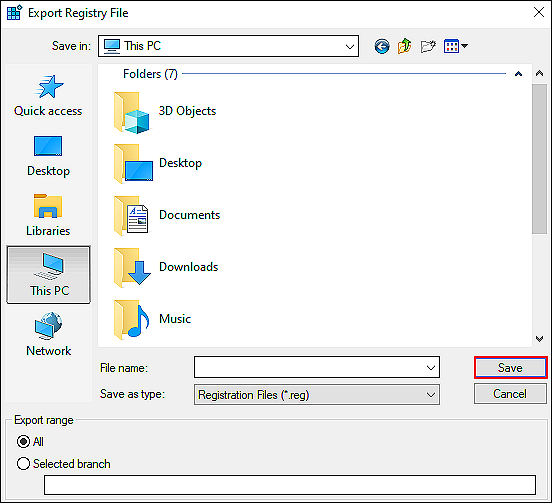
- Navigate to the location where you want to save the backup in the next window and rename the backup file.
- Finally, click Save to save the changes you just made.
You now successfully have created a backup of your Windows Registry.
2. Try Using CleanMyPC.
It is common for Registry hives to get corrupt at times. This typically happens when you make changes in the Registry Editor.
If your operating system is not working properly after you experimented with the Registry Editor, you can either restore the Registry or use a Registry Cleaner to get rid of the corrupt files. In case you do not want to restore Windows Registry, try using CleanMyPC.

CleanMyPC is a one-stop shop for all your PC-related needs. It comes with an extensive list of maintenance tools including a Registry Cleaner. All that you need to do is install the tool and run a scan using it. CleanMyPC will identify all the potential issues and fix them with little to no user input.
Install CleanMyPC and get your computer up and running like new!
3. Restore the Registry Using Backup.
There are times when your system starts acting up after you modify Registry keys or values. Worry not, because now is the time you get rewarded for thinking ahead about creating a backup.
Restoring Windows Registry to a previous point in time only takes a few minutes.
Here is all that you need to do:
- Press Windows + R keys simultaneously on your keyboard to open a Run dialogue box.
- Type ‘regedit‘ in the text field of the dialogue box and hit Enter. This will open Windows Registry on your PC.
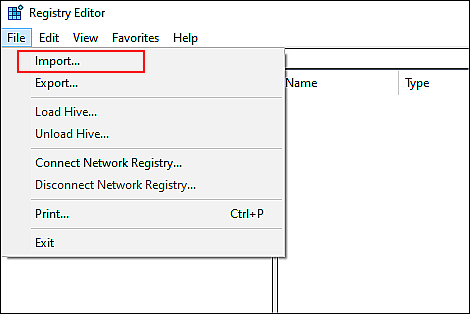
- Once you are inside the Registry Editor, click on File and select Import from the list of options available.
- In the next window, navigate to the location where you saved the backup and click on the backup file.
- Hit Open.
That’s it.
This should restore your Registry to its previous state.
This wraps up our guide on backing up and restoring Windows Registry. We hope that the methods mentioned in this guide did the trick for you. If you still have any questions about the steps, feel free to let us know in the comment section below.
If this guide helped you, please share it. 🙂
