Are you wondering why you cannot insert rows on Microsoft Excel?
Microsoft Excel is one of the best spreadsheet tools in the world, with over a billion copies sold. It has various features that aid in managing, analyzing, and presenting large datasets and tables.
As you work on your workbook, you’ll eventually need to insert additional rows to accommodate more data.
Unfortunately, the Insert Row function may not work all the time.
Recently, there have been complaints from various users who cannot insert rows on Microsoft Excel. Depending on the situation, this issue can be caused by various problems within the software.
Most of the time, improper configurations are the culprit for this problem. However, it can also be due to locked worksheets, outdated software, or corrupted data.
In this guide, we will show you what to do if you cannot insert rows on Microsoft Excel.
Let’s get right into it!
1. Restart Your Computer.
As a common practice, we always recommend users restart their systems first whenever they encounter problems with Microsoft Excel or any software. This should allow your computer to reload its resources and eliminate temporary errors.
Here’s what you need to do:
- First, press the Windows key on your keyboard to open the Start Menu.
- After that, access the Power Options tab.
- Lastly, choose Restart and wait for your system to reboot.

Go back to Microsoft Excel afterward and see if the problem is solved.
2. Clear Bottom Row Values.
There are instances when we accidentally add values under the table we are currently working on. If this is the case, we cannot add or insert more rows inside the table until we clear any formatting, border, or value below the table.
Here’s what you need to do:
- First, scroll down until you reach the bottom of the table you want to add or insert rows.
- After that, select the next row under your table.
- Now, press the CTRL + SHIFT + DOWN keys on your keyboard to select all cells below your table.
- Lastly, go to Home > Editing > Clear > Clear All.
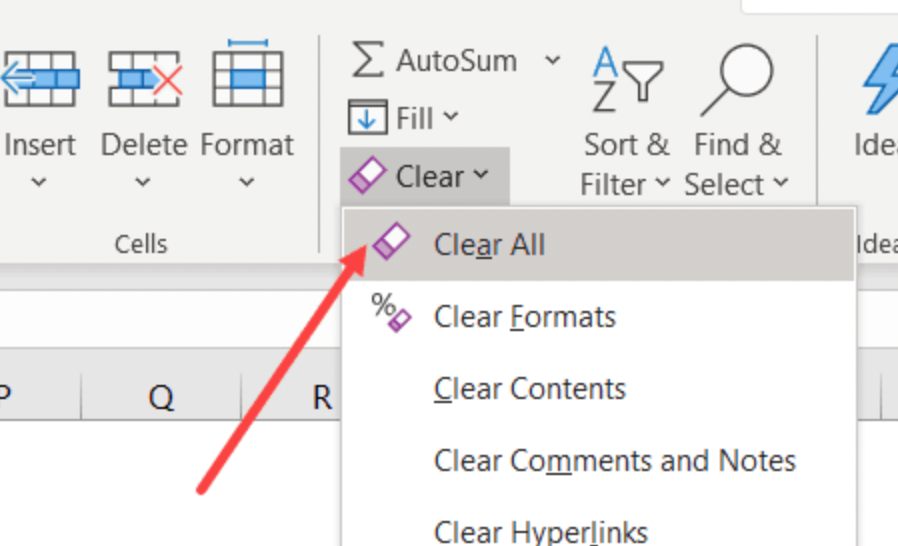
Once done, see if you can now insert rows on Microsoft Excel.
3. Unfreeze Panes.
Another reason why you cannot insert rows on Microsoft Excel is if there are frozen panes on your worksheet. If this is the case, you must unfreeze those panes first before modifying or inserting rows.
Check out the steps below to unfreeze panes:
- On Microsoft Excel, open your worksheet and locate any frozen panes.
- Next, highlight them using your cursor.
- Finally, go to the File > Freeze Panes and click on Unfreeze Panes.
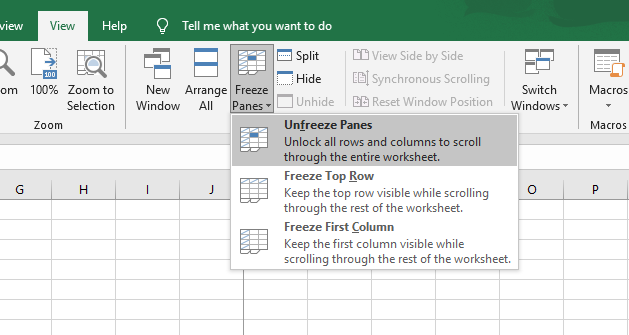
Reload your worksheet and try inserting rows again.
4. Unprotect Your Workbook.
Microsoft Excel has a safety feature that allows users to protect their workbooks and worksheets. When your document is protected, it cannot be modified. If you cannot insert rows on Excel, check if your workbook is protected.
Here’s what you need to do:
- First, access your workbook and go to the Review tab.
- After that, look for the Protect section.
- Lastly, click on Unprotect Worksheet and Unprotect Workbook.
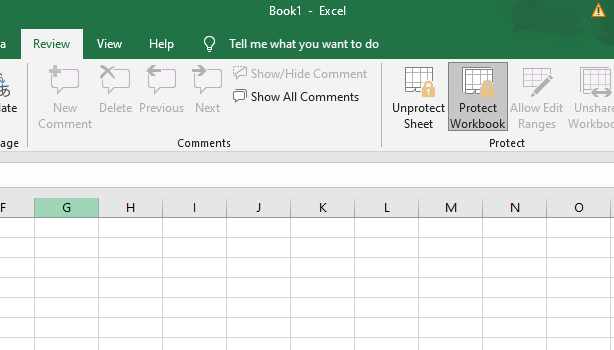
Try modifying your workbook again to check if the problem is solved.
5. Update Microsoft Excel.
There might be an issue with the version of Microsoft Excel you are running, which causes the insert row feature to malfunction. To rule this out, update your software to the latest version possible.
Check out the guide below to update Excel:
- First, launch Microsoft Excel on your computer.
- After that, click on File > Accounts.
- Lastly, access the Update Options tab and click on Update Now or Enable Updates.
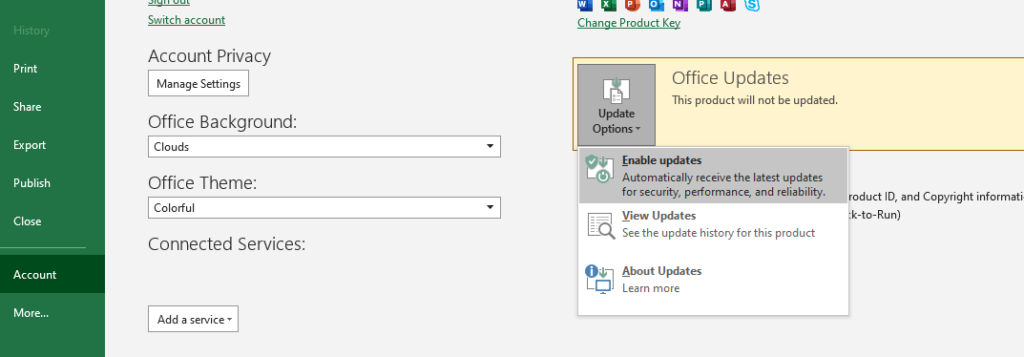
Restart your computer to apply the changes, and go back to Microsoft Excel to check if the problem is solved.
6. Disable Add-Ins.
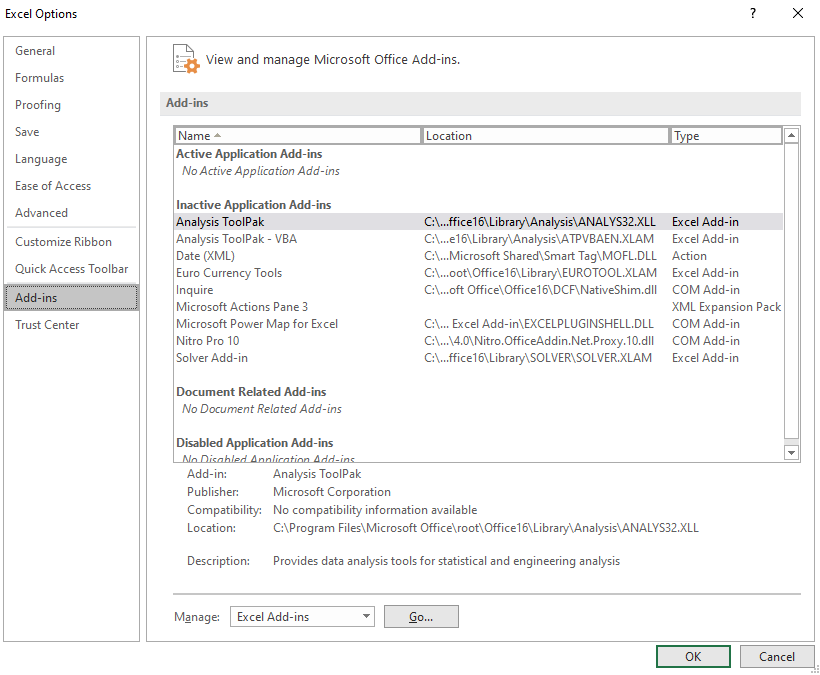
You can also try disabling Microsoft Excel add-ins if you cannot insert rows on your worksheet. Some of your add-ins might be preventing the program from adding more rows to your worksheet.
Follow the steps below to disable your add-ins:
- On your computer, launch Microsoft Excel and open your workbook.
- Next, go to File > More > Options.
- Finally, access the Add-Ins tab and ensure that your add-ins are turned off.
Go back to your workbook afterward and see if you can now add rows.
7. Repair Your File.
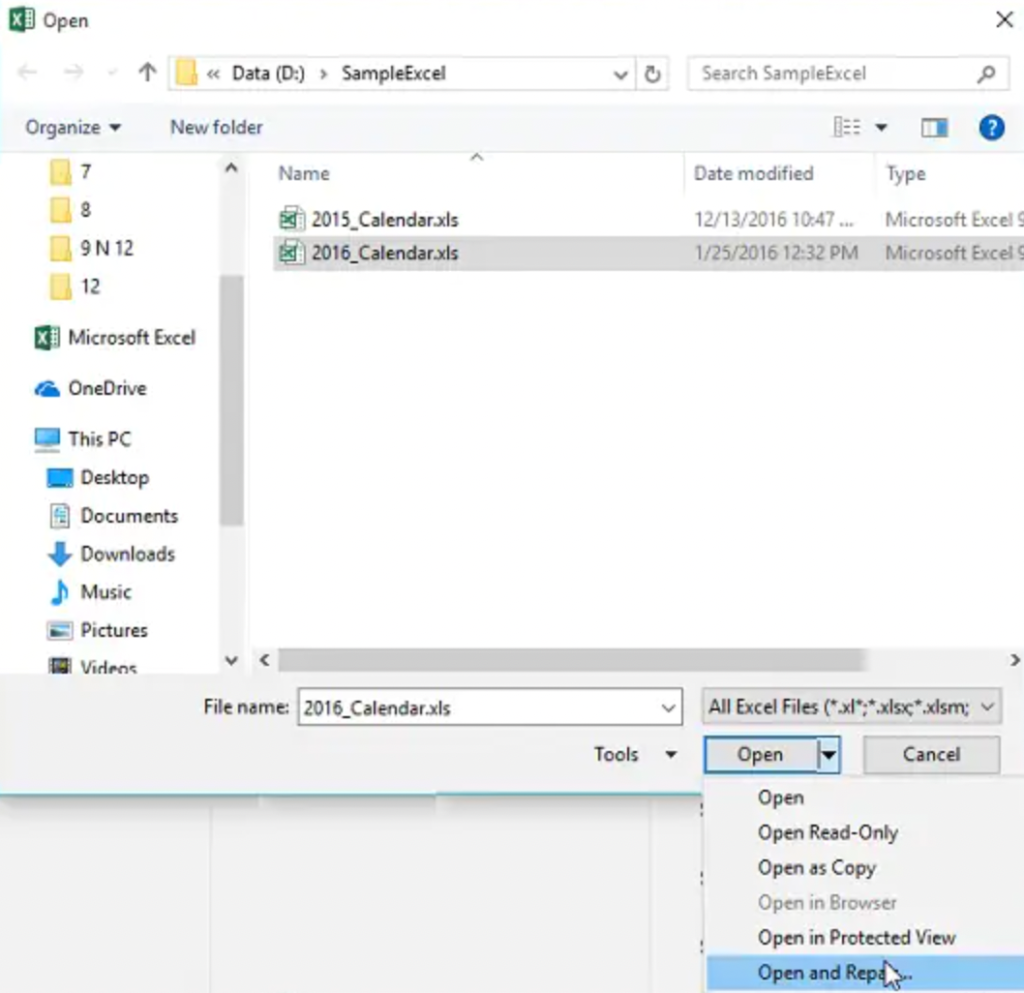
If none of the solutions above worked, the last thing you can do is repair your Microsoft Excel file. This should ensure that there are no missing or corrupted data on your worksheet.
See the steps below to repair your workbook:
- Launch Microsoft Excel on your computer.
- Next, click on File and choose Open. Locate the file you want to repair.
- Finally, click on the drop-down arrow beside the Open button and select Open and Repair.
Re-open your Microsoft Excel file afterward and check if the problem is solved.
That brings us to the end of our guide on what to do if you cannot insert rows on Microsoft Excel. If you have questions, please drop a comment below, and we’ll do our best to help.
If this guide helped you, please share it. 🙂


