

Do you see a ‘can’t export media’ error on Adobe Premiere Pro?
It’s a given that Adobe Premiere Pro is the best timeline-based video processing and editing tool globally. However, it can be a pain to compile and export your projects once you’re done editing them.
Besides using a lot of system resources, Adobe Premiere Pro can also run into errors and crash if you set the wrong export preferences.
The ‘can’t export media’ error is one of the most common issues you’ll encounter on Adobe Premiere Pro while saving your projects. It occurs on both Windows and macOS and could be caused by a handful of reasons.
Sadly, this issue has plagued users for years and continues to be a problem, especially for users with mid and low-end hardware.
Nonetheless, the ‘can’t export media’ error on Adobe Premiere Pro can also occur on high-end computers.
In this guide, we’ll show you what to do if you can’t export your projects on Premiere Pro.
Let’s begin!
1. Restart Your System.
One of the best ways to fix most issues on Adobe Premiere Pro or any software is to restart your computer. This allows your system to reload its resources and eliminate any errors that may have occurred during runtime.
If you’re using a Windows computer, see the steps below to restart it:
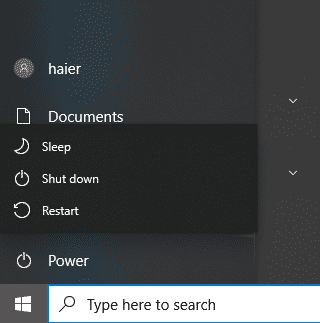
- First, open the Start Menu by clicking the Windows icon on your Taskbar.
- Next, access the Power Options tab.
- Lastly, choose Restart to reboot your system.
On Mac, here’s how you can restart it:
- Click on the Apple icon on the upper left corner of your screen to open Apple Menu.
- After that, choose Restart from the drop-down menu.
- Finally, click Restart to confirm your action.

Once done, go back to Adobe Premiere Pro to check if the problem is solved.
2. Close Unused Programs.
When exporting projects on Premiere Pro, it consumes a lot of system resources, which can cause issues if your computer runs out of resources. To avoid this, we suggest closing unnecessary applications on your system while exporting your projects.
This should free up your system memory and give more room for Adobe Premiere Pro to function.
3. Update Adobe Premiere Pro.
Outdated versions of Premiere Pro could also be the reason for the ‘can’t export media’ error. In this case, we suggest updating the software on your system to patch potential bugs and glitches.
Here’s how you can update Premiere Pro:
- First, open Adobe Creative Cloud on your computer.
- After that, click on the Updates tab on the side menu.
- Lastly, hit the Update button if there’s an available update for Adobe Premiere Pro.
Restart your computer afterward and check if the problem is solved.
4. Enable GPU Acceleration.
Adobe Premiere Pro has a feature that allows you to utilize your graphics card to render and export projects faster. If you haven’t enabled this option on your system, try doing so to address the export error on Premiere Pro.
Check out the guide below to enable GPU acceleration on Premiere Pro:
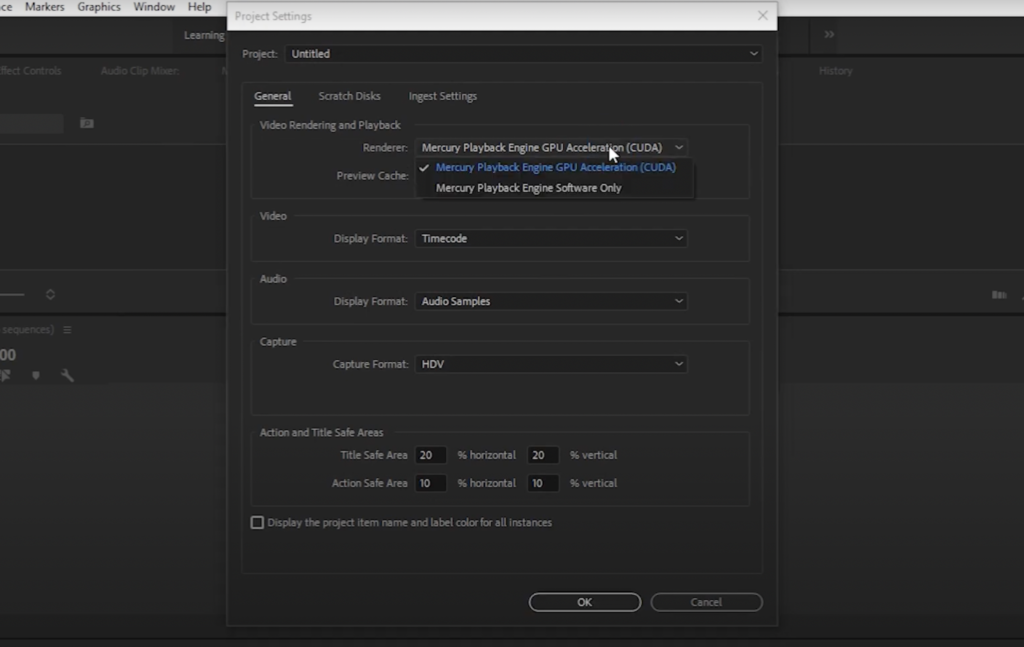
- On Adobe Premiere Pro, click on File and choose Project Settings.
- Next, open the General tab.
- Finally, change the Render option to Mercury Playback Engine GPU Acceleration.
Save the changes afterward and check if the problem is solved.
5. Check Your Storage.
If your system doesn’t have enough storage left for the project you’re exporting, you’ll surely run into the ‘can’t export media’ error. To avoid this, make sure that you have enough space on your computer to export the project you’re working on.
You can also use an external hard drive to store your other clips to free up space on your internal storage.
6. Export to A Different Format.
Another way to address the ‘can’t export media’ error on Adobe Premiere Pro is to export your project in a different format. Based on the reports, users were able to export their projects after changing the file format of the exported video.
If you’re exporting your project to MP4, try changing it to AVI, FLV, MKV, and similar video formats.
7. Reinstall Adobe Premiere Pro.
If none of the solutions above worked for you, the last thing you can do is reinstall Adobe Premiere Pro on your computer. This way, you can ensure that you have the latest working copy of the software installed.
For Windows, here’s how you can delete Premiere Pro:
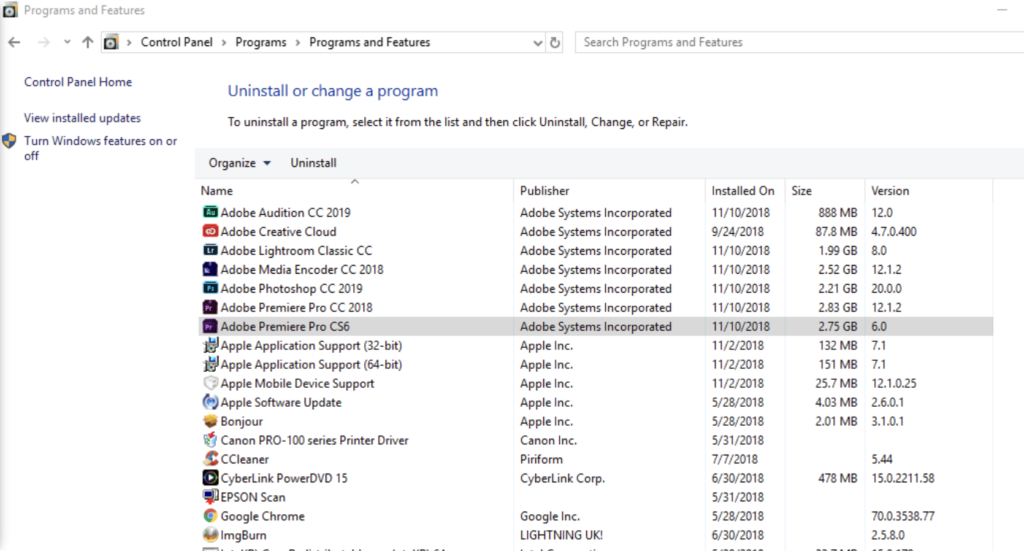
- On your computer, launch the Control Panel and click on Uninstall a Program.
- Next, locate Adobe Premiere Pro from the list.
- Finally, right-click on the app and choose Uninstall.
If you’re using a Mac, access the Finder, go to Applications and drag Premiere Pro to the Trash.
Head to Adobe’s official website afterward and download the latest installer of Adobe Premiere Pro from there.
That wraps up our guide on how to fix the ‘can’t export media’ error on Adobe Premiere Pro. If you have questions or other concerns, please drop a comment below, and we’ll do our best to answer them.
If this guide helped you, please share it. 🙂
