

Wondering how to change between dark and light mode in Windows 11?
The dark mode is not just a feature – it’s a mood.
We like the dark mode for many reasons, including its aesthetics, subtlety, and the fact that it’s easy on the eyes.
However, if you like your system to be bright and colorful, dark mode to you might feel like a feature version of a rainy day where you are brooding and listening to a sad classical on an unhealthy loop.
Fortunately, Windows 11 has got you covered regardless of which category you fall under. It allows you to switch between dark and light mode on your PC in a few simple steps, and in this guide, we will show you how to do so.
Let’s get right into it!
1. Modify Windows Settings.
The simplest method for executing the task under consideration is through Windows Settings.
This method, however, can be used by all standard users to switch between light and dark modes. If there are multiple users on your PC, prevent them from customizing such features using Windows Registry.
Here is what you need to do:
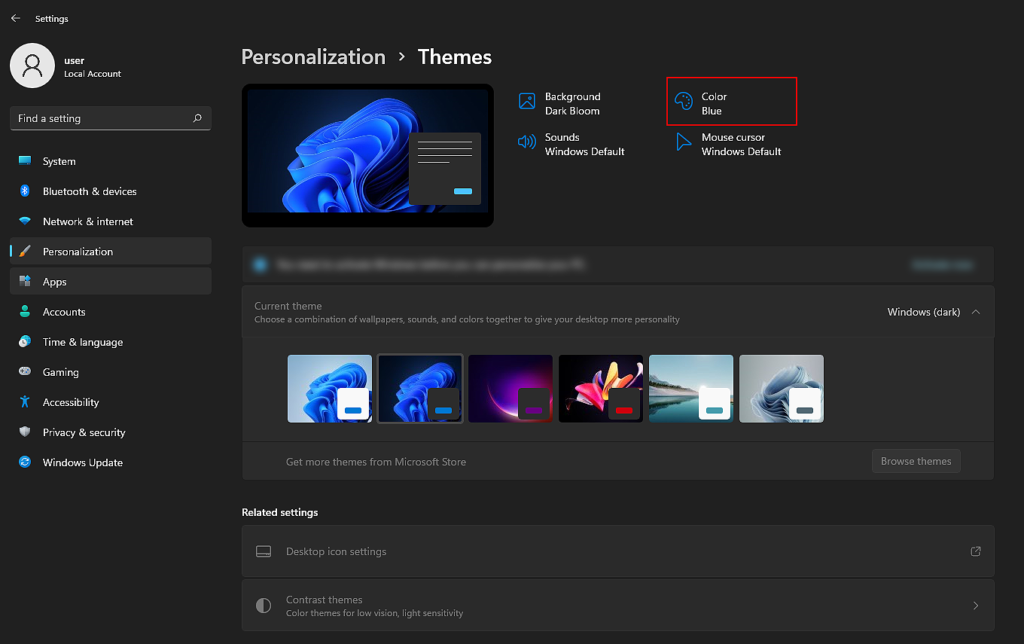
- Press Windows + I keys simultaneously to open the Settings window.
- Select Personalization from the left panel.
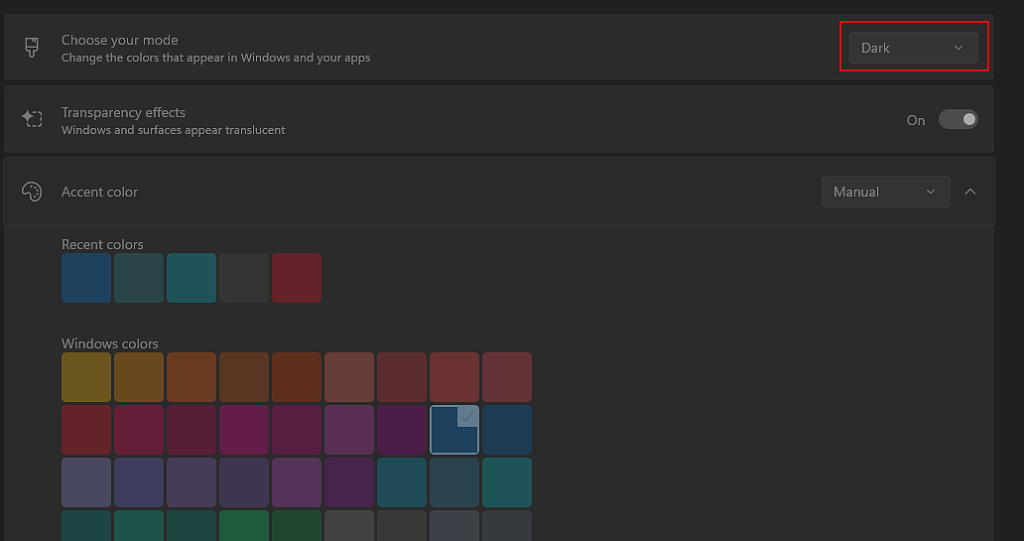
- Now click on Color and expand the drop-down menu associated with Choose your mode.
- Select Dark or Light according to your preferences and close the Settings window.
This should make the desired changes in no time.
2. Modify Windows Registry.
Windows’s Registry plays a crucial role in how the operating system works. In essence, this is a huge database that your operating system’s programs refer to when determining relevant, essential information.
Windows Registry stores http://windhampharmacy.com information about programs and processes as Registry keys. You can easily make changes at an administrative level in Windows by modifying the appropriate keys.
Listed below are the ways you can use Windows Registry to switch between dark and light modes at an app and system level. Proceed with the method that suits you the best.
At an App Level
If you want to switch between dark and light modes on apps, follow the steps mentioned below:
- Press Windows + R keys simultaneously to open a Run dialogue box.
- Inside the text field of the dialogue box, type ‘regedit‘ and hit Enter.

- Once you are inside the Registry Editor, navigate to the location mentioned below.
HKEY_CURRENT_USER\SOFTWARE\Microsoft\Windows\CurrentVersion\Themes\Personalize
- Now with the Personalize key selected, double-click on the AppsUseLightTheme in the right pane.
- Set the Base to Hexadecimal and type 1 under Value data for the light theme. For dark theme, type 2 under Value data and hit Enter.
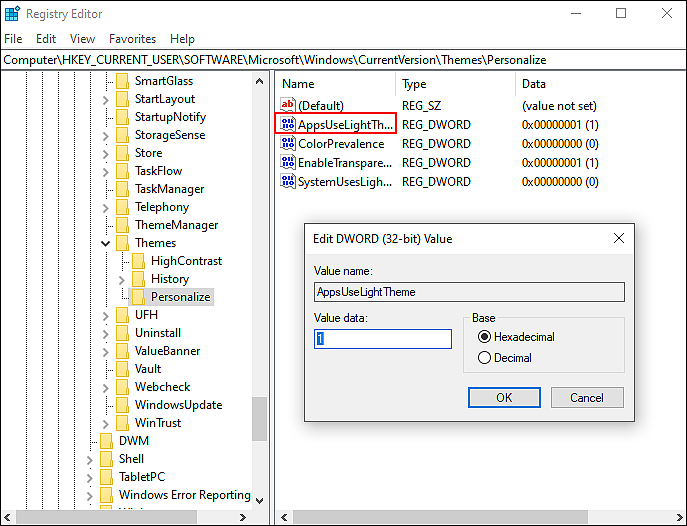
- Close the Registry Editor and restart your PC.
By following the steps mentioned above, you should be able to switch between color modes Windows 11.
At System Level
In case you want to make the desired changes on the entire system level, follow the steps mentioned below:
- Press Windows + R keys simultaneously to open a Run dialogue box.
- Inside the text field of the dialogue box, type ‘regedit‘ and hit Enter.
- Once you are inside the Registry Editor, navigate to the location mentioned below.
HKEY_CURRENT_USER\SOFTWARE\Microsoft\Windows\CurrentVersion\Themes\Personalize
- Now with the Personalize key selected, double-click on the SystemUsesLightTheme.
- Set the Base to Hexadecimal and type 1 under Value data for the light theme. For dark theme, type 0 under Value data and hit Enter.
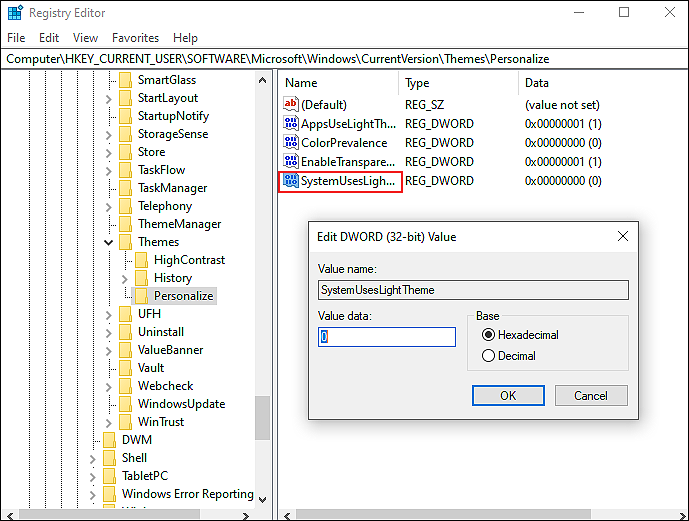
- Close the Registry Editor and restart your PC.
These steps should enable dark/light mode at a system level.
3. Try Using CleanMyPC.
Your system may be corrupt if you have tried both methods described in this guide and you still cannot accomplish the desired action.
To eliminate any bugs or corruption errors from your PC, you should perform a deep cleaning before following this guide. When this happens, using a good PC cleaner can be beneficial, as manual cleaning can take up a lot of time and energy.
In case you’ve never used a PC cleaner before, we recommend CleanMyPC.

CleanMyPC helps you solve all PC problems fast and efficiently. A multi-uninstaller, speed boost, and registry cleaner are just a few of the tools in this software that can optimize your system and fix most problems.
If this looks like something your PC desperately needs, install CleanMyPC now and get your PC up and running like new!
4. Use Powershell.
Powershell is a task automation tool developed by Microsoft for administrators.
Windows PowerShell allows you to perform a range of tasks, from automating repetitive tasks to network administration. This is achieved by composing commands that are called ‘cmdlets’, and writing scripts.
In this method, we will execute relevant commands using Powershell to switch between dark and light mode on Windows 11.
At an App Level
To make changes at an app level, here is what you need to do:
- Open a Run dialogue box by pressing Windows + R keys simultaneously.
- Inside the text field of the dialogue box, type ‘powershell‘ and press Ctrl + Shift + Enter keys together to open Powershell with administrative privileges.
- Once you are inside the Powershell window, copy and paste one of the commands mentioned below according to your preferences. Hit Enter to execute it.
Dark Mode:
Set-ItemProperty -Path HKCU:\SOFTWARE\Microsoft\Windows\CurrentVersion\Themes\Personalize -Name AppsUseLightTheme -Value 0 -Type Dword -Force

Light Mode:
Set-ItemProperty -Path HKCU:\SOFTWARE\Microsoft\Windows\CurrentVersion\Themes\Personalize -Name AppsUseLightTheme -Value 1 -Type Dword -Force
- Wait for the command to execute. Once done, restart your PC.
As simple as that. If in the future you want to switch between the modes again, simply follow the steps mentioned above.
At a System Level
To make changes on your entire system level, here is what you need to do:
- Open a Run dialogue box by pressing Windows + R keys simultaneously.
- Inside the text field of the dialogue box, type ‘powershell‘ and press Ctrl + Shift + Enter keys together to open Powershell with administrative privileges.
- Once you are inside the Powershell window, copy and paste one of the commands mentioned below according to your preferences. Hit Enter to execute it.
Dark Mode
Set-ItemProperty -Path HKCU:\SOFTWARE\Microsoft\Windows\CurrentVersion\Themes\Personalize -Name SystemUsesLightTheme -Value 0 -Type Dword -Force

Light Mode
Set-ItemProperty -Path HKCU:\SOFTWARE\Microsoft\Windows\CurrentVersion\Themes\Personalize -Name SystemUsesLightTheme -Value 1 -Type Dword -Force
- Wait for the command to execute. Once done, restart your PC.
Hopefully, following these steps will allow you to make the required changes at the system level without any hassle.
This brings us to the end of our guide on ways to change between dark and light mode in Windows 11. We tried walking you through all the steps in detail and hope that one of the methods mentioned above did the trick for you. In case you still have any confusion about the methods, please let us know in the comment section below!
If this guide helped you, please share it. 🙂
