

Wondering how to change the taskbar location on screen in Windows 11?
Microsoft has finally released Windows 11, the most significant update to its PC software in more than half a decade. It definitely is an eye-catching update – the start of a new era.
A big area of change on Windows 11 is with the new Taskbar. The icons placed in the center feel more immediately accessible since we no longer have to turn our heads all the way into the corner of our massive monitor. However, many of you might have noticed that the Windows 11 taskbar is not quite as configurable. For instance, Windows 11 does not provide a menu option for moving the taskbar to the top of the screen yet.
Luckily, a Registry tweak can allow you to move the taskbar on screen in Windows 11, and we’ll demonstrate how to do that in this guide. The steps are fairly simple, and should not take much of your time.
Let’s get started!
1. Change Taskbar Location on the Main Display.
To change the taskbar location on the screen in Windows 11 as an administrator, we will be using Windows Registry.
If are used to performing administrative-level tasks and customizing the processes of your operating system, then you might already be aware of the Windows Registry. For those of you who do not know, Windows Registry is a database of information related to Windows programs and processes. It saves information in the form of Registry keys, and by modifying the relevant Registry keys, you make the desired changes.
In this method, we will show you how you can change the location of the taskbar on the main display of your PC.
Here is what you need to do:
- Open a Run dialogue box by pressing Windows + R keys simultaneously.
- Inside the text field of the dialog box, type ‘regedit‘ and hit Enter.

- Once you are inside the Registry Editor, navigate to the location mentioned below.
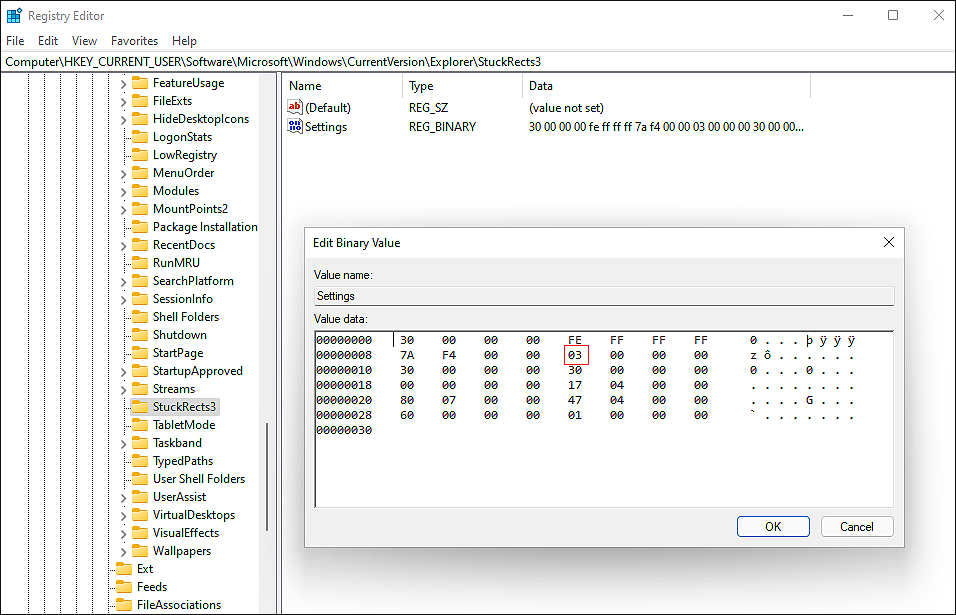
HKEY_CURRENT_USER\SOFTWARE\Microsoft\Windows\CurrentVersion\Explorer\StuckRects3
- With StuckRects3 key selected, double-click on Settings in the right pane.
- Locate the value on the 0008 column and the FE row. The value here should be set to 03 by default.
- Modify the value to one of the following according to your preferences.
03 - Force the Taskbar to the bottom of the screen on your main display

01 - Force the Taskbar to the top of the screen on your main display
- Once done, click OK to save the changes.
This should make the desired changes in no time.
2. Try Using CleanMyPC.
It may be that your system is corrupt if you have tried the methods described in this guide and you are still unable to accomplish the goal.
To solve this issue, you should thoroughly clean your computer before continuing with this guide. By doing so, your computer will be free of bugs and corruption errors. Using a good PC cleaner when this happens can be a good idea since manual cleaning is time and energy-consuming.
We recommend CleanMyPC if you have never used one before.

CleanMyPC allows you to fix all kinds of PC issues in a quick and efficient manner. The program includes many tools, such as a Multi-Uninstaller, a Speed Booster, and a Registry Cleaner, which allow you to fix the majority of problems with your system and enhance its performance.
If this sounds like something you need for your PC, you can install CleanMyPC right now and see how much faster your PC will be!
3. Change the Taskbar Location on the Secondary Display/s.
In case you want to change the taskbar location on your secondary display/s instead of the main display, Windows 11 allows you to do so.
Here is what you need to do:
- Open a Run dialogue box by pressing Windows + R keys simultaneously.
- Inside the text field of the dialog box, type ‘regedit‘ and hit Enter.
- Once you are inside the Registry Editor, navigate to the location mentioned below.
HKEY_CURRENT_USER\SOFTWARE\Microsoft\Windows\CurrentVersion\Explorer\MMStuckRects3
- With MMStuckRects3 key selected, double-click on the binary value of the taskbar location that you want to modify.
Note: In the MMStuckRect3 key, you will find UID binary values for each display you currently have connected. For those of you with more than one display connected, there is no way to know what UID goes to what display. That can only be determined after you force the change. In case you mistakenly modified the taskbar on the wrong display, you can change it back easily.
- Next, the value located on the 0008 column and the FE row needs to be changed to one of the following options to change the location of the secondary displays on the taskbar.
03 - Force the Taskbar to the bottom of the screen on your secondary display

01 - Force the Taskbar to the top of the screen on your secondary display
- Hit OK and close the Registry Editor.
- Restart your PC to save the changes.
This should change the taskbar location on secondary displays without any hassle.
This wraps up our guide on changing taskbar location in Windows 11. We hope that one of the methods mentioned in this guide did the trick for you. If you have any questions regarding the methods listed above, please let us know in the comment section below.
If this guide helped you, please share it. 🙂
