

Wondering how to disable automatic updates on Windows 11?
Microsoft Windows 11 comes preconfigured to download and install various updates, including feature, quality, driver, security, and other updates. The OS will do so automatically without your knowledge in the background!
In spite of the fact that updates are very important to solve bugs or to improve the overall performance of your system, sometimes the updates themselves are responsible for certain issues within the system, like corruption errors. The fact that Windows 11 is relatively new means that updates can introduce random bugs to your computer. This is why we recommend sticking to a stable build of Windows 11 till a new critical and stable update is released.
In this guide, we will walk you through several methods of disabling automatic updates on Windows 11. All the methods are easy to execute, and should not take much of your time.
Let’s get started!
1. Pause Updates Temporarily.
In case you do not want to disable automatic updates on Windows 11 permanently, you can pause them for the time being and resume later. This solution is perfect for situations like when you are traveling or have a limited internet connection.
The pausing time is 7 days, and the updates will automatically resume downloading after that.
Here is what you need to do:
- Press Windows + I keys simultaneously on your keyboard to open Windows Settings dialogue box.
- Once you are inside the Settings window, select Windows Update from the left panel.
- Now locate the Pause for 1-week button under More options and click on it.
This should pause the updates for a week.
2. Disable Windows Update Service.
The Windows Update Service is responsible for automatically downloading and installing the latest updates on your PC.
Here is all that you need to do:
- Press Windows + R keys simultaneously on your keyboard to open a Run dialogue box.
- Inside the text field of the dialogue box, type ‘services.msc‘ and hit Enter. This will launch Windows Services on your PC.
- Inside the newly launched window, locate and right-click on the Windows Update service.
- Select Properties and in the Properties window, go to the General tab.
- Now set the Startup type to Disabled and click on the Stop button.
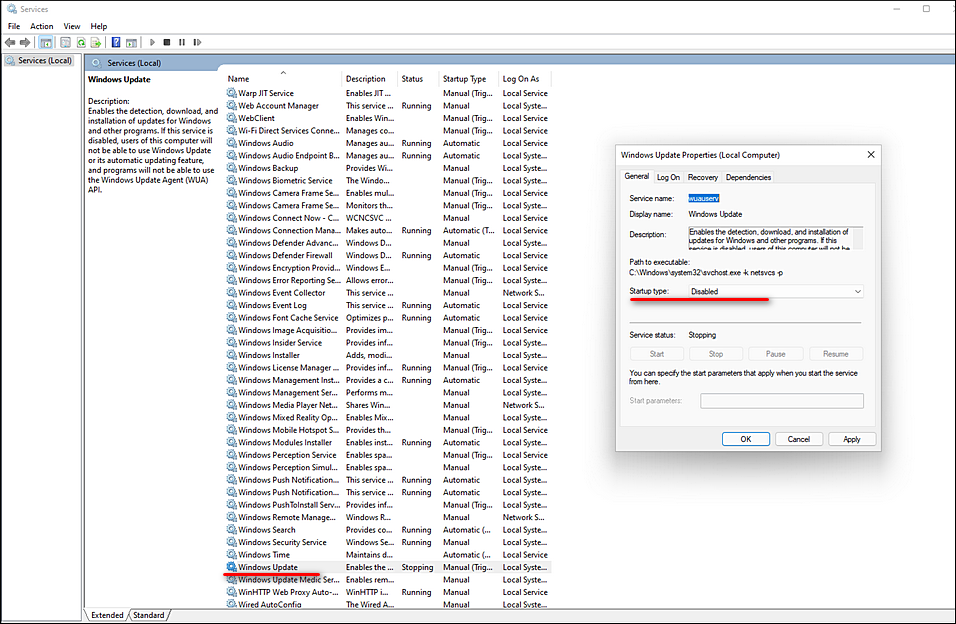
- Finally, click on Apply to save the changes.
Once the service is disabled, updates will no longer be installed automatically.
3. Set Up a Metered Connection.
Another way of disabling the installation of automatic updates is by setting up a metered connection. Metered connections allow you to place limits on the amount of data that is used.
By restricting the amount of data, you can effectively prevent automatic updates on Windows 11.
Here is what you need to do:
- Press Windows + I keys simultaneously on your keyboard to launch Windows Settings.
- In the Settings window, choose Network & Internet from the left panel and then click on Properties in the right pane.
- Now turn the toggle against Metered Connection on to disable automatic updates.
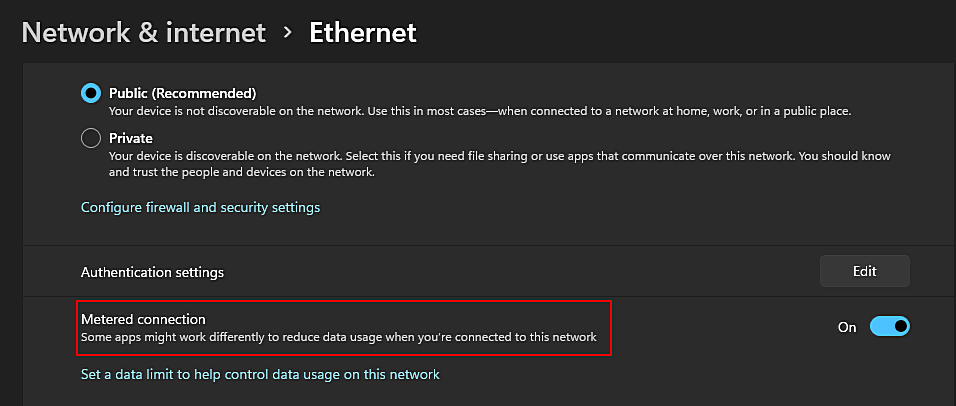
This should make the desired changes in no time.
4. Modify Windows Registry.
Registry refers to a database used by Windows to store low-level details about an operating system’s processes and applications. During relevant operations, Windows relies on the Registry Editor for vital information. This makes the Registry Editor an important component of our operating system.
If you have multiple PC users and want to make administrative-level changes on all the standard user accounts, Windows Registry can help you.
Here is how you can make the desired changes using the Registry Editor:
- Open a Run dialogue box by pressing Windows + R keys simultaneously on your keyboard.
- Inside the text field of the dialogue box, type regedit and hit Enter. This will launch Windows Registry on your PC.

- Once you are inside the Registry Editor, navigate to the location mentioned below.
HKEY_LOCAL_MACHINE\SOFTWARE\Policies\Microsoft\Windows
- Now right-click on the Windows key and select the New > Key option.
- Rename this newly created key as WindowsUpdate and hit Enter.
- Next, right-click on the WindowsUpdate key and select the New > Key option again.
- Rename this key as AU and hit Enter.
- Double-click on the AU key and then right-click anywhere in the right pane.
- Select the New > DWORD (32-bit) Value option and rename this value as NoAutoUpdate.
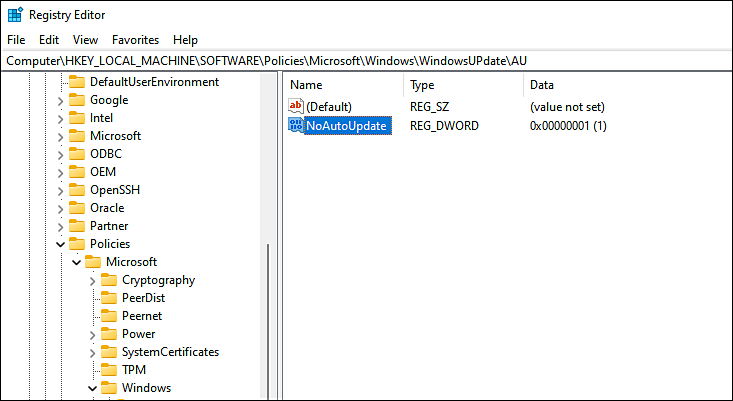
- Now double-click on the newly created value and under Value data, type 1.
- Finally, hit OK and restart the PC.
This will disable automatic updates for all standard users.
5. Modify Group Policy Editor.
Another easy way of modifying the feature under consideration is via Group Policy Editor.
Group Policy Editor (GPE) is a utility that provides administrators with the ability to customize the behavior of their Windows operating systems. The information in GPE is stored in policies, and by modifying the relevant policies, you can make the changes you desire.
Here is how you can use the Group Policy Editor to make the desired changes:
- Press Windows + R keys simultaneously on your keyboard to open a Run dialogue box.
- Type gpedit.msc in the text field of the dialogue box and hit Enter. This will launch Group Policy Editor on your PC.

- Once you are inside the Group Policy Editor, navigate to the location mentioned below.
Computer Configuration > Administrative Templates > Windows Components > Windows Update > Manage end user experience
- Now locate and double-click on Configure Automatic Updates in the right pane.
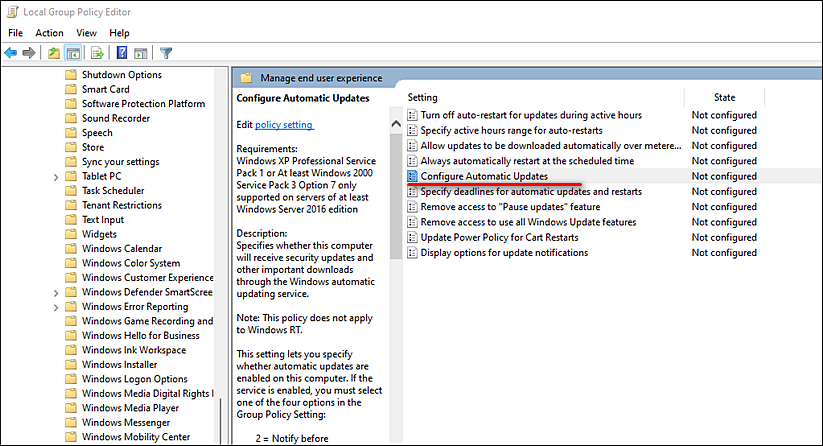
- Select Disabled and hit Apply to save the changes.
This brings us to the end of our guide on ways to disable automatic updates on Windows 11. We tried walking you through all the steps in detail and hope that one of the methods mentioned in this post did the trick for you. In case you still have any confusion about the steps, please let us know in the comment section below!
If this guide helped you, please share it. 🙂
