Want to learn how to disable CSM to install Windows 11?
Windows 11 brings new and advanced features to enhance the performance and security of your computer. To install it, a secure boot is required, and for that to happen, the Compatibility Support Module (CSM) needs to be disabled first.
Even if your computer is updated with the latest UEFI firmware, certain settings may make the system incompatible with Windows 11. This is because UEFI motherboards feature a CSM which is mostly enabled by default.
This component provides legacy hardware compatibility by imitating a BIOS environment. It results in losing certain UEFI features essential for the Windows 11 update. Hence, you’ll need to disable CSM to run the latest compatible operating system.
Let’s take a look at different ways you can perform this task!
1. Disable CSM on Gigabyte to Install Windows 11.
Gigabyte’s BIOS menu features two modes—easy and advanced. To enable UEFI/BIOS instead of Legacy BIOS or CSM, select the advanced mode and access additional system settings.
Following are the step-by-step instructions on how to perform this task:
- First, enter the BIOS screen or Security menu by pressing the Del key while the computer is on boot.
- Then, look for CSM Support under the BIOS tab and double click on it.
- On the pop-up box, select Disabled.
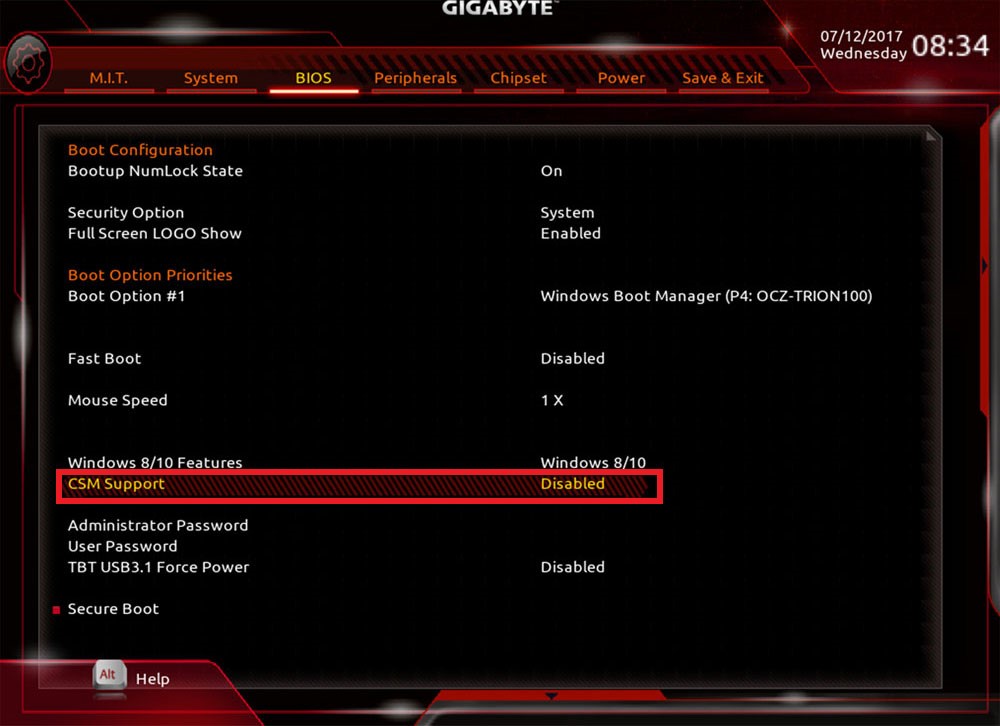
- Now, to save these changes, click on the Power tab. From there, go to Save & Exit Setup and select Yes on the confirmation box.
- Again, reboot the system and enter the BIOS screen.
- This time, double-click on Secure Boot in the BIOS tab.
- Next, select Enabled.
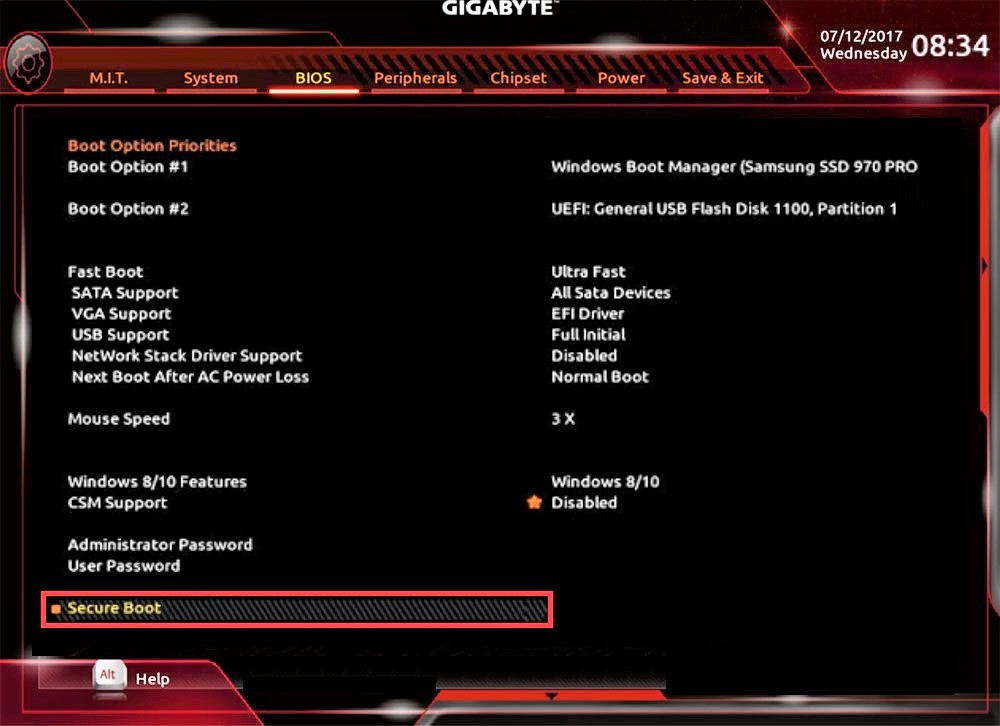
- Once again, go to the Power tab and click Save & Exit Setup.
- Then, click Yes and reboot the system one last time.
- Enter the BIOS screen again and go to the Peripherals tab.
- Now, double-click on Intel Platform Trust Technology (PTT) and select Enabled.
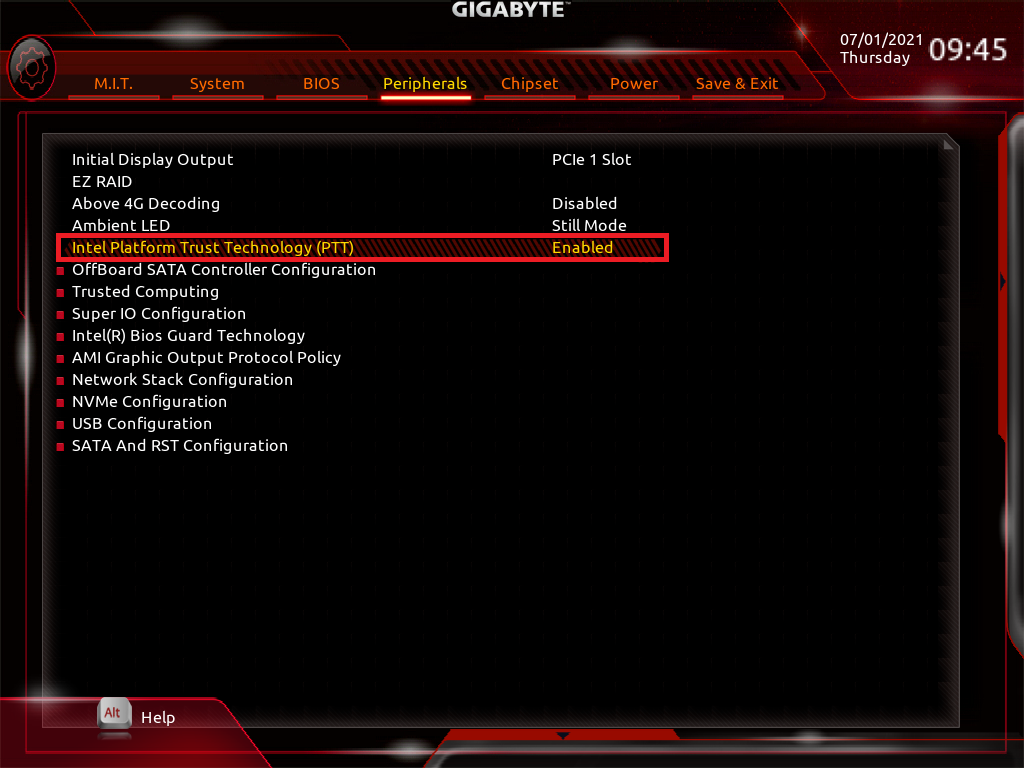
- Save these changes too by going to the Power tab and clicking on Save & Exit Setup.
You will now have secure boot and TPM 2.0 available on your computer. When you check your Windows 11 Health app after restarting your computer, it should display compatibility.
2. Disable CSM on ASUS to Install Windows 11.
The process to disable CSM in ASUS is pretty similar except for how you enter the BIOS screen and the user interface. The boot mode is also usually set to UEFI by default. But if it’s not, follow the steps below to make your computer compatible with Windows 11:
- Start by entering into the BIOS screen by booting the computer in recovery mode. You also press the F2 or F8 key while the computer is turning on.
- Then, you need to enter the Advanced mode by pressing F7 on the keyboard.
- Next, go to the Boot tab at the top.
- Now, scroll down and click on Boot\CSM (Compatibility Support Module).
- Finally, switch Launch CSM to Disabled.
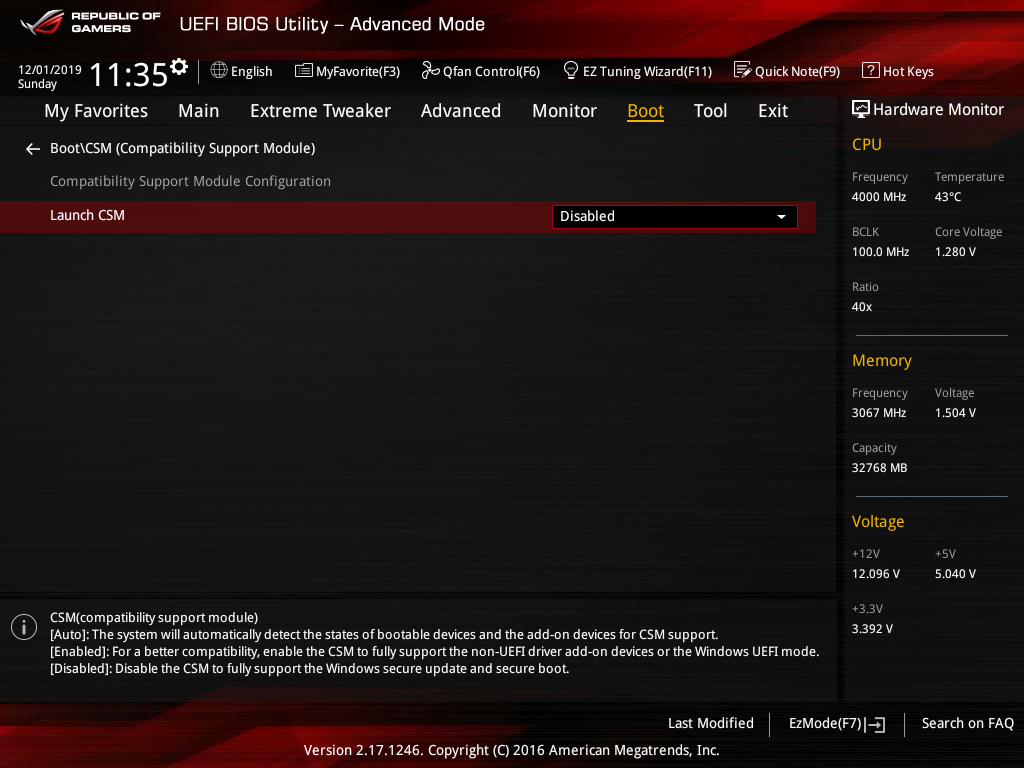
- Then, under the Exit tab and select Save & Exit.
- Now, repeat steps 1 to 3.
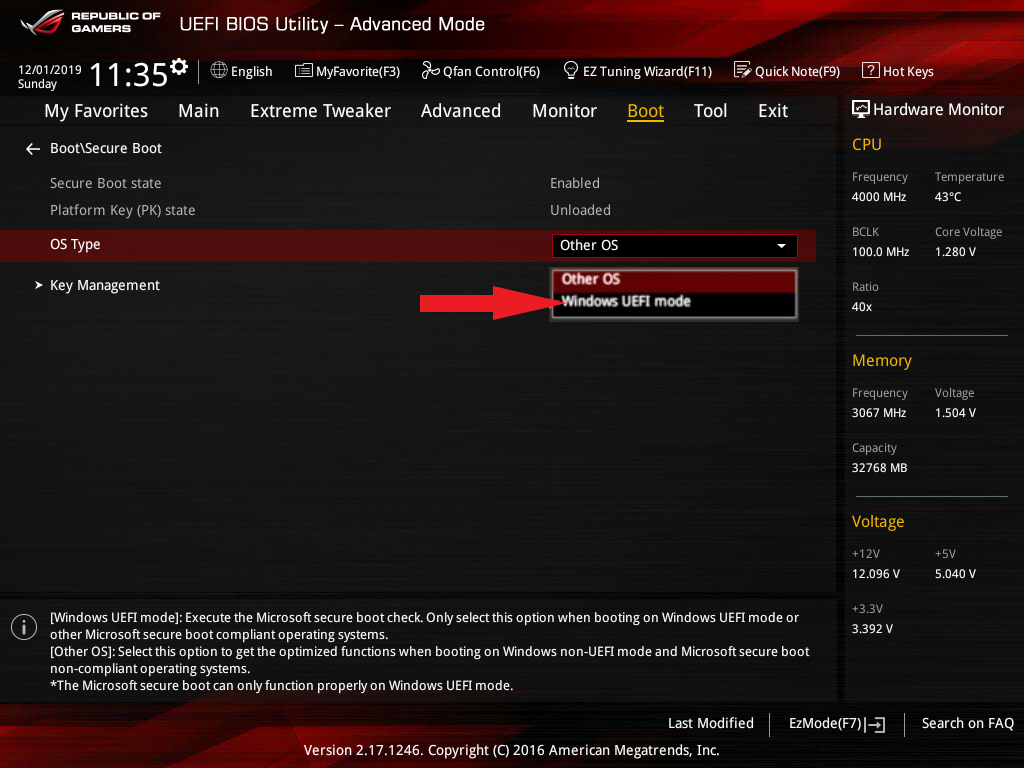
- This time scroll down to the Boot\Secure Boot option and click on it.
- Then, switch OS Type to Windows UEFI Mode.
- Again save these changes and this time repeat only the first two steps.
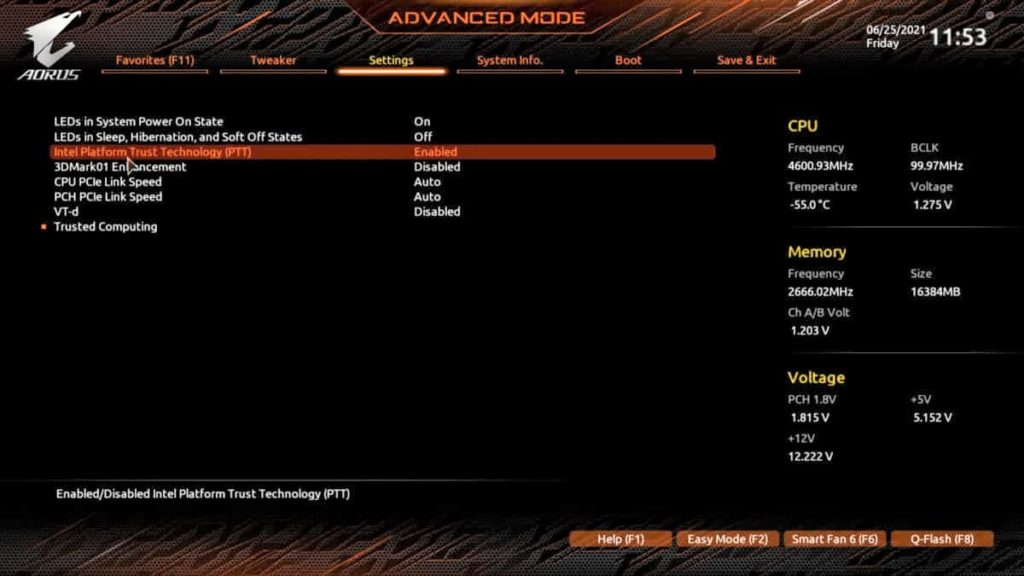
- Next, click on the Settings tab.
- Lastly, enable Intel Platform Trust Technology (PTT) and save the changes under the Exit tab.
You can now successfully install Windows 11 on ASUS.
3. Disable CSM on Biostar to Install Windows 11.
Biostar is another high-performance motherboard that demands upgradability for efficient functionality. If you come across an error while trying to update your Biostar system to the latest version, here’s is what you need to do:
- First, you’ll need to enter the BIOS screen by pressing the F12 key.
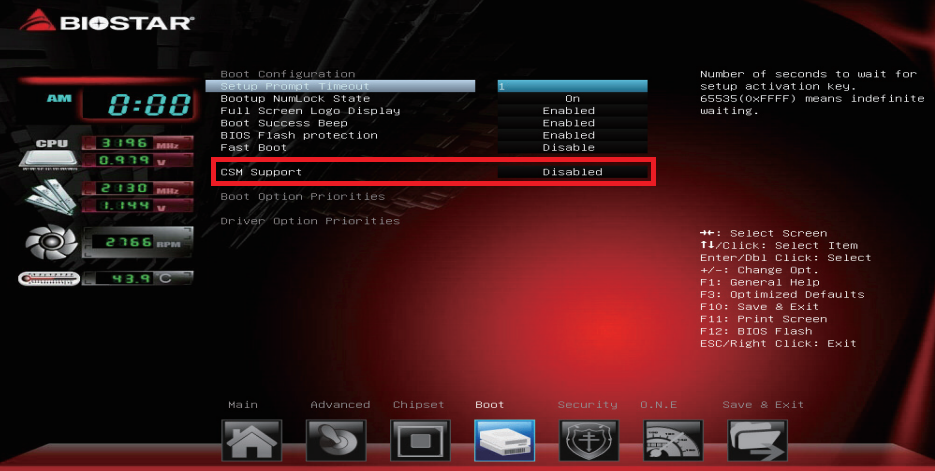
- When the menu shows up, go to the Boot tab from the bottom of the screen.
- Then, look for CSM Support and set it as Disabled.
- Exit the screen and reboot the system. This time press the F9 key to enter the Boot menu.
- In the Boot menu, you are to select a compatible operating system to boot into. From there, enable UEFI mode under the Boot or Advanced tab and your computer will be ready to download Windows 11.
4. Turn Off CSM on ASRock.
ASRock was a spin-off of ASUS. For this reason, many of the pre-built ASUS systems utilize ASRock motherboards. If you own ASRock hardware, read through the following steps to disable CSM and install Windows 11:
- To begin, reboot your computer and press the F2 key during the POST test to enter the BIOS screen.
- Once in the Boot menu, click on the Boot tab present at the top of your screen.
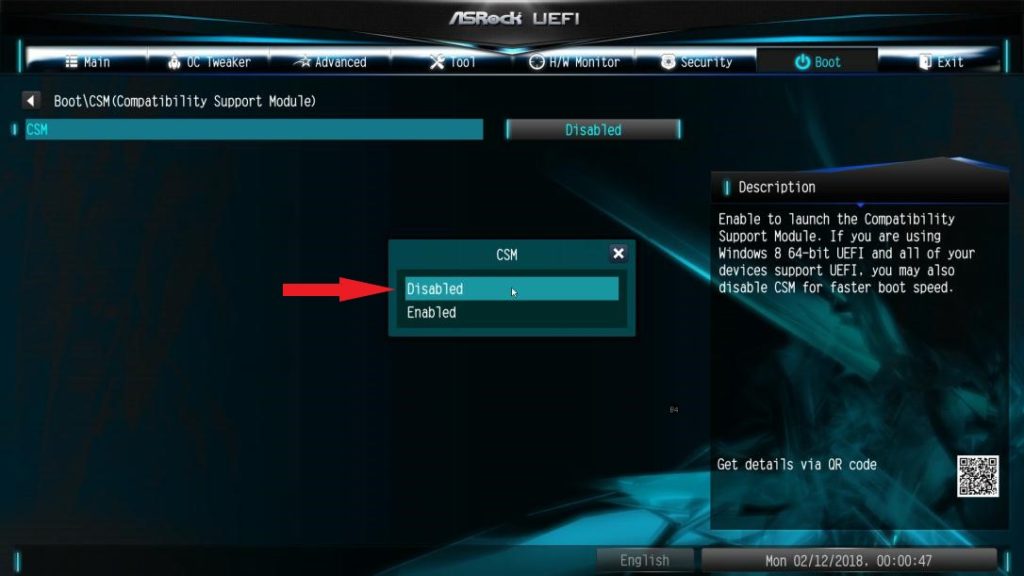
- Then, scroll down until you find CSM and click on it.
- From there, set it as Disabled and choose the Exit tab from the top.
- Finally, click on Save & Exit, then restart your computer.
Rebooting will apply the changes to your system and let you select a compatible operating system to proceed with the setup process.
5. Turn Off CSM on MSI.
Micro-Star International, or MSI, is one of the world-leading companies when it comes to motherboards. Like all other top brands, MSI incorporated the UEFI Firmware to simplify user experience and make systems compatible with the new Windows 11.
Here’s how to disable CSM and allow UEFI mode for your OS installation:
- First, enter the BIOS screen on your computer by pressing the Del key during the POST process.
- When you’re in the menu, click the Boot tab at the top of the screen.
- Now, look for Boot mode select and click on it.
- Then, from the pop-up menu, choose UEFI only.
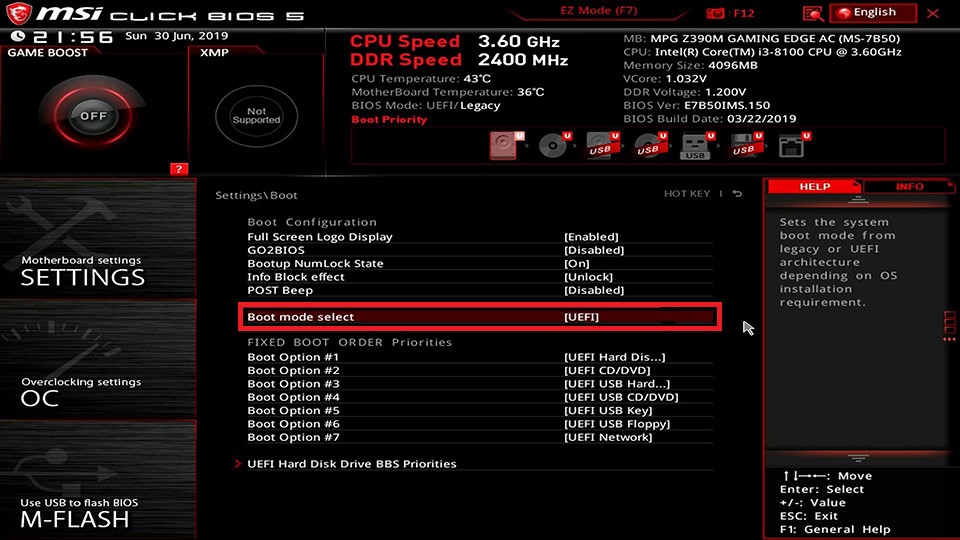
- Lastly, save these changes by pressing the F10 key on your keyboard and exit BIOS.
- After following the above steps, your computer will restart automatically. You can then press F11 during POST to enter the Boot menu and select the preferable OS or recovery drive.
Note: From the Boot mode select menu, choosing Legacy will enable CSM, whereas UEFI + Legacy will automatically allow the motherboard to choose the optimum settings for the running OS.
That’s it! You have now reached the end of our guide on how to disable CSM to install Windows 11 on your system. Remember to use the method specific to your motherboard. If you somehow fail to turn off CSM, feel free to ask for further assistance in the comment section below. We’ll be more than happy to help you out.
If this guide helped you, please share it. 🙂


