

Wondering how to disable Error Reporting in Windows on your PC?
Not all of us are Sherlock Holmes when it comes to uncovering the mysteries of Windows, but we do have Windows Error Reporting, aka Dr. Watson (no pun intended) which according to many, is more than just a sidekick.
When an application on Windows crashes, Windows Error Reporting automatically generates a report and sends it to Microsoft. Normally, you’d expect this to be helpful in finding a solution, but sadly most of the time, that is not the case.
In most cases, it is best to disable Error Reporting because it slows down your PC and transmits data in an unencrypted form. If you are looking for easy ways to do so, you are in the right place.
In this guide, we will walk you through the methods of disabling Error Reporting in Windows in detail.
Let’s get started!
1. Modify Service Screen Properties.
If you want to disable Error Reporting in Windows, then the easiest way to do so is by modifying the service screen properties.
Windows allows its users to manually start and stop all the services, which is exactly what we are going to do right now.
This method is going to work for all users, regardless of the Windows version they are using.
Here is what you need to do:
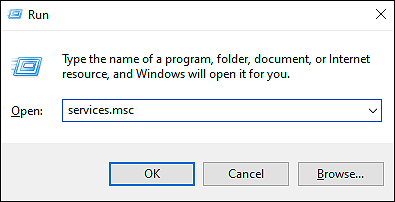
- Press Windows + R keys simultaneously on your keyboard to open a Run dialogue box.
- Inside the text field of the dialogue box type ‘services.msc‘ and hit Enter. This will launch the Services window on your PC.
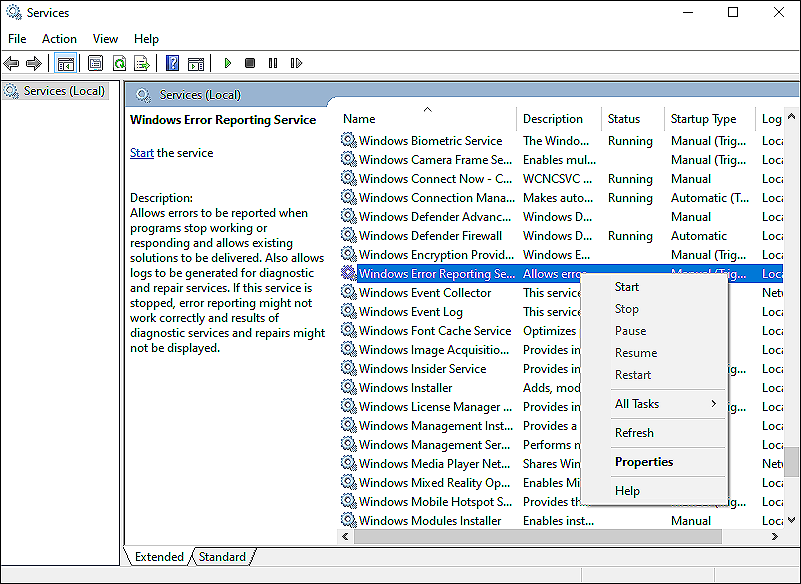
- Once you are in the Services window, right-click on the Windows Error Reporting Service and select Properties from the list of options available.
- Inside the Properties window, go to the General tab and expand the dropdown menu against Startup type.
- Select Disabled and then click on the Stop button under Service status.
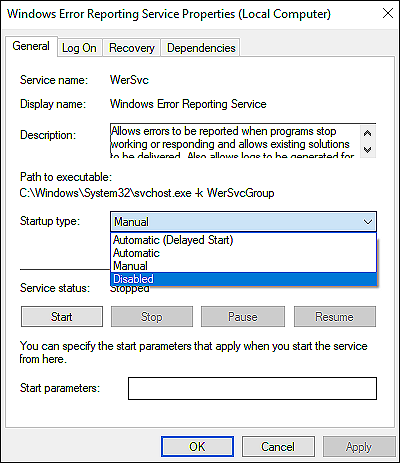
- Click on Apply to save the changes and then restart your PC.
Hopefully, doing so will disable Error Reporting in Windows without any issues.
2. Use Control Panel (for Windows 7 and Windows 8.1 Users).
If you find modifying service screen properties complex, then you can try disabling Error Reporting using the Control Panel.
This method is quite similar to the one we discussed above, but it will only work for Windows 7 and Windows 8.1 users. If you are using a Windows version other than these, jump to the next methods below.
Here is what you need to do:
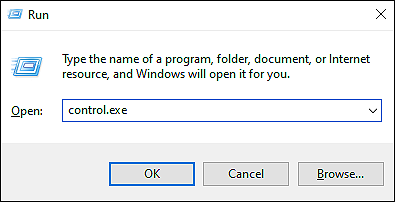
- Open a Run dialogue box by pressing Windows + R keys simultaneously.
- Inside the text field of the dialogue box, type ‘control.exe‘ and hit Enter. This will launch the Control Panel.
- Once you are inside the Control Panel window, type security in the search bar and hit Enter.
- Click on Security and Maintenance and then select Action Center.
- Now select Action Center settings from the left pane and in the next window, click on Problem reporting settings.
- Next, click on Never Check for solutions (not recommended) or Each time a problem occurs, ask me before checking for solutions to disable the Windows Error Reporting tool.

- Finally, restart your PC to make the changes.
This should help you make the desired changes in no time.
3. Use Windows Registry.
Another easy method of disabling Error Reporting in Windows is via Windows Registry.
The Windows Registry is a database of low-level information about Windows programs and processes. This information is stored in the Registry as Registry keys and Windows refers to this information while performing relevant tasks.
In this step, we will modify the relevant keys to make the desired changes.
Here is what you need to do:
- Open a Run dialogue box by pressing Windows + R keys simultaneously.
- In the text field of the dialogue box, type ‘regedit‘ and hit Enter to launch Windows Registry.

- Once you are inside the Registry Editor, navigate to the location mentioned below.
HKEY_LOCAL_MACHINE\SOFTWARE\Microsoft\Windows\Windows Error Reporting
- Now right-click anywhere in the right pane and select the New > DWORD (32-bit) Value option.
- Rename this new value as Disable and double-click on it.
- Under Value data, type 1 and under Base, select Hexadecimal.
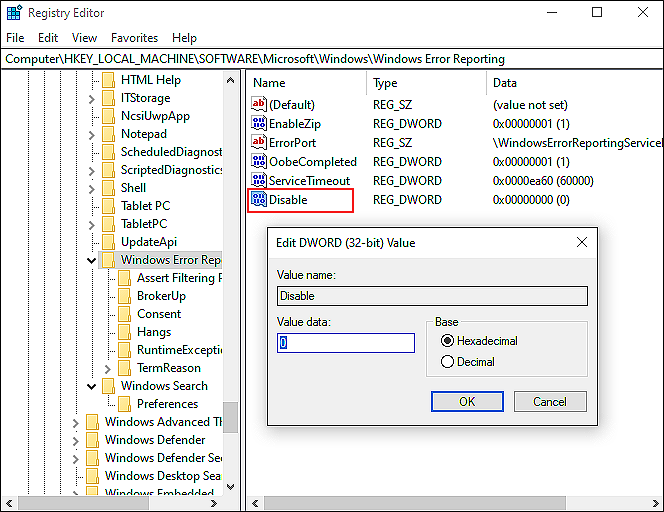
- Lastly, click on OK and restart your PC to save the changes.
That’s it.
If you want to enable the feature back in the future, simply follow the steps mentioned above again, and under Value data, type 0.
4. Try Using CleanMyPC.
If our recommended solutions don’t work for you, your system may have bugs infected with corruption errors that are blocking you from completing certain tasks. To solve this issue effectively, you should remove the junk files from your computer before proceeding with the methods mentioned in this guide.
To remove junk, corrupt files from your PC, it is best to use a PC cleaner and if you need one, our personal favorite is CleanMyPC.

CleanMyPC comes with a variety of system maintenance tools that can take care of other PC-related problems as well. Install the tool, run the initial scan, and it will automatically detect and fix problems with very limited user input.
Also, CleanMyPC is a very easy-to-use program, so even if you’ve never used a PC cleaner before, you should not have a problem!
5. Use Group Policy Editor.
If you find using Windows Registry complicated, then try using the Group Policy Editor.
It is an administrative tool designed to assist advanced users in customizing the operating system in accordance with their needs. Group Policy Editor stores information as policies, and users can alter these policies to customize Windows operations.
Here is how you can use the Group Policy Editor to disable Error Reporting in Windows:
- Open a Run dialogue box by pressing Windows + R keys simultaneously.
- In the text field of the dialogue box, type ‘gpedit.msc‘ and hit Enter to launch the Group Policy Editor.

- Once you are inside the Group Policy Editor, navigate to the location mentioned below.
Computer Configuration > Administrative Templates > Windows Components > Windows Error Reporting
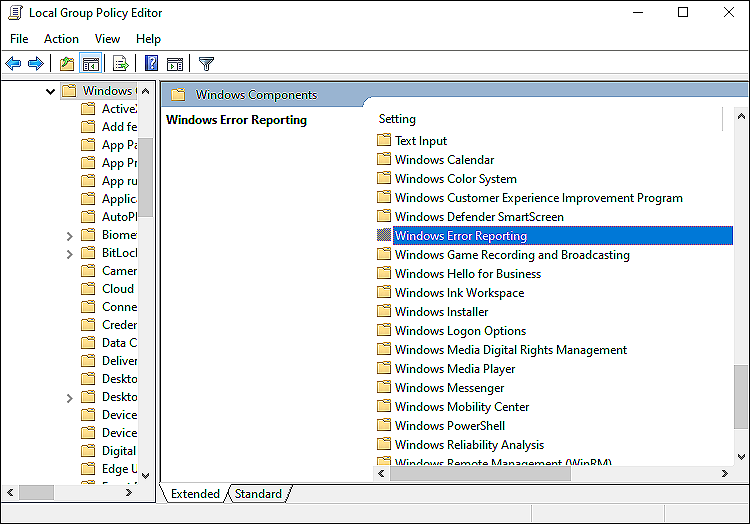
- Now locate Disable Windows Error Reporting in the right pane and double-click on it.
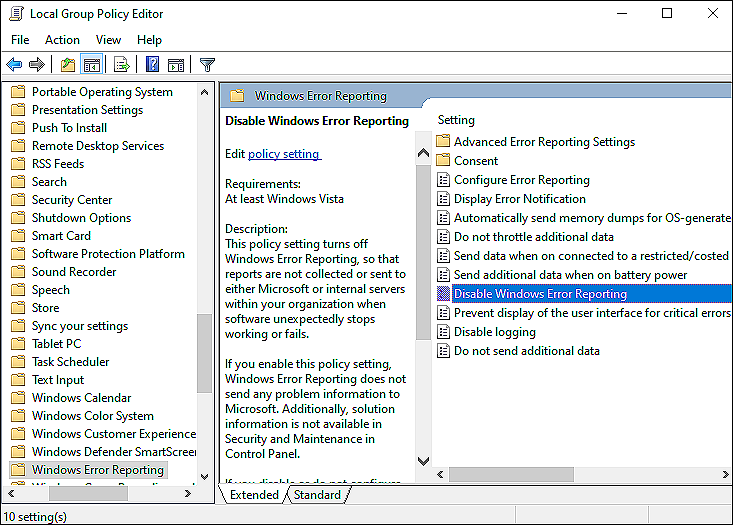
- Select Enabled and hit Apply/OK to save the changes.
Modifying the aforementioned policy in the Group Policy Editor should disable Error Reporting in Windows.
This brings us to the end of our guide on disabling Error Reporting in Windows. We tried walking you through all the steps in detail and hope that one of the methods mentioned above did the trick for you. In case you still have any confusion about the methods, please let us know in the comment section below!
If this guide helped you, please share it. 🙂
