Looking for ways to disable OneDrive on Windows 11?
OneDrive is the cloud storage service developed by Microsoft to keep all your files securely in one place. The service comes built-in with your Windows 11 operating system and offers to backup and synchronize your data across all devices running on the same OneDrive account.
Similar to Microsoft Edge, bundling OneDrive with Windows OS has caused trouble for some users. The program may repeatedly pop up asking for backup permissions or slow down your PC. In severe cases, it may transfer your files entirely to the cloud storage, leaving you with only their shortcut icons and making them inaccessible without the internet.
This inclines people to better alternatives to OneDrive like Dropbox, Google Drive, iCloud, Mega, etc. Others may not even want to store data in any drive at all. For that reason, we’ve concluded this guide to inform you how to temporarily or permanently disable OneDrive on Windows 11, prevent it from running on startup, or uninstall it.
So without any delay, let’s get started!
1. Disable OneDrive from Starting Automatically.
For most users, the most annoying part of OneDrive is that it launches on startup. Fortunately, you can disable it by following this method. That way, you can use OneDrive only when required and won’t have it constantly running in the background.
Here’s what you need to do:
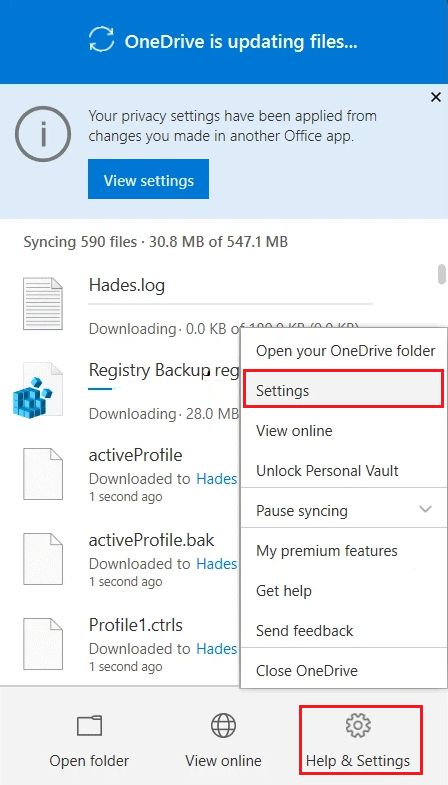
- To start, click on the OneDrive icon from your taskbar.
- After that, select Help & Settings located at the bottom-right corner and click on Settings.
- A Microsoft OneDrive window will appear. From there, select the Settings tab and uncheck the box next to Start OneDrive automatically when I sign in to Windows.
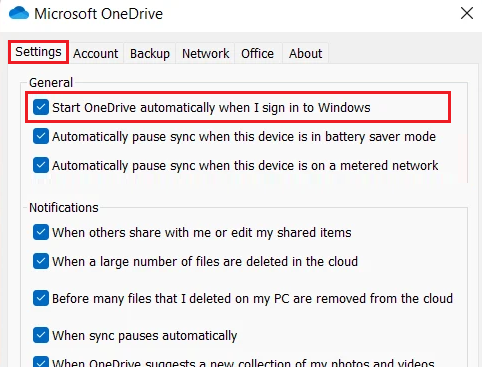
- Then, click on OK to confirm.
2. Disable Using Windows Settings.
Another way to disable OneDrive from starting up immediately as you log in to Windows 11 is through Windows Settings. All you have to do is disable Microsoft OneDrive from the list of startup apps.
Here’s how to do it:
- Begin by pressing Win + i keys from your keyboard to open Settings.
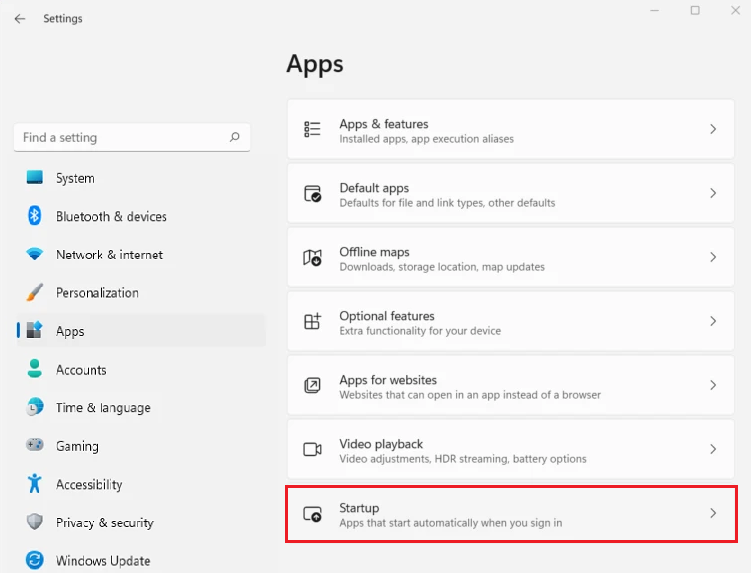
- Now, click on Apps from the left pane of Settings.
- After that, select Startup from the App settings.
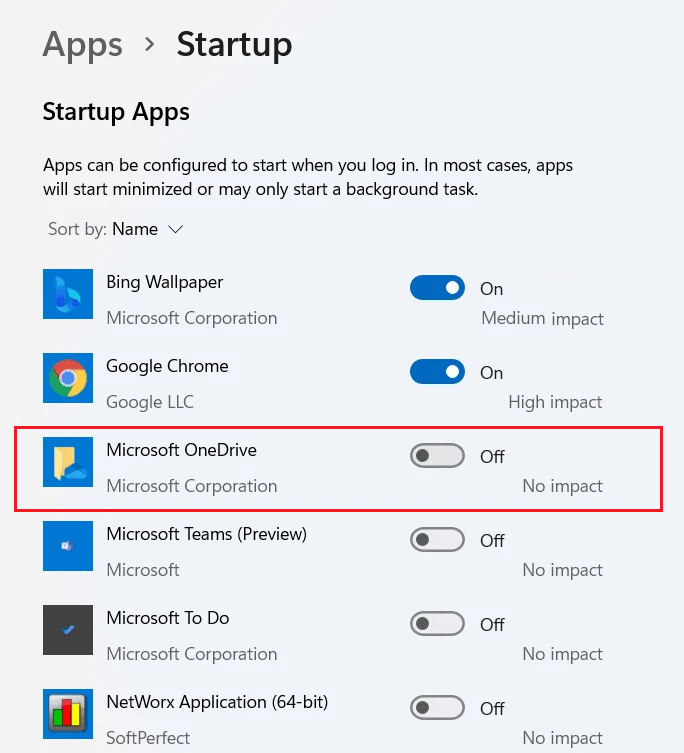
- Then, locate Microsoft OneDrive and turn off the toggle next to it.
3. Via Task Manager.
If you’re looking for another method to disable OneDrive on startup, you can utilize the Task Manager. This tool allows you to monitor and manage the programs and processes that are running on your computer. You can also use it to close apps that are currently executing or to disable them on startup.
To do so, follow these steps:
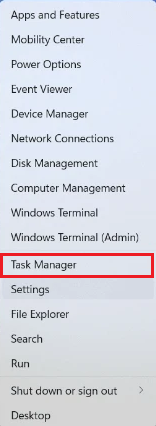
- Firstly, launch the Task Manager by pressing Ctrl + Shift + Esc keys from your keyboard. Alternatively, you can right-click on the Start menu and select Task Manager from there.
- Once it opens, select the Startup tab.
- Afterward, look for the Microsoft OneDrive and right-click on it.
- Then select Disable.
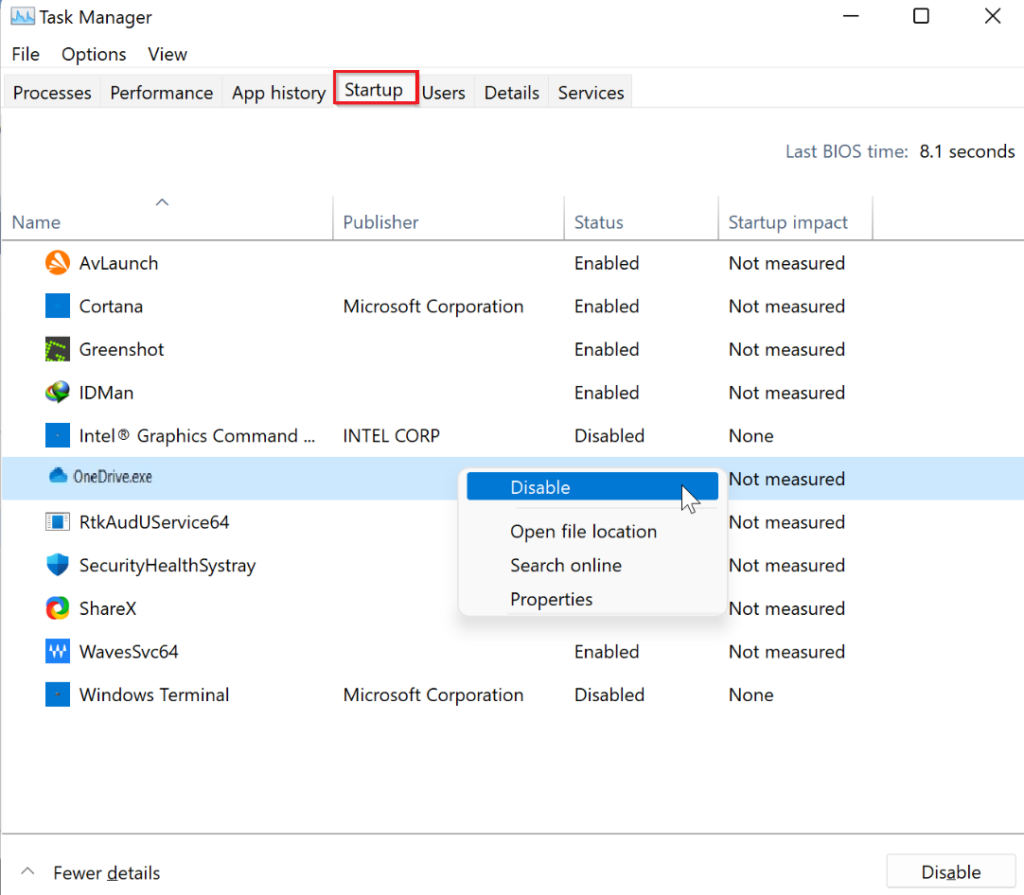
Once done, restart your computer to apply these changes.
4. Through the Registry Editor.
All built-in and third-party programs on your system have their related sub-keys added to Windows Registry. When you want to make changes, Windows offers a default graphical program known as the Registry Editor. Through it, you can easily disable OneDrive on Windows 11.
Follow the steps below to do it:
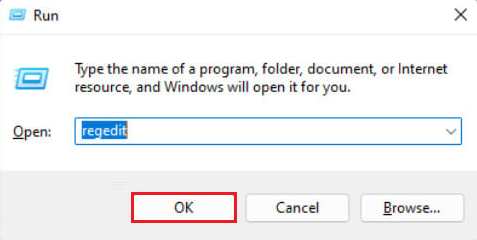
- Launch the Run command box by pressing Win + R keys from your keyboard.
- Type in ‘regedit’ and click on OK to open the Registry Editor.
- Now, copy and paste the following in the address bar and press the Enter key:
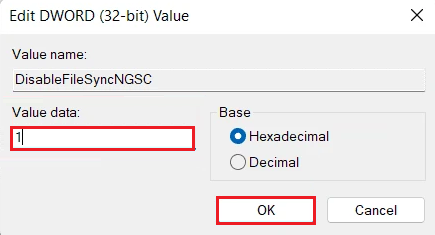
Computer\HKEY_LOCAL_MACHINE\SOFTWARE\Policies\Microsoft\Windows\OneDrive- After that, find and double-click on DisableFileSyncNGSC.

- A value box will appear, type 1 in the box under Value data and click on OK.
- Lastly, restart your PC so that the changes can be applied.
5. By Group Policy Editor.
Group Policy Editor is an administration tool offered by Windows that enables you to configure important settings related to group policies. Through administrator permissions, you can edit startup programs, password requirements, etc.
You can also use it to disable OneDrive on Windows 11. However, the Group Policy Editor is only available on Professional, Enterprise, and Workstation versions of Windows OS.
Here’s what you should do:
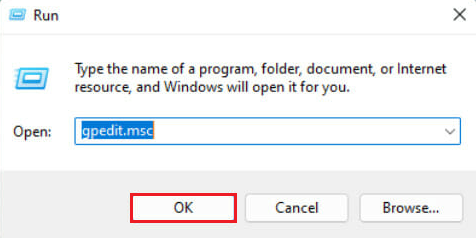
- To start, click on the Start menu and type in ‘gpedit’ and select Open from the right pane of Edit group policy. You can also do it by pressing Win + R to open the Run command, type gpedit.msc, and click on OK to launch Group Policy Editor.
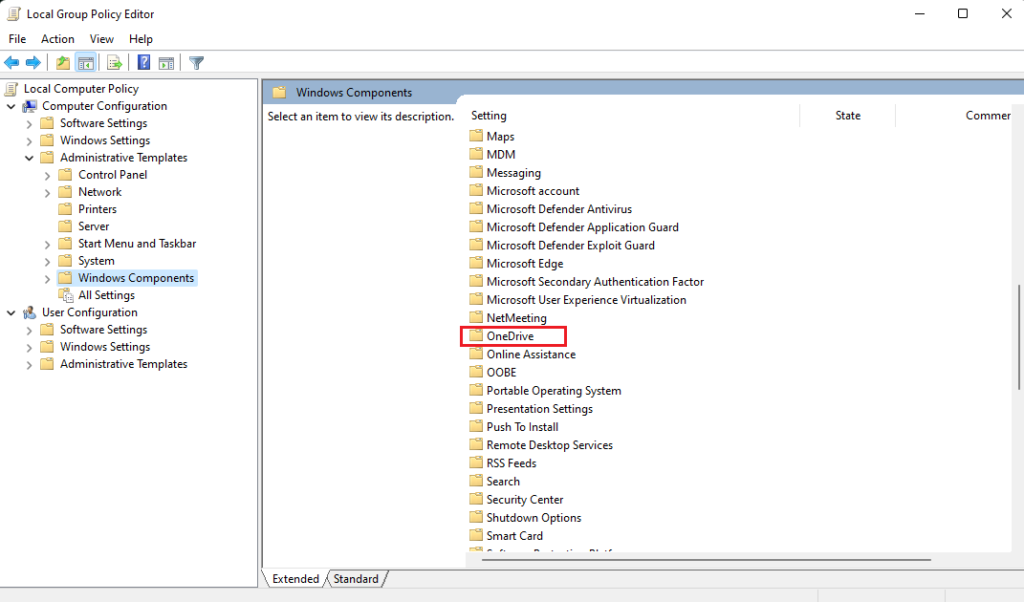
- Once in the Group Policy Editor, go to Computer Configuration from the side pane and select Administrative Templates.
- Then, go to Windows Components and select OneDrive.
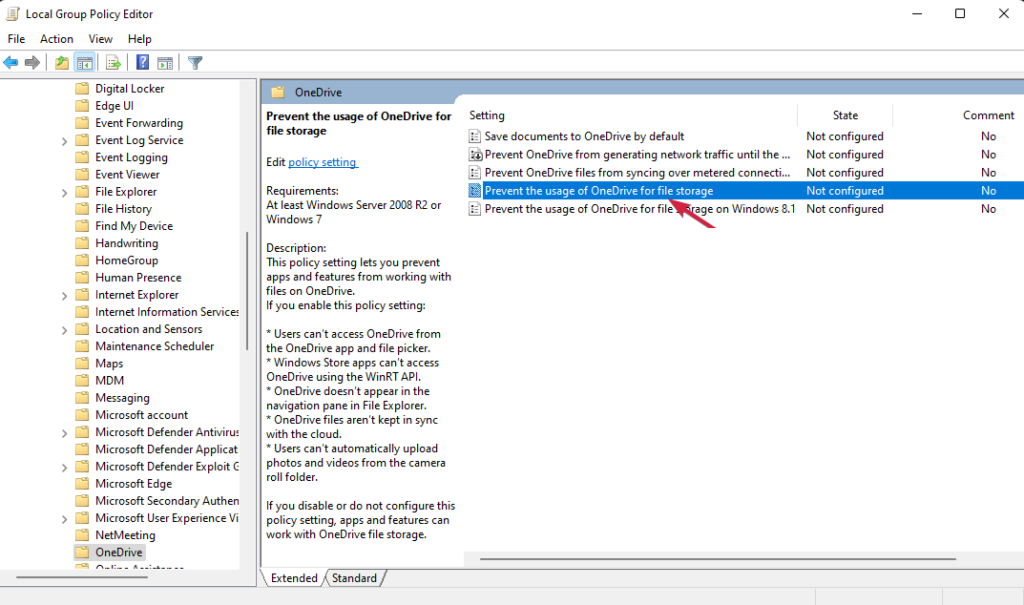
- Double-click on Prevent the usage of OneDrive for file storage.
- A window will appear. Click on Enabled from the upper-left corner, then select Apply.
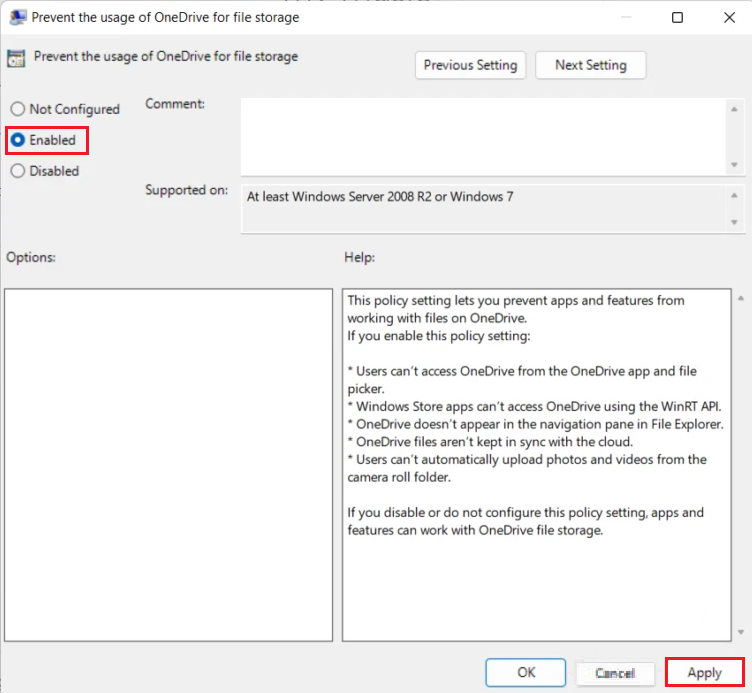
- Afterward, click on OK.
6. With Windows Terminal.
From Windows 10 onwards, Microsoft developed a replacement for Windows Console. You can utilize the program to run any command to enable or disable Windows OS features.
To disable OneDrive with Terminal, follow the steps provided below:
- Launch Windows Terminal by pressing on Win + X from your keyboard, then select Windows Terminal (admin).
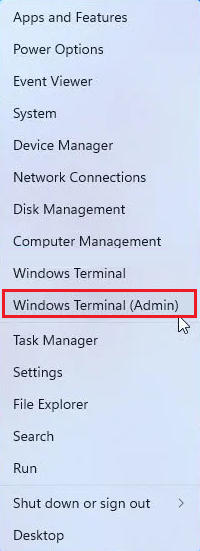
- After that, paste the following codes and hit Enter.
taskkill/f/im OneDrive.exe%SystemRoot%\SysWOW64\OneDriveSetup.exe/uninstall7. Unlink Windows from OneDrive.
If you want to remove your OneDrive account from your PC but keep all the data in your local drive, this method is for you. After following the instructions below, your OneDrive account will get unlinked from your computer, and your future data will no longer sync to the cloud.
But remember, if there are files stored only in your OneDrive, they will be removed from your local storage.
Here’s how to unlink it:
- Click on the Upward arrow icon from the taskbar and select the OneDrive icon.
- Next, click on Help & Settings and then Settings.
- From the Microsoft Overdrive window, go to the Account tab.
- Then, click on Unlink this PC.
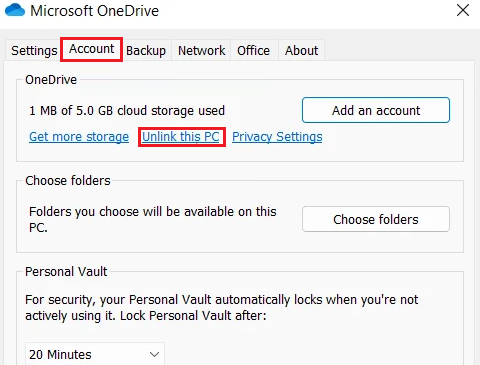
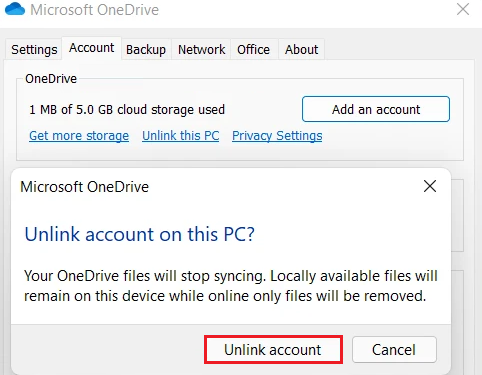
- A confirmation message will appear. Simply click on the Unlink account button to confirm.
8. Uninstall from Windows Settings.
If you know you won’t be using OneDrive, it’s best to uninstall the program right away. However, that doesn’t mean you won’t be able to reinstall it if you change your mind later. Windows will leave some traces of OneDrive on your PC so that you can recover it if necessary.
You may delete OneDrive from your computer in the same way you would any other program using Windows Settings.
Here’s how:
- Press the Win + i from your keyboard to launch Windows 11 Settings.
- Then, select Apps from the left bar and click on Apps & features from the right pane.
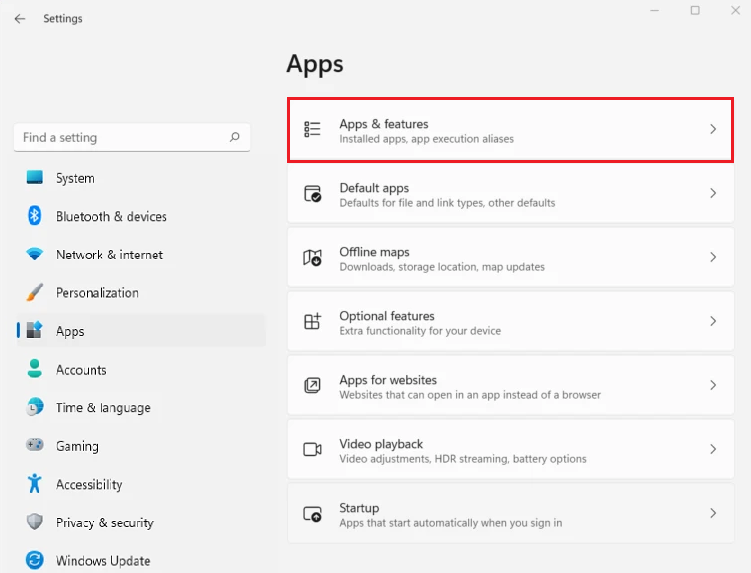
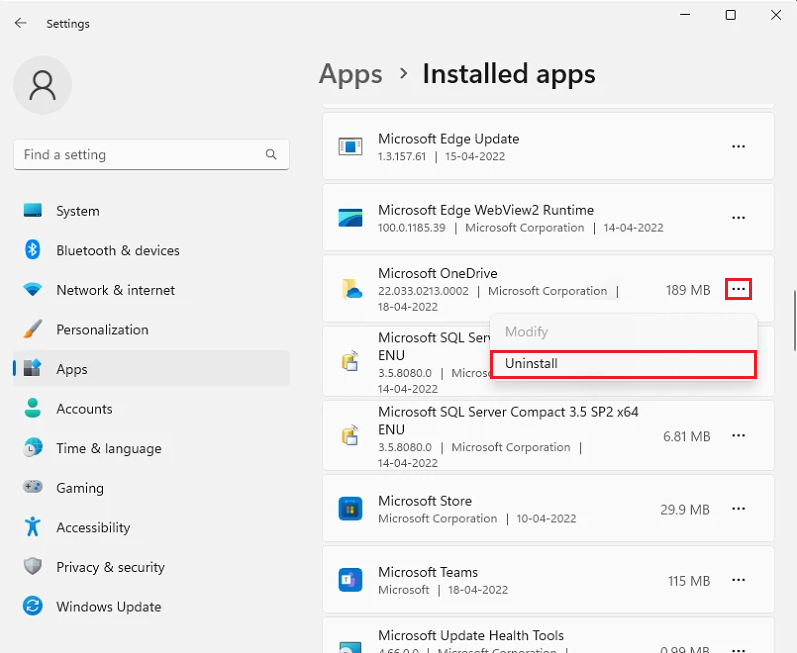
- After that, locate Microsoft OneDrive.
- Now, click on the three vertical dots next to Microsoft OneDrive and select Uninstall.
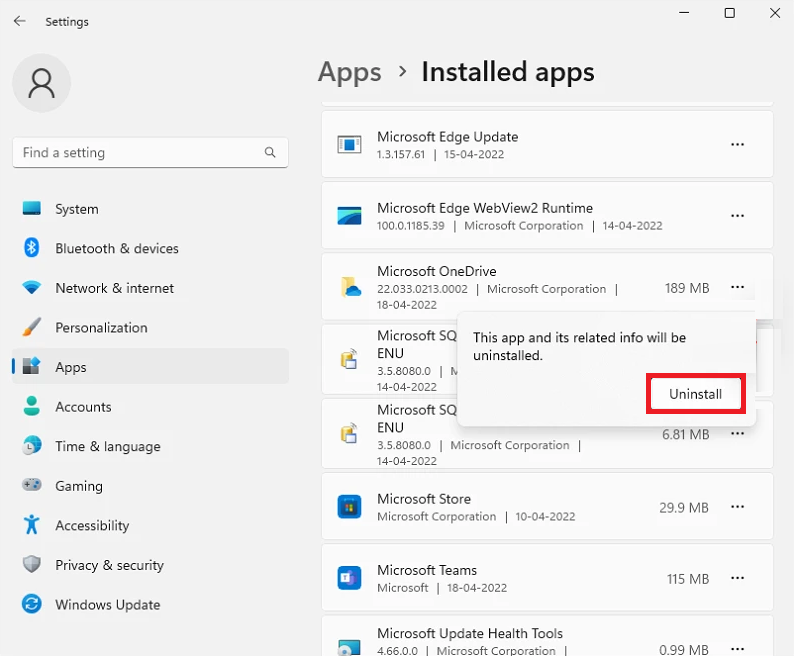
- Click on Uninstall again from the confirmation dialog.
9. Uninstall from Command Prompt.
If you’ve decided to uninstall OneDrive from your computer, another way you may do it is via Command Prompt. But before proceeding, you need to know whether your PC runs on a 32 or 64-bit version of Windows 11.
Then follow the steps below:
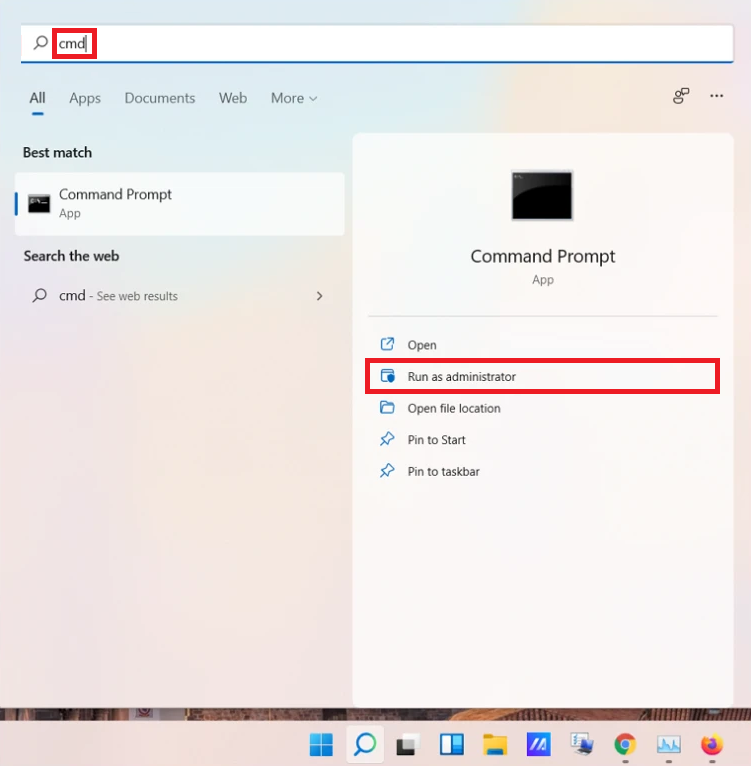
- Head to the Start menu, type in ‘cmd,’ and click on Run as administrator to open the Command Prompt.
- Now, paste the following commands one after the other and press the Enter key. For a 32-bit system:
taskkill /f /im OneDrive.exe%SystemRoot%\System32\OneDriveSetup.exe /uninstall
For a 64-bit system:
taskkill /f /im OneDrive.exe%SystemRoot%\SysWOW64\OneDriveSetup.exe /uninstall
- A User Control box will appear. Click on Yes to uninstall Microsoft OneDrive from your computer.
This will successfully uninstall OneDrive from your computer. In case it doesn’t, restart your PC.
That was it! Now you know the various methods to disable OneDrive on Windows 11. If you still have any confusion, feel free to let us know in the comment section below. We’ll do our best to assist you further.
If this guide helped you, please share it. 🙂


