

Wondering how to disable printing in Microsoft Edge on Windows 10?
By default, Microsoft Edge allows users to print web content that includes web pages, documents, PDF files, etc. This feature proves to be helpful in situations where you would want to go through long pages of text in paper format rather than reading through digital copies.
Although it may be beneficial for personal use, not all organizations are comfortable allowing users to print documents from their computers. Fortunately, this feature is customizable, which means that you can enable/disable it according to your preferences.
If you are an administrator wanting to disable this feature for standard users, there are quite a few ways of doing so. In this guide, we will walk you through all the methods in detail.
Let’s get started!
1. Use Group Policy Editor.
Group Policy Editor is an administrative-level utility that allows advanced users to make changes within their operating systems.
Group Policy Editor stores information about Windows programs and functions in the form of policies. By modifying the relevant policies, you can make the desired changes.
Listed below are the two ways you can use Group Policy Editor to disable printing in Microsoft Edge. Proceed with the one that suits your situation the best.
Method 1
This method is for the users who are using the Legacy Microsoft Edge which is an HTML-based browser. This version comes as a default browser with Windows 10.
Here is what you need to do:
- Press Windows + R keys simultaneously on your keyboard to open a Run dialogue box.
- Inside the text field of the dialogue box, type ‘gpedit.msc’ and hit Enter. This will launch Group Policy Editor on your PC.

- Once you are inside the Group Policy Editor, navigate to the location mentioned below.
User Configuration\ Administrative Templates\ Windows Components\ Microsoft Edge
- Now locate and double-click on Allow printing in the right pane.

- Select Disabled or Not Configured and click on Apply to save the changes.
- Now check if the desired changes have been made. If not, then type cmd in the search bar and click on Run as administrator.
- Type the command mentioned below in the Command Prompt window and hit Enter to execute it.
gpupdate /force
This should make the desired changes.
Method 2
If you are using the latest Microsoft Edge browser which is based on Chromium, then follow the steps mentioned below. This version was released in 2020 and is downloaded separately to replace the Legacy version.
Here is what you need to do next:
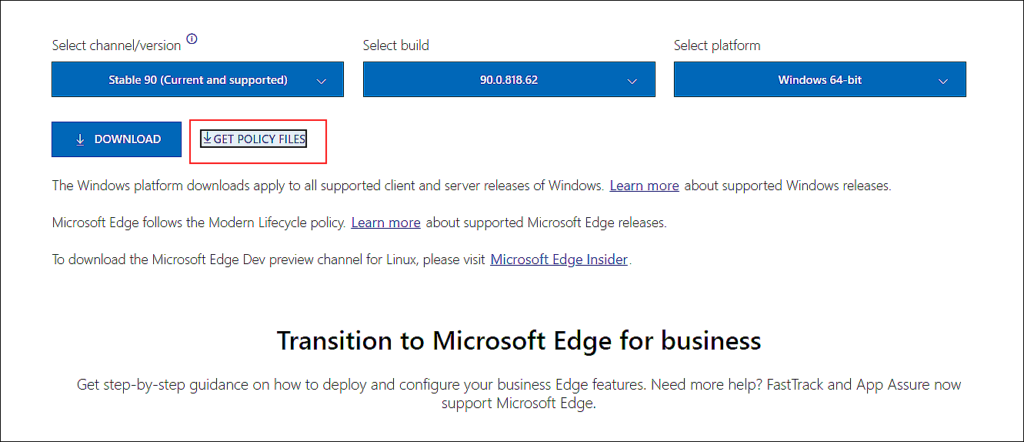
- Visit Microsoft’s official website.
- Scroll down the window and select the version details of your Microsoft Edge.
- Click the GET POLICY FILES button to download the policy files.
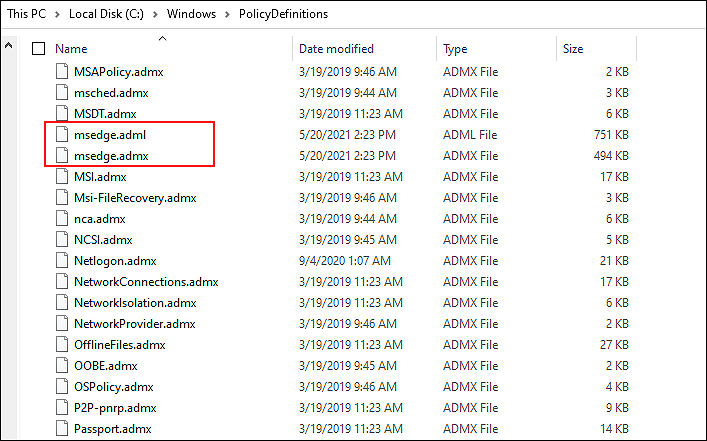
- Once the download is complete, extract the downloaded file and then open the folder.
- In the folder, navigate to the location mentioned below.
MicrosoftEdgePolicyTemplates\windows\admx
- Copy the msedge.admx and msedge.adml files and paste them in the C:\Windows\PolicyDefinitions folder.
- Once you have pasted the files, restart your PC.
- Upon reboot, open a Run dialogue box by pressing Windows + R keys on your keyboard simultaneously.
- Inside the text field of the dialogue box, type ‘gpedit.msc‘ and hit Enter. Doing so will launch the Group Policy Editor on your PC.
- In the Group Policy Editor window, navigate to the location mentioned below.
Computer Configuration\ Administrative Templates\ Microsoft Edge\ Printing
- Now locate and double-click on the Enable printing in the right pane.
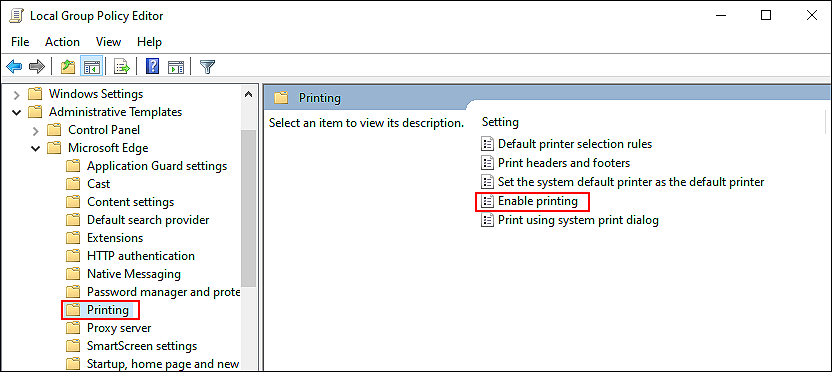
- Select Disabled or Not Configured and click on Apply to save the changes.
Hopefully, this will disable printing for all users in Microsoft Edge.
2. Try Using CleanMyPC.
If your operating system contains corruption errors, you may encounter issues when executing the methods in this guide.
In general, corruption issues result from junk files in your system, so if you haven’t cleaned them up in a while, now is the time.
We recently tested some of the best cleaners in the market and found CleanMyPC to be the best.

It includes a comprehensive list of tools for system maintenance that can do a great deal more than just remove junk files. These tools include (but are not limited to) Multi-Uninstaller, Registry Cleaner, and a Speed Booster. All that you need to do is install CleanMyPC and run a scan using it. If any issues are identified, it will take care of them with little to no user input.
Install CleanMyPC now and get your PC up and running like new!
3. Use Windows Registry.
A Registry is a database used by Windows to store low-level information about operating system’s processes and applications. Windows refers to the Registry Editor for required information while executing relevant operations. This makes the Registry Editor a vital aspect of our operating system.
Make sure, however, that you are logged into Windows as an administrator before proceeding with the methods mentioned below.
Method 1
This method is for the users using Legacy Microsoft Edge.
Here is what you need to do:
- Press Windows + R keys simultaneously on your keyboard to open a Run dialogue box.
- Inside the text field of the dialogue box, type ‘regedit’ and hit Enter. This will launch Windows Registry on your PC.

- Once you are inside the Registry Editor, navigate to the location mentioned below.
HKEY_CURRENT_USER\Software\Policies\Microsoft\MicrosoftEdge\Main
Note: If you cannot locate this path, then try the following path:
HKEY_CURRENT_MACHINE\Software\Policies\Microsoft\MicrosoftEdge\Main
- If you cannot locate the Main key, then right-click on the MicrosoftEdge key and select the New > Key option.
- Rename this key as Main and double-click on it.
- Now right-click anywhere in the right pane and select the New > DWORD (32-bit) Value option.
- Rename this newly created value as AllowPrinting.
- Double-click on AllowPrinting and under Value data, type 0.

- Once done, restart your PC to save the changes.
If you are using the legacy version of Microsoft Edge, the aforementioned steps should work for you.
Method 2
If you are using the new version of Microsoft Egde, then follow the steps mentioned below:
- Press Windows + R keys simultaneously on your keyboard to open a Run dialogue box.
- Inside the text field of the dialogue box, type ‘regedit’ and hit Enter. This will launch Windows Registry on your PC.
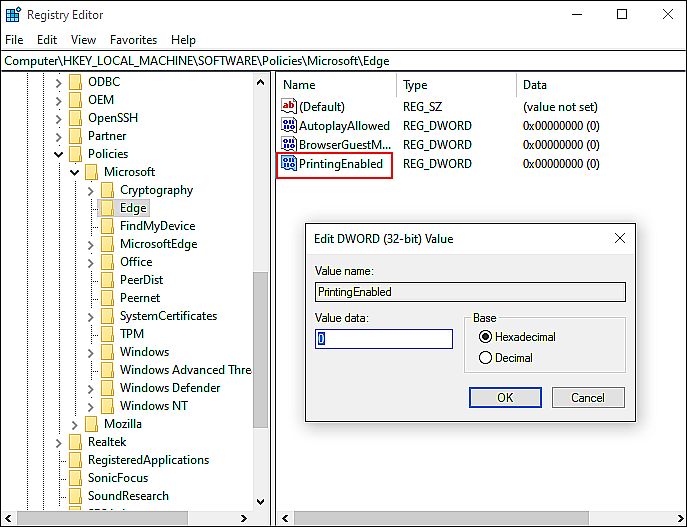
- Once you are inside the Registry Editor, navigate to the location mentioned below.
HKEY_LOCAL_MACHINE\SOFTWARE\Policies\Microsoft\Edge
- If you cannot locate the Edge key, then right-click on the Microsoft key and select the New > Key option.
- Rename this key as Edge and double-click on it.
- Now right-click anywhere in the right pane and select the New > DWORD (32-bit) Value option.
- Rename this newly created value as PrintingEnabled.
- Double-click on PrintingEnabled and under Value data, type 0.
- Once done, restart your PC to save the changes.
Following the steps mentioned above will disable printing in Microsoft Edge without any issues.
This brings us to the end of our guide on disabling printing in Microsoft Edge. We tried walking you through all the steps in detail and hope that one of the methods mentioned above did the trick for you. In case you still have any confusion about the methods, please let us know in the comment section below!
If this guide helped you, please share it. 🙂
