

Wondering how to disable ‘Show more options’ from the right-click menu in Windows 11?
As part of the new user interface in Windows 11, a new right-click functionality replaces the previous one, which seems to have divided many users. Despite the new minimalist approach, many people prefer the old right-click context menu with all options in one place.
With Windows 11, the Context menu offers you additional actions that can be taken with the selected item. You might, however, want to disable the feature if it becomes stuffed or overloaded by unwanted entries.
In case you’re in the same boat and looking to get the old right-click context menu on Windows 11, this guide contains several easy methods of doing so.
Let’s get right into it!
1. Revert to the File Explorer Old Look.
If you are missing the functions and look of Windows 10 File Explorer, then you can revert your current File Explorer version to its old look. However, keep in mind that it will change your File Explorer entirely, not just the context menu.
Here is what you need to do:
- Press Windows + E keys simultaneously to open File Explorer.
- Select the More button (three dots) from the ribbon menu and click on Options from the list of options available.
- Go to the View tab and under Advanced settings, checkmark the box associated with Launch folder options in a separate process.
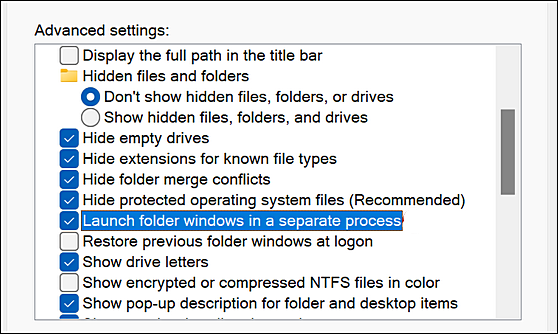
- Click on Apply to save the changes.
As simple as that!
2. Modify Windows Registry.
If your PC is used by several users and you want to change the said feature for all of them as an administrator, this is your way to go.
The Windows Registry stores the low-level settings used by Windows applications. It allows programs to access system resources and lets you store your customized operating system settings. Windows Registry stores information about Windows programs and processes as Registry keys. By modifying these keys, you can customize the system.
Here is how you can modify Windows Registry:
- Press Windows + R keys simultaneously to open a Run dialogue box.
- Inside the text field of the dialogue box, type regedit and hit Enter to open Windows Registry.
- Once you are inside the Registry Editor, navigate to the location mentioned below.
HKEY_LOCAL_MACHINE\SOFTWARE\Microsoft\Windows\CurrentVersion\Shell\Update\Packages
- Now right-click anywhere in the right pane and select the New > Dword (32-Bit) Value option.
- Rename this newly created value as UndockingDisabled.
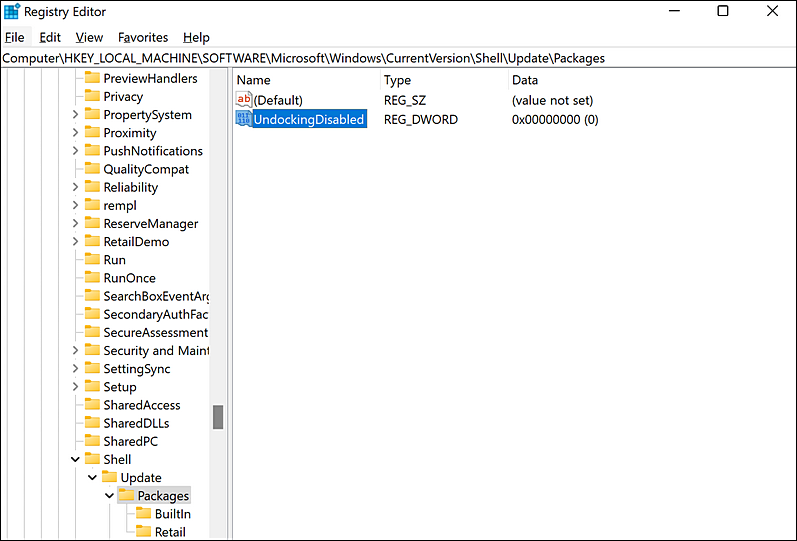
- Double-click on UndockingDisabled and under Value data type 1.
- Hit Enter to save the changes and restart your PC.
This should make the desired changes.
3. Try Using CleanMyPC.
There might be a corrupt file on your computer that prevents certain features from working, so the steps outlined here might not work. There is no need to worry in this scenario as the fix is simple.
An effective PC cleaner will identify issues on your computer, identify how to fix them, and then automatically fix them. The best part is that CleanMyPC can accomplish all this without any user input!

You’ll find a variety of tools for maintaining your system with this program. As well as solving the problem at hand, these tools can also fix other related problems, such as slow boot times and slow performance.
The only thing you need to do is download CleanMyPC and run a scan. It will take care of the rest!
4. Use Command Prompt.
If you find using Windows Registry complicated, then try disabling ‘Show more options’ using Command Prompt.
Here is how you can do that:
- Type cmd in the search area of your taskbar and select Run as administrator to launch Command Prompt with administrative privileges.
- Now type the command mentioned below in the Command Prompt window and hit Enter to execute it.
reg add HKCU\Software\Classes\CLSID\{86ca1aa0-34aa-4e8b-a509-50c905bae2a2}\InprocServer32 /ve /d "" /f
- Once the command is executed, restart your computer.
This brings us to the end of our guide on ways to disable ‘Show more options’ from the right-click menu in Windows 11. We tried walking you through all the steps in detail and hope that one of the methods mentioned in this post did the trick for you. In case you still have any confusion about the steps, please let us know in the comment section below!
If this guide helped you, please share it. 🙂
