

Trying to figure out how to fix: DISM error 1009 in Windows 10 [Initialization error] to repair your installation?
Deployment Image Servicing and Management (DISM) is a command-line tool that prepares Windows Recovery Environment, diagnoses various problems in the system, and facilitates Window Installation in your PC.
![Fix: DISM error 1009 in Windows 10 [Initialization error]](https://www.saintlad.com/wp-content/uploads/2020/12/Registry-database-is-corrupt.jpg)
The DISM in Windows 10 supports several new features, and it is common to run into the DISM error 1009 while trying to repair Windows images. If you want to run troubleshoots on your PC but haven’t been able to do so because of this error, you’re in the right place.
This guide will walk you through the process of fixing the DISM error 1009 in Windows 10 [initialization error] in a few simple steps.
Let’s get straight into it.
- 1. Remove Windows Update
- 2. Registry Restore from Backup
- 3. Restore Windows to a Previous Working Version
- 4. Perform an in-place Upgrade
- 5. Reset Windows 10
1. Remove Windows Update
It is common to experience the DISM error 1009 after an unsuccessful installation of Windows Update. The best way to resolve this issue to remove the Windows update.
For this, follow the steps mentioned below:
- Start the PC using the installation media.
- On the boot screen, press Shift + F10 simultaneously to open Command Prompt.
- After the Command Prompt opens, type the command mentioned below:
wmic logicaldisk get name
![Fix: DISM error 1009 in Windows 10 [Initialization error]](https://www.saintlad.com/wp-content/uploads/2020/12/Screenshot-274.png)
- Press Enter to run the command successfully.
- Now to locate the drive containing the Windows folder, type “dir C:”. If this drive does not contain your Windows folder, replace “C” with the alphabet you named your drive with. For instance, it can be D: or E: etc.
- Once you find the drive, type the alphabet in the Command Prompt and press Enter.
- Now type the command mentioned below to create a scratch folder in your drive.
mkdir C:\Scratch
![Fix: DISM error 1009 in Windows 10 [Initialization error]](https://www.saintlad.com/wp-content/uploads/2020/12/remove-windows-update.png)
- After creating a scratch folder, type the command mentioned below to undo the recently installed updates. Make sure to replace “C” with your drive name.
DISM /Image:C:\ /ScratchDir:C:\Scratch /Cleanup-Image /RevertPendingActions
- After the operation is completed, you will receive a confirmation message. You can now close the command prompt and restart your PC.
Your PC should work fine now. If the problem persists, follow the steps mentioned below.
PC Attempts to Reinstall Updates
If your PC attempts to reinstall upgrades after following the method mentioned above, follow the following steps.
- Boot PC using installation media and launch the command prompt again.
- Run the command
del C:\Windows\SoftwareDistributionafter replacing “C” with your drive name.
![Fix: DISM error 1009 in Windows 10 [Initialization error]](https://www.saintlad.com/wp-content/uploads/2020/12/Screenshot-276.png)
- Now, run the commands mentioned below.
del C:\Windows\WinSxS\cleanup.xml
del C:\Windows\WinSxS\pending.xml
- Press Enter to run all the commands and once done, restart your PC.
- If the problem persists, boot your PC again and open Command Prompt.
- Now run the commands mentioned below after replacing “C” with your drive name.
chkdsk /f C:
sfc /scannow /offbootdir=C:\ /offwindir=C:\windows
dism /image:C:\ /cleanup-image /restorehealth
![Fix: DISM error 1009 in Windows 10 [Initialization error]](https://www.saintlad.com/wp-content/uploads/2020/12/dism-restorehealth.jpg)
- Press Enter to run the commands and once done, restart your PC.
Hopefully, this would solve the “DISM Error 1009 The configuration registry database is corrupt” on your PC. If it did not, follow the next step.
2. Registry Restore from Backup
You can also fix the DISM error using the RegBack folder. This method will help you solve the error by restoring the Windows registry.
Follow the steps mentioned below to fix the error:
- Use installation media to boot your Windows.
- Open Command Prompt by pressing Shift + F10 simultaneously.
- Type the command mentioned below in the command prompt to find the Windows folder in your drive.
wmic logicaldisk get name
- After running the command mentioned above successfully, run the commands mentioned below one by one.
cd \windows\system32\config
md Backup
copy *.* Backup
![Fix: DISM error 1009 in Windows 10 [Initialization error]](https://www.saintlad.com/wp-content/uploads/2020/12/restore-windows-registry.jpg)
- Now run the command “
cd RegBack” in the command prompt to open the RegBack folder. - Search for the files containing zero bytes (0) as they might be corrupted. If you find these files, you will have to restore the Windows.
- If you do not find any files having zero bytes (0), type the command “
copy *.* ..” in the command prompt.
![Fix: DISM error 1009 in Windows 10 [Initialization error]](https://www.saintlad.com/wp-content/uploads/2020/12/restore-windows-registry-1.jpg)
- Doing so will copy the registry files to the Windows folder. You can type “A” to overwrite the files in the destination.
- Once all the registry files have been copied, exit the command prompt by typing “Exit”.
- Lastly, reboot your PC and try running the program again. Hopefully, this method will solve the error.
- If the problem persists, boot PC and open command prompt again.
- Type the commands mentioned below, one by one:
chkdsk /f C:
sfc /scannow /offbootdir=C:\ /offwindir=C:\windows
dism /image:C:\ /cleanup-image /restorehealth
- Now restart your PC and try using the program again.
Doing so shall solve the DISM error in no time.
3. Restore Windows to a Previous Working Version
This method is for anyone who noticed zero byte (0) files, as mentioned in the second method. These files can be corrupted, and the only way to solve the issue is restoring the Windows.
To restore Windows to a previous working version, follow the steps mentioned below:
- Boot your system using the installation media.
- Click on Repair Your Computer and then select Troubleshoot.
- Now select Advanced Options and click on System Restore or Go back to a previous build.
- Add your operating system in the next screen to open System Restore Wizard.
- Follow the instructions available on-screen and click Next to restore your Windows to a previous working state.
- After the process is finished, restart your PC.
This will repair Windows and doing so will solve the “DISM Error 1009 The configuration registry database is corrupt” in your PC.
4. Perform an in-place Upgrade
An in-place upgrade overwrites the operating system files without removing the older version first. To perform an in-place upgrade in your PC, follow the steps mentioned below:
- Download Media Creation Tool.
- After successful installation, open the app and click on Upgrade this PC now.
- Follow the instructions on the screen.
- In the “Ready to Install” window, select the items you want to keep in your PC after installation.
- Click Next and follow the instructions visible on the screen to start Windows installation.
Once the Windows installation is complete, you will no longer see the “DISM Error 1009 The configuration registry database is corrupt” on your PC again.
5. Reset Windows 10
If none of the methods mentioned above work, you will have to reset your Windows 10 to get rid of the DISM error.
For this, follow the steps mentioned below:
- Open the Settings app and click on Update & security.
- Select Recovery on the left panel.
- Click on Get Started to start the process.
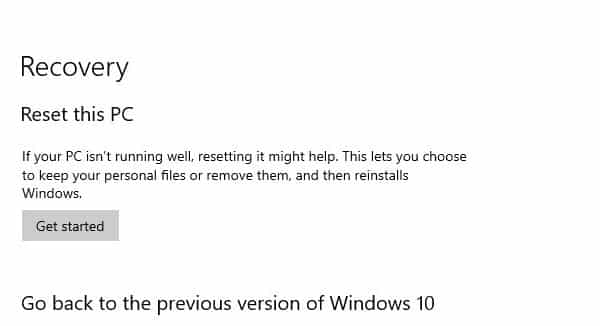
- This will open a new window where you can select if you want to keep the files or remove them. Select Keep my files if you do not want to lose your data.
- Now follow the instructions on the screen to reset Windows.
- If doing so did not solve your problem, follow the first three steps again and select Remove everything before you begin to reset Windows.
Hopefully, this method will solve your issue once and for all.
This brings us to the end of the guide. We hope our guide on “Fix: DISM error 1009 in Windows 10 [Initialization error]” was helpful. Moreover, if you are facing ‘DISM source files could not be found’ error, don’t forget to check our detailed guide. If you still have any confusion, feel free to drop them in the comment section below. We will try to help as much as we can!
If this guide helped you, please share it. 
