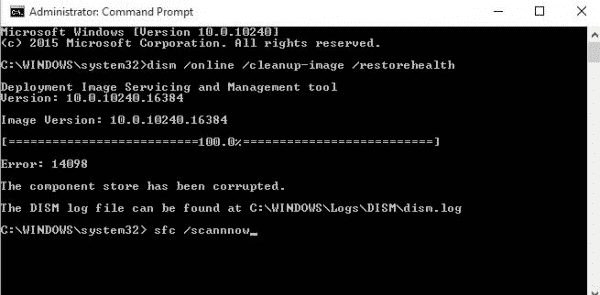
Wondering how to fix DISM error 14098 “Component Store has been corrupted” on your PC?
Windows Component Store supports the functions and programs that are required for installation, customization, and updating Windows in your PC. It was first introduced in Windows XP, and the latest version of Windows Component Store is way more efficient in terms of functionality.
If you have ever scanned the Local Disk (C:) on your PC, you might have seen a folder named WinSxS. This folder contains the Component Store files that help Windows install programs and updates regularly.
Unfortunately, there are times when the Component Store fails to respond. Corrupt Windows Update Components mainly cause this. These components stop DISM from working and, as a result, users experience DISM error 14098 when trying to execute commands.
If you have been facing the DISM error 14098, you’re in the right place. We have compiled a list of simple solutions that can fix this error in no time.
Let’s get started.
- 1. Run Start Component Cleanup Command.
- 2. Reset Windows Update Components.
- 3. Run Restore Health Command in a Clean Boot State.
- 4. Whitelist the “dism.exe” in Your Antivirus Program.
- 5. Uninstall Recently Installed Updates.
1. Run Start Component Cleanup Command.
The Start Component Cleanup command cleans up the components of a system that are not in use, automatically. The primary function of this command is to ensure that your system is free of any corruption errors.
To fix DISM error 14098 “Component Store has been corrupted” using the Cleanup command, follow the steps mentioned below:
- Press Windows + X keys simultaneously to run Command Prompt as an administrator.
- Type the command mentioned below and hit Enter to execute it.
Dism.exe /online /Cleanup-Image /StartComponentCleanup
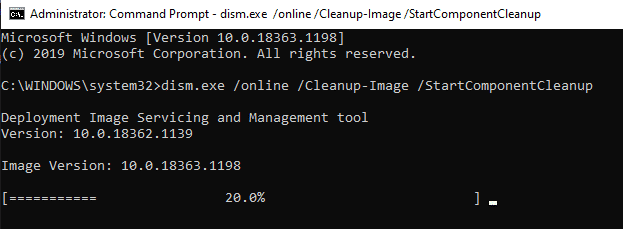
- Once the process is complete, restart your PC.
Doing so will help your system get rid of all the corruption errors within the system and you will be able to execute all commands successfully.
2. Reset the Windows Update Components.
Windows Update is one of the most essential components of Microsoft Windows. It manages the updates within the system, and a corrupt Windows Update can cause errors.
If you have been facing the DISM error 14098, a corrupt Windows Update component might be the reason behind it. In this case, you can try restarting the components to solve the error.
To restart Windows Update Components, follow the steps mentioned below:
Run Command Prompt
First, you need to open Command Prompt and execute the commands mentioned below.
To do so, follow the steps mentioned below:
- Press Windows + X keys simultaneously to run Command Prompt as an administrator. Ypu can also type cmd in the search bar and click on Run as administrator to open elevated Command Prompt.
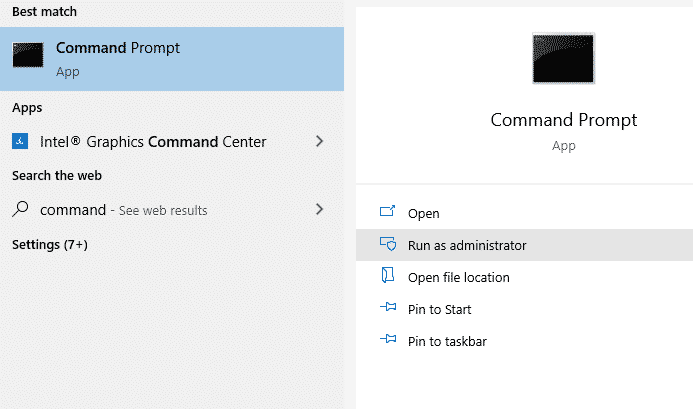
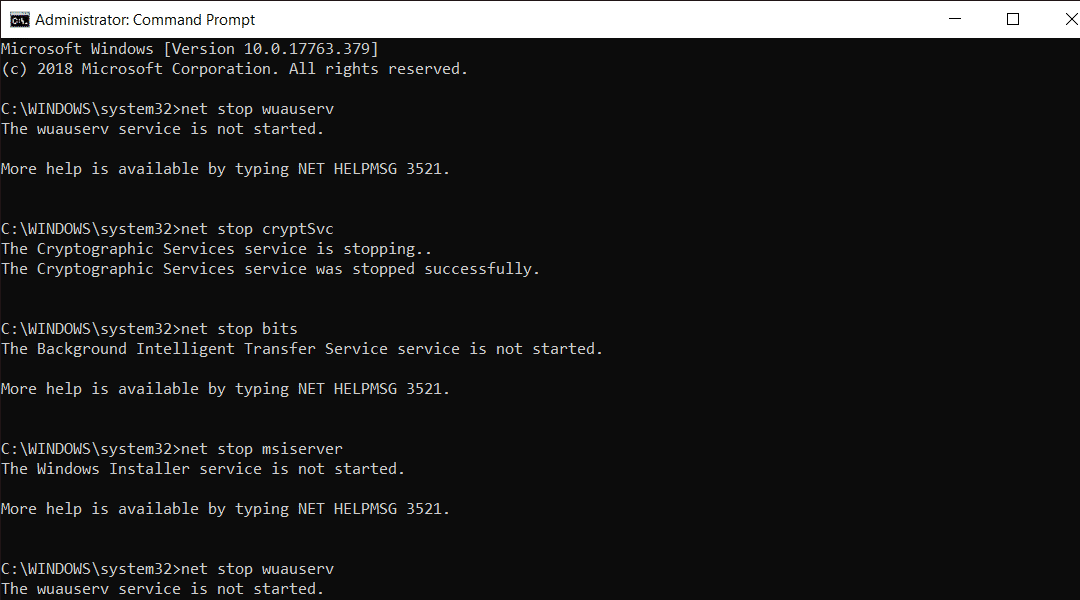
- Type the commands mentioned below and press Enter after each command to execute it.
net stop bits
net stop wuauserv
net stop appidsvc
net stop cryptsvc
- Now, you need to delete the qmgr*.dat files. To do this, open Command Prompt as an administrator again and type the command mentioned below.
Del “%ALLUSERSPROFILE%\Application
Data\Microsoft\Network\Downloader\qmgr*.dat”
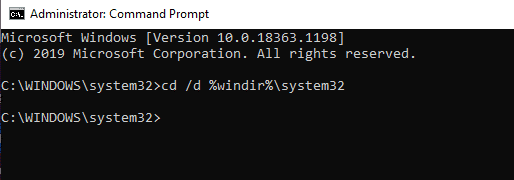
- Next, type the command mentioned below.
cd /d %windir%\system32
Once the process is complete, move down to the next step.
Re-register the BITS Files and the Windows Update Files
Once the command is executed, you need to re-register the BITS files and the Windows Update files. To do this, follow the steps mentioned below:
- Type the commands mentioned below and hit Enter after each command to execute it.
regsvr32.exe atl.dll
regsvr32.exe urlmon.dll
regsvr32.exe mshtml.dll
regsvr32.exe shdocvw.dll
regsvr32.exe browseui.dll
regsvr32.exe jscript.dll
regsvr32.exe vbscript.dll
regsvr32.exe scrrun.dll
regsvr32.exe msxml.dll
regsvr32.exe msxml3.dll
regsvr32.exe msxml6.dll
regsvr32.exe actxprxy.dll
regsvr32.exe softpub.dll
regsvr32.exe wintrust.dll
regsvr32.exe dssenh.dll
regsvr32.exe rsaenh.dll
regsvr32.exe gpkcsp.dll
regsvr32.exe sccbase.dll
regsvr32.exe slbcsp.dll
regsvr32.exe cryptdlg.dll
regsvr32.exe oleaut32.dll
regsvr32.exe ole32.dll
regsvr32.exe shell32.dll
regsvr32.exe initpki.dll
regsvr32.exe wuapi.dll
regsvr32.exe wuaueng.dll
regsvr32.exe wuaueng1.dll
regsvr32.exe wucltui.dll
regsvr32.exe wups.dll
regsvr32.exe wups2.dll
regsvr32.exe wuweb.dll
regsvr32.exe qmgr.dll
regsvr32.exe qmgrprxy.dll
regsvr32.exe wucltux.dll
regsvr32.exe muweb.dll
regsvr32.exe wuwebv.dll
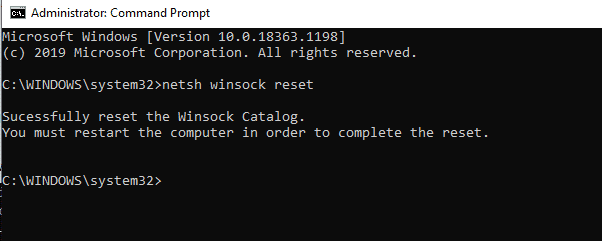
- Next, type the command mentioned below to reset Winsock.
netsh winsock reset
- Once Winsock is reset, you need to reset BITS service and the Windows Update service to the default security descriptor. For this, type the commands mentioned below.
sc.exe sdset bits D:(A;;CCLCSWRPWPDTLOCRRC;;;SY)(A;;CCDCLCSWRPWPDTLOCRSDRCWDWO;;;BA)(A;;CCLCSWLOCRRC;;;AU)(A;;CCLCSWRPWPDTLOCRRC;;;PU)
sc.exe sdset wuauserv D:(A;;CCLCSWRPWPDTLOCRRC;;;SY)(A;;CCDCLCSWRPWPDTLOCRSDRCWDWO;;;BA)(A;;CCLCSWLOCRRC;;;AU)(A;;CCLCSWRPWPDTLOCRRC;;;PU)
- Next, start the Windows Update service again and type the commands mentioned below.
net start bits
net start wuauserv
net start appidsvc
net start cryptsvc

- Finally, install the latest Windows Update Agent and restart your PC.
Hopefully, you will be able to solve the DISM Error 14098 by restarting the Windows Update Components. If the problem persists, see the next method below.
3. Run Restore Health Command in a Clean Boot State.
A Clean Boot State is used to identify and troubleshoot the issues within the Windows. In a Clean Boot State, Windows is started with minimum programs and drivers. This allows the users to identify if a background program is causing the errors easily.
To diagnose and troubleshoot errors using the Clean Boot State, follow the steps mentioned below:
- First, you need to restart your PC in a Clean Boot State. For this, type msconfig in the search bar to open the System Configuration utility.
- Go to the General tab and select the Selective Startup option.
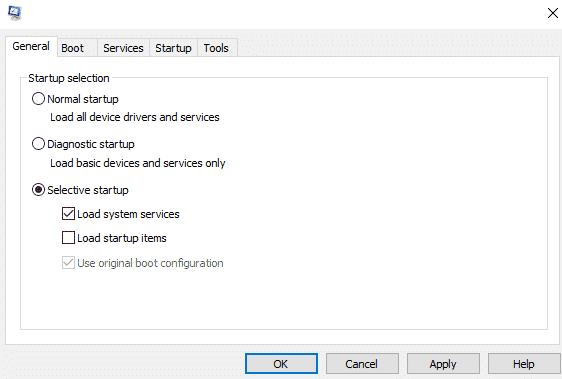
- Uncheck the “Load Startup items”.
- Checkmark the “Load System Services” and the “Use Original boot configuration” as well.
- Now, go to the Services tab and check mark the “Hide All Microsoft Services” check box.
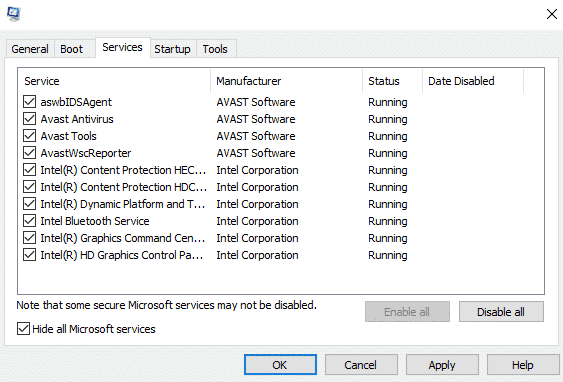
- Click on Disable all and select Apply to confirm the changes.
- You can now restart your PC. This time, the PC will restart in the Clean Boot State.
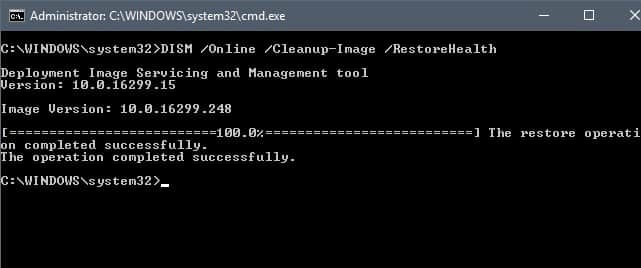
- Now run Command Prompt as an administrator and type the command mentioned below.
Dism /Online /Cleanup-Image /RestoreHealth
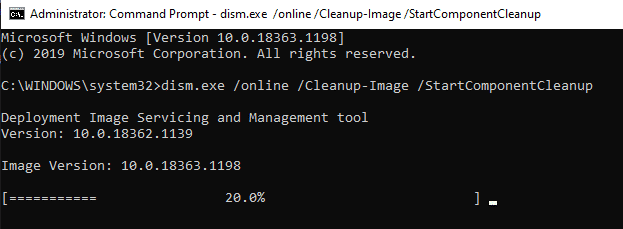
- If the command mentioned above fails to execute, type the command mentioned below.
Dism /Online /Cleanup-Image /StartComponentCleanup
- Lastly, restart your PC and see if the issue is resolved.
Running the /RestoreHealth command in a Clean Boot State will most likely solve the system’s corruption errors. The steps mentioned above are safe to follow as the Clean Boot State does not damage the computer’s files and personal data.
4. Whitelist the “dism.exe” in Your Antivirus Program.
Antivirus programs protect systems from getting attacked, but unfortunately, these programs are incredibly invasive themselves. Antivirus interference is common and it stops the system from performing certain actions. This can be the reason you are facing the DISM error 14098.
To fix this issue, you need to whitelist the “dism.exe” in your antivirus program. Follow the steps mentioned below to whitelist “dism.exe” successfully:
- Type Windows Security in the search bar and select Virus & threat protection.
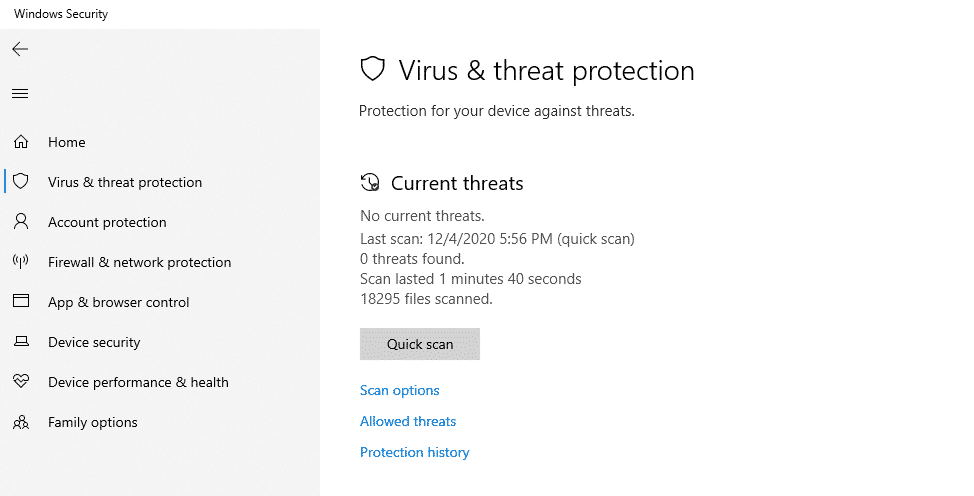
- In the “Virus & threat protection” window, click on Manage settings.
- Scroll to the bottom and select Exclusions to add or remove exclusions.
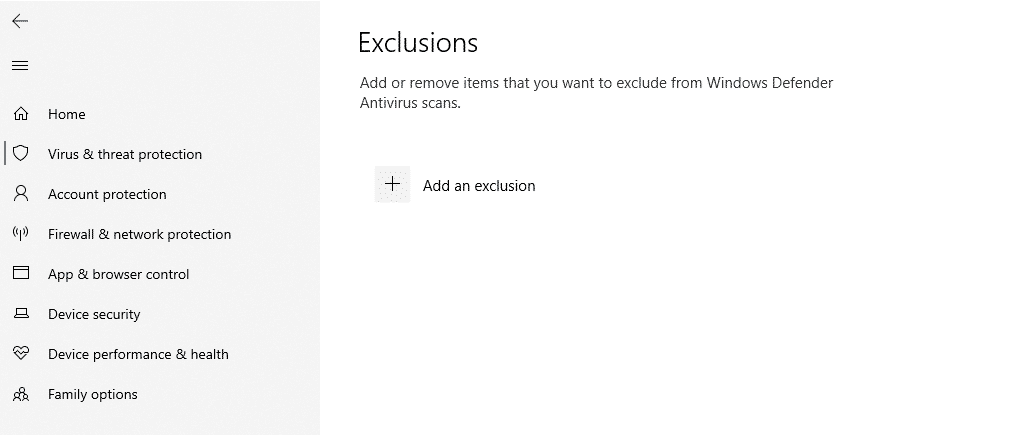
- Click on Add an exclusion and type dism.exe as the process you want to exclude.
- Now try rerunning the commands to see if this solved your issue.
If the antivirus software was causing the DISM error, following the steps mentioned above will solve it. If you have installed a third-party security tool on your PC, follow the same steps mentioned above to get rid of the error.
5. Uninstall Recently Installed Updates.
Some Windows updates can affect the internal mechanism of the Operating System. This prevents users from accessing several programs and executing specific commands.
If you have been facing the DISM error 14098 after installing updates on your PC, you should try uninstalling them.
To uninstall recently installed updates, follow the steps mentioned below:
- Go to Settings and click Windows Update on the left panel.
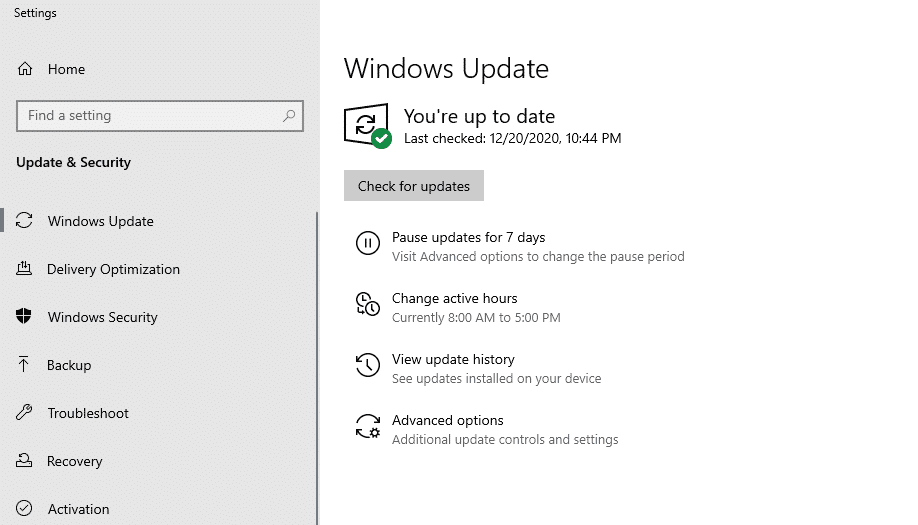
- Select the View update history option and click on the Uninstall Updates option.
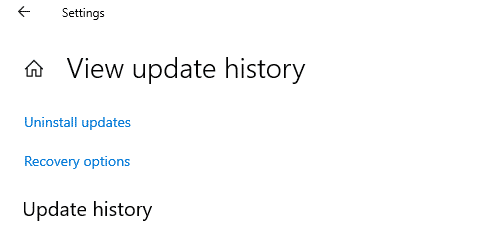
- Doing so will open a window containing a list of all the recent updates on your PC. Right-click on the update you want to uninstall and follow the on-screen instructions.
- After uninstalling the recently installed updates, try rerunning the command to see if the issue has been resolved.
It is essential to remember that Windows will try to reinstall it after a while once an update is uninstalled. In this case, you should pause your updates until you can successfully execute the command.
This brings us to the end of our guide on fixing DISM error 14098 “Component Store has been corrupted”. We hope our solutions helped you solve the error. We have also discussed the DISM error 50 on Windows 10 in our previous post. Don’t forget to give it a read if you have been facing the DISM error 50 on your PC. If you still have any confusion or queries, please let us know in the comment section below.
If this guide helped you, please share it.


