

Wondering how to enable or disable clock and date from taskbar in Windows 10?
Windows 10 displays your computer’s clock and the current date in the right corner of your taskbar by default. While the clock on the taskbar may make it easier to keep track of time, it eats up space that could be used by shortcuts and other items in the system tray.
Luckily, this feature is customizable, which means that you can enable/disable clock and date from the system notification area in Windows 10.
If you are looking for easy ways of doing so, you are in the right place because, in this guide, we will walk you through some easy methods of enabling and disabling the system’s clock and date.
Let’s get started!
1. Use Group Policy Editor.
The first way to enable/disable clock and date from the system notification area in Windows 10 is via Group Policy Editor.
Group Policy Editor is a Windows feature that is designed to help advanced users control the working environment of Windows better.
Information about Windows programs is stored in the form of group policies in the Group Policy Editor. Advanced users modify the relevant policies to make desired changes, which is exactly what we will do in this method.
Here is what you need to do:
- Press Windows + R keys on your keyboard simultaneously to open a Run dialogue box.
- Inside the text field of the dialogue box, type ‘gpedit.msc’ and hit Enter. This will launch Group Policy Editor.

- In the newly launched window, navigate to the location mentioned below.
User Configuration\Administrative Templates\Start Menu and Taskbar
- In the right pane, locate Remove Clock from the system notification area and double-click on it.
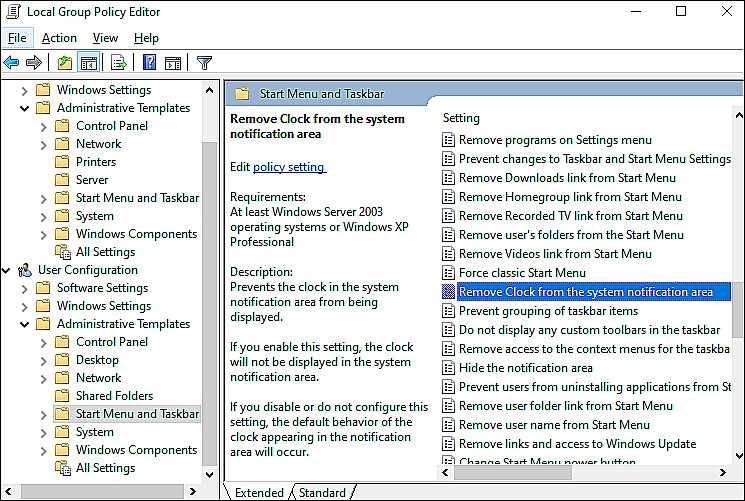
- Select Enabled and hit Apply to save the changes you just made. If you want the time and date to be displayed, select Disabled.
Following these steps should help you make the desired changes in no time.
2. Use Registry Editor.
If performing the desired task via Group Policy Editor did not work for you, try using the Registry Editor.
Windows Registry is a database of low-level settings for the Windows operating system. Like the Group Policy Editor, Windows Registry also allows users to customize their operating system’s operations. The information here is stored in the form of Registry keys.
Here is how you can use Windows Registry to enable or disable clock and date from taskbar in Windows 10:
- Press Windows + R keys on your keyboard simultaneously to open a Run dialogue box.
- Inside the text field of the dialogue box, type ‘regedit’ and hit Enter. This will open Registry Editor on Windows.

- Inside the Registry Editor window, navigate to the location mentioned below.
HKEY_CURRENT_USER\SOFTWARE\Microsoft\Windows\CurrentVersion\Policies\Explorer
- If you cannot locate the Explorer key, then right-click on the Policies key and select the New > Key option.
- Rename this newly created key as Explorer and double-click on it.
- Now right-click anywhere in the right pane.
- Choose the New > DWORD (32-bit) Value option and rename this value as HideClock.
- Double click on HideClock, and under Value data, type 1 to hide clock and date. To display it on the taskbar, type 0.
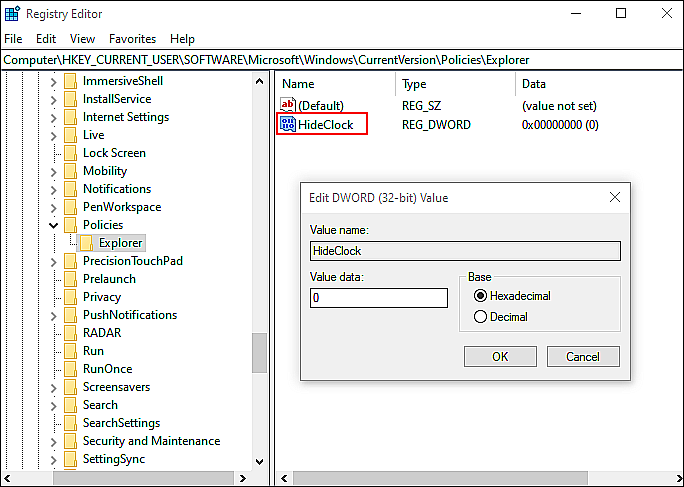
- Finally, click OK to save the changes.
Hopefully, this will enable/disable the clock and date from the system notification area in Windows 10 successfully.
3. Try Using CleanMyPC.
If neither of these methods works for you, then there is a chance that your system may be infected with a corruption error that is preventing you from executing certain operations.
The best way to proceed in this scenario would be to perform a deep PC cleaning first and then follow the steps in this guide. We recommend using a powerful PC cleaner to accomplish this task, as doing it yourself will take up a lot of time and resources.
If this is your first time using a PC cleaner, we recommend CleanMyPC.

CleanMyPC is a one-stop-shop solution for all your PC-related issues. With its multi-uninstaller, speed booster, and registry cleaner, you can quickly solve most PC problems and give your computer a performance boost.
If this looks like something your PC desperately needs, install CleanMyPC now and get your PC up and running like new!
4. Use Windows Settings.
Another easy method of performing the task under consideration is via Windows Settings directly.
However, all the standard users on your computer can use this method to enable/disable the clock and date feature. If multiple users use your PC and you do not want them to customize such features, perform the task using either the Group Policy Editor or Windows Registry as described above.
Here is how you can use Windows Settings to enable or disable the clock and date feature:
- Go to Windows Settings and click on Personalization.
- In the new window, select Taskbar from the left panel.
- Now in the right pane, click on the Turn system icon on or off hyperlink.
- Turn on/off the toggle option against Clock to enable/disable the feature.
That’s it!
You should be able to make the required changes by following these steps.
This brings us to the end of our article on enabling/disabling clock & date from taskbar in Windows 10. We hope that one of the methods mentioned in this guide did the trick for you. If you have questions regarding the methods discussed above, please let us know in the comment section below.
If this guide helped you, please share it. 🙂
