

Want to learn how to enable or disable mouse pointer trails on Windows 11?
Microsoft has always been about releasing features that help users of all kinds. From providing the settings to change the size of desktop icons to a feature that leaves a trail behind the mouse pointer’s path, you name it. The latter, although developed for LCD monitors with slow response time, is still available on modern LCD screens.
The objective, however, has slightly changed. Now it aims to assist users with visual impairments in seeing and tracking the movement of the mouse pointer. While some users may have difficulty finding the cursor, especially for a busy desktop background, others may consider it an annoying feature that diverts their focus.
Luckily, Microsoft allows you to both enable or disable the mouth pointer trails on Windows 11. If you’re unsure how to do it on your own, simply read this guide. We’ve covered all the different ways you can do it, so pick the one that seems more convenient for you.
So, let’s get started!
1. Enable or Disable Mouse Pointer Trails From the Settings App.
When wanting to change the features on your PC, the Windows Settings app is the first place you should consider looking. It provides organized tabs and sections, so searching for the desired settings becomes as easy as a piece of cake.
If you want to enable the mouse pointer trails, here’s what you need to do:
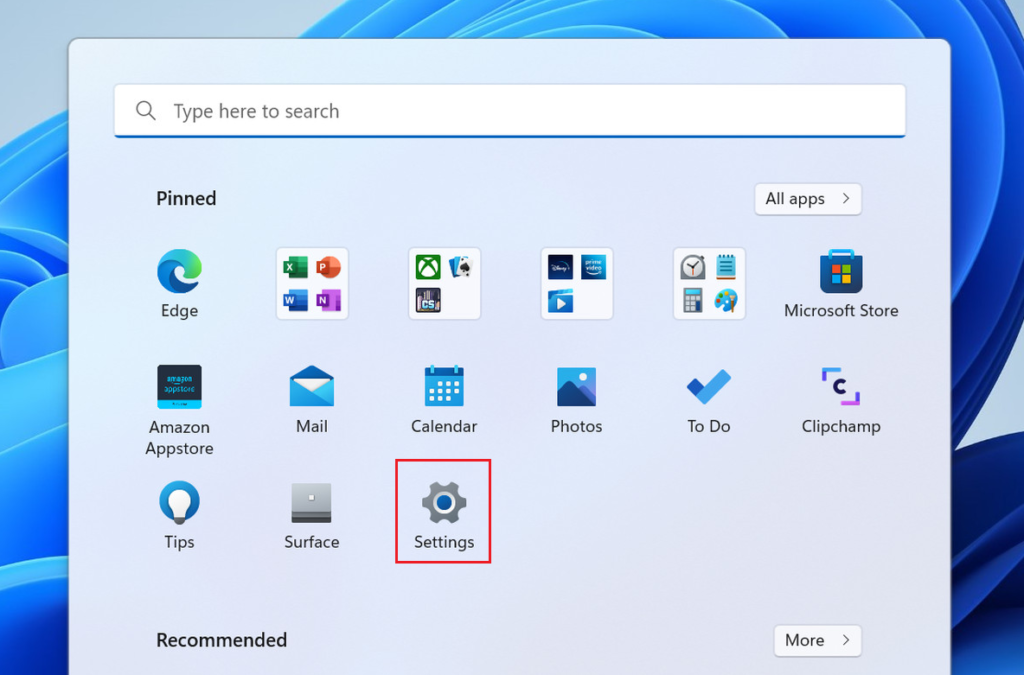
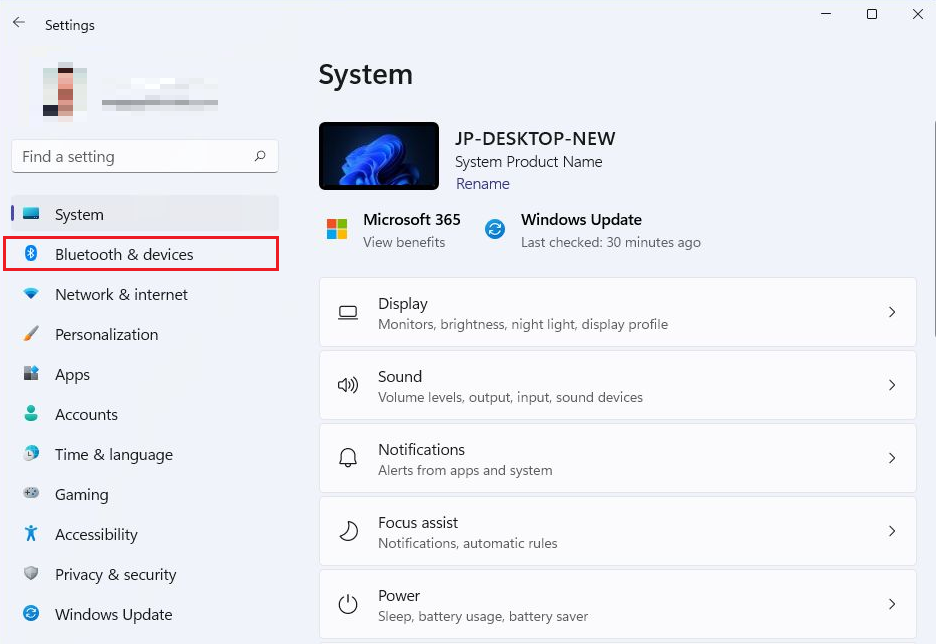
- First, launch the Settings app by pressing Windows + i.
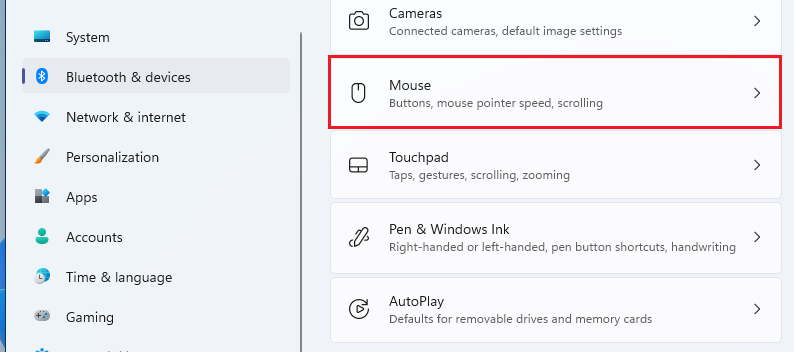
- After the Settings window opens, select the Bluetooth & Devices tab from the left pane.
- On the right side, scroll down until you locate the Mouse option and click on it.
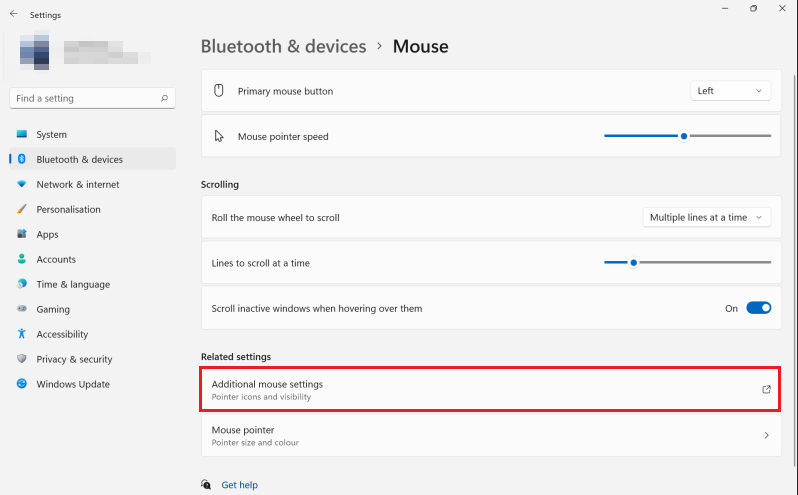
- Then, below the Related settings section, you will find the Additional mouse settings option. Click on it.
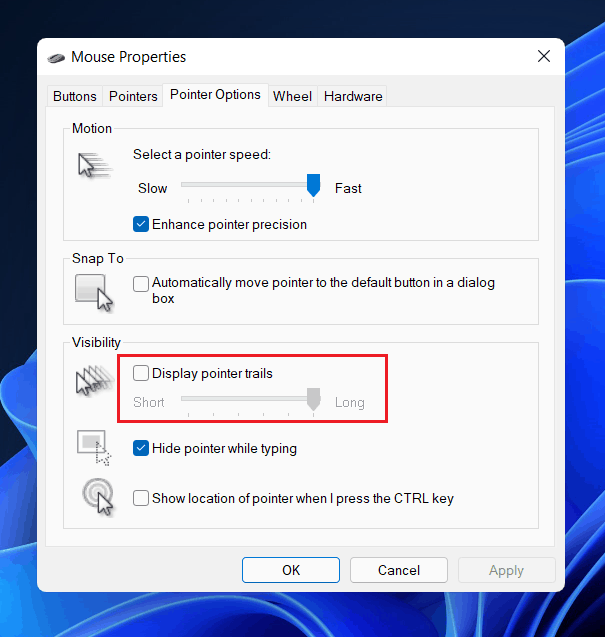
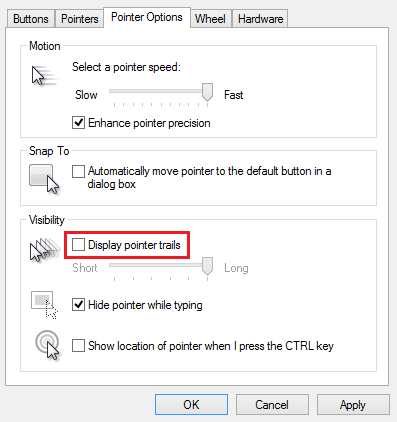
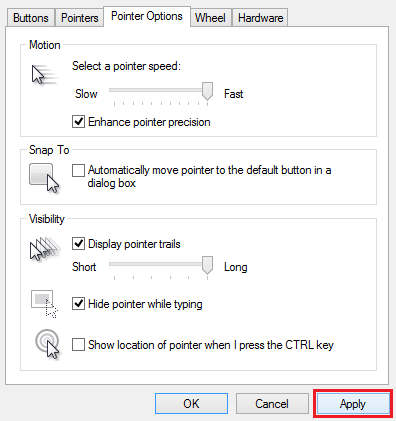
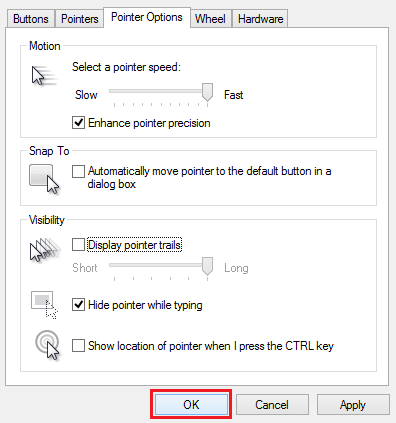
- A window will pop up with the term Mouse Properties written on the top. From there, go to the Pointer Options tab.
- Check the box Display Pointer trails. To change the length of the mouse pointer trail, use the slider below:
- Then, select Apply to confirm.
- Lastly, click on the OK option.
Now, you should be able to see the pointer trails. If not, consider waiting a few minutes or restarting your PC, as the settings may not have been successfully updated on the system.
If you want to disable the mouse pointer trails on Windows 11, follow these steps instead:
- Open the Settings app by either using the Windows key + i or from the Start menu.
- Once the Settings app launches, click on the Bluetooth & Devices tab from the left pane.
- On the right section of the screen, scroll down and select the Mouse option.
- Under the term Related Sections, click on Additional mouse settings.
- After that, the Mouse Properties window will appear. Select the Pointer Options tab on the top of the window.
- Uncheck the box next to Display Pointer trails.
- Once done, select the OK option to apply and save the changes.

2. Enable or Disable Mouse Pointer Trails From the Control Panel.
If, for some reason, you were unable to access the mouse pointer settings from Windows Settings, or you simply don’t prefer the app, don’t worry. You can also head over to the Control Panel to perform the task.
As difficult as it may appear to be, using the Control Panel to modify your computer’s settings is really simple. Not only is the user interface friendly, but accessing the mouse pointer settings requires just a few clicks.
Follow the steps below to enable the pointer trails on Windows 11:
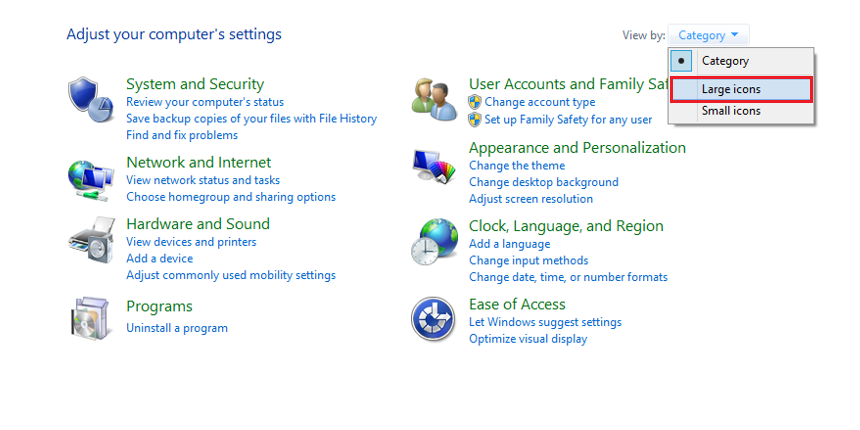
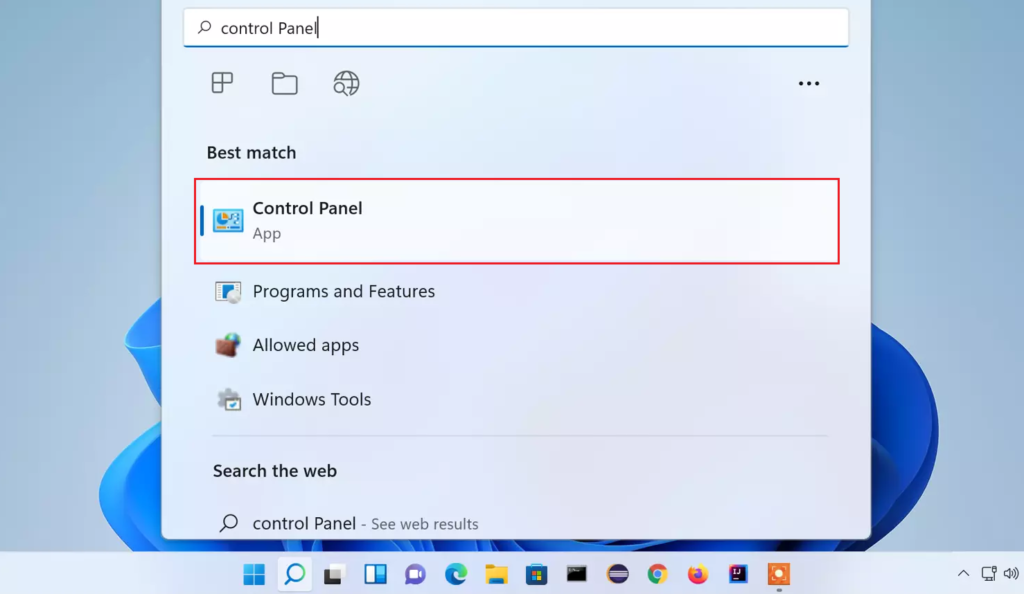
- Start by going to the Start menu.
- Then, in the search bar, type ‘control panel‘.
- From the following search results, select the title Control Panel.
- Once the Control Panel opens, click on View by: Category and select Large icons.
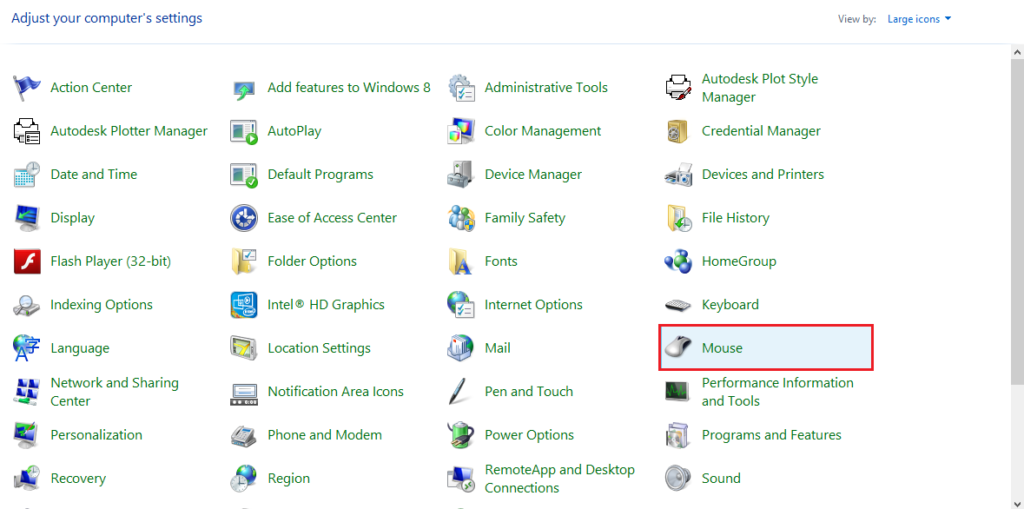
- Then, click on the Mouse option.
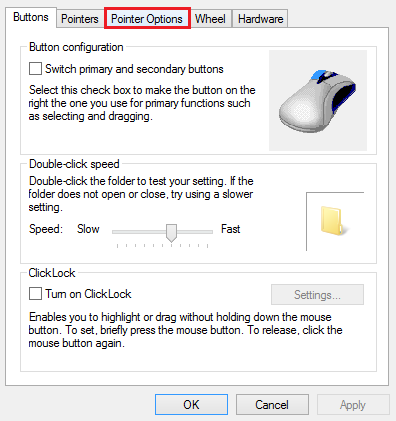
- A new window of Mouse Properties will pop up on your screen. Then, select the Pointer Options tab from the top of the window.
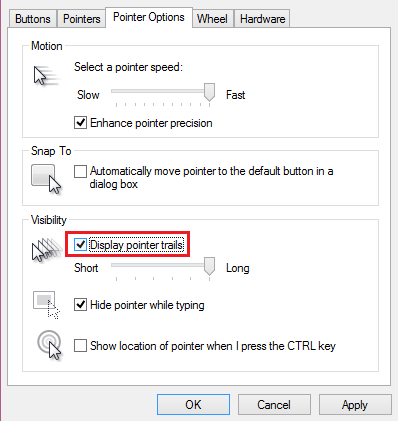
- Next, check the box Display Pointer trails. You will also have the option to adjust the length of the pointer trail according to your need through the slider situated under it.
- After that, click on Apply to confirm your action.
- Click OK to exit the window.
Now to disable the mouse pointer trails from the Control Panel, here’s what you need to do:
- Head over to the Start menu.
- In the search bar, type control panel.
- Then, select the Control Panel option from the search results.
- After the Control Panel opens, find the Mouse option and click on it.
- The Mouse Properties window will appear on your screen. From there, go to the Pointer Options tab.
- Then, uncheck the box Display Pointer trails to disable the function.
- Click on Apply to save the changes.
- Finally, select the OK option to exit the window.
3. Enable or Disable Mouse Pointer Trails From Registry Editor.
Apart from Windows Settings and Control Panel, the Windows Registry is also used to store low-level settings of your PC. You’ll need to access the Registry Editor to make changes to it.
You can also use it to enable or disable mouse pointer trails on Windows 11. While doing it, you must pay close attention to the steps, as any mistake can damage the entire system. We also recommend creating a Back Up of the Registry as a precautionary measure.
Below are the steps you need to follow:
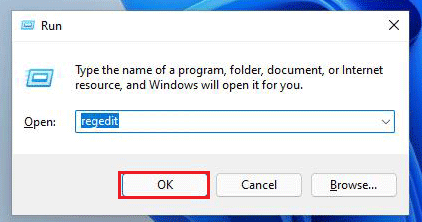
- First, press the Windows key + R from the keyboard.
- A box will appear on your screen. Type ‘regedit‘ in the provided text area and click on OK.
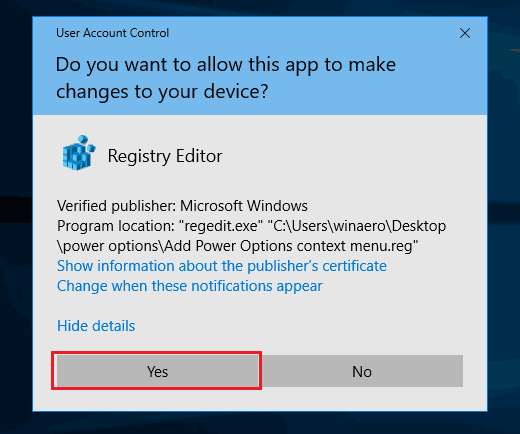
- After that, a User Account Control box will pop up. Click Yes for the Registry Editor to open up.
- When the prompt launches, navigate to the following path:
HEY_CURRENT_USER\Control Panel\ Mouse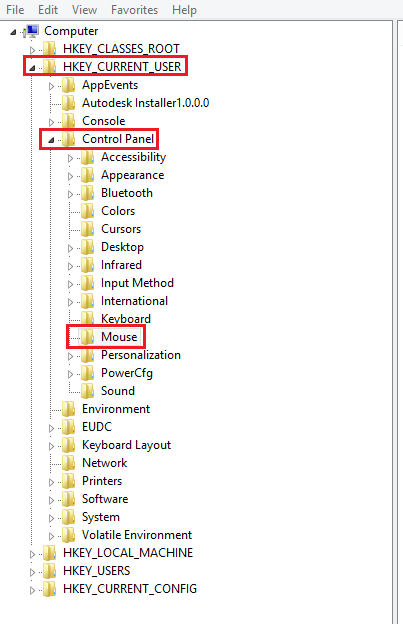
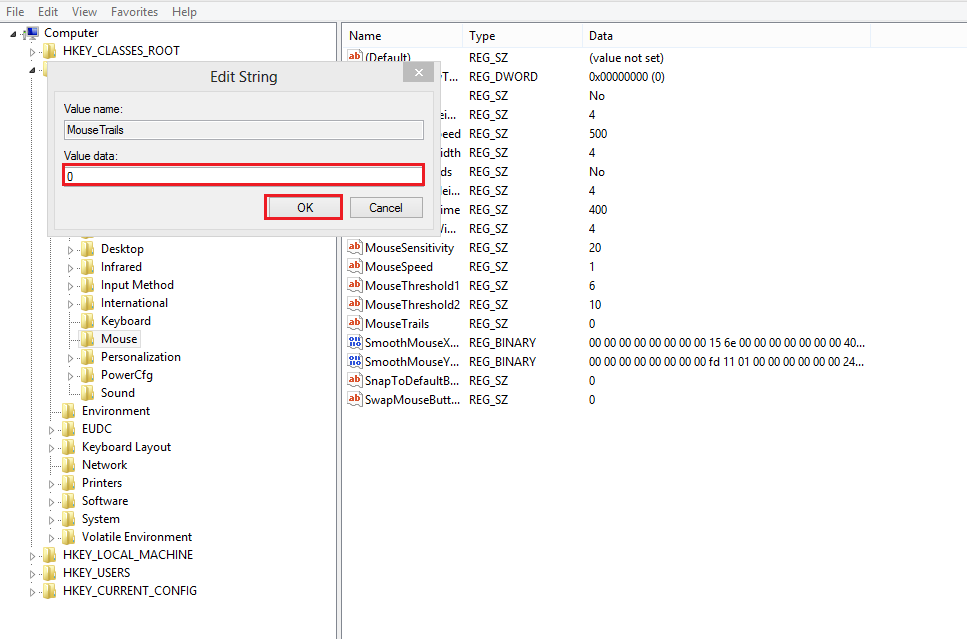
- On the right pane of the window, look for the MouseTrails value and double-click on it.
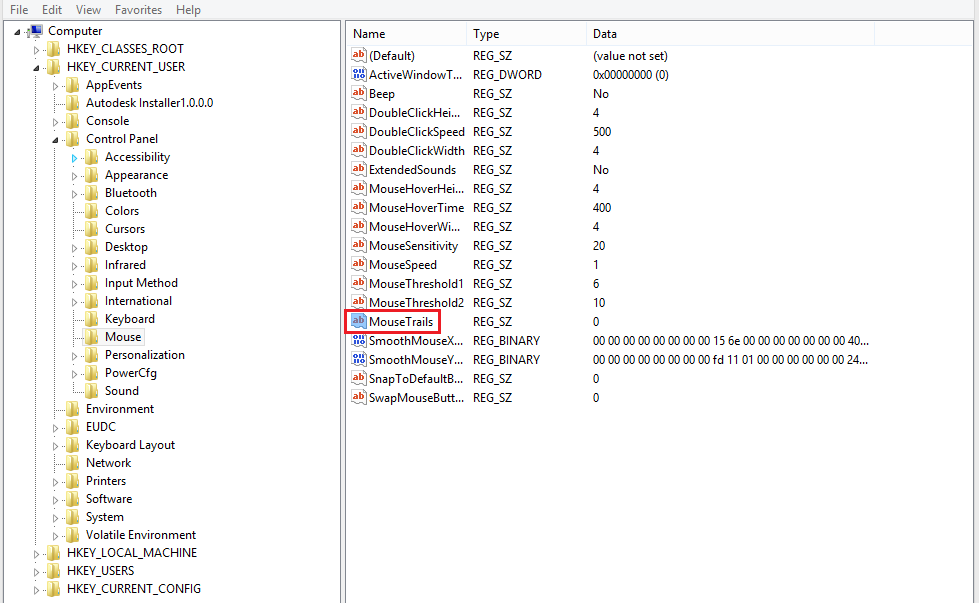
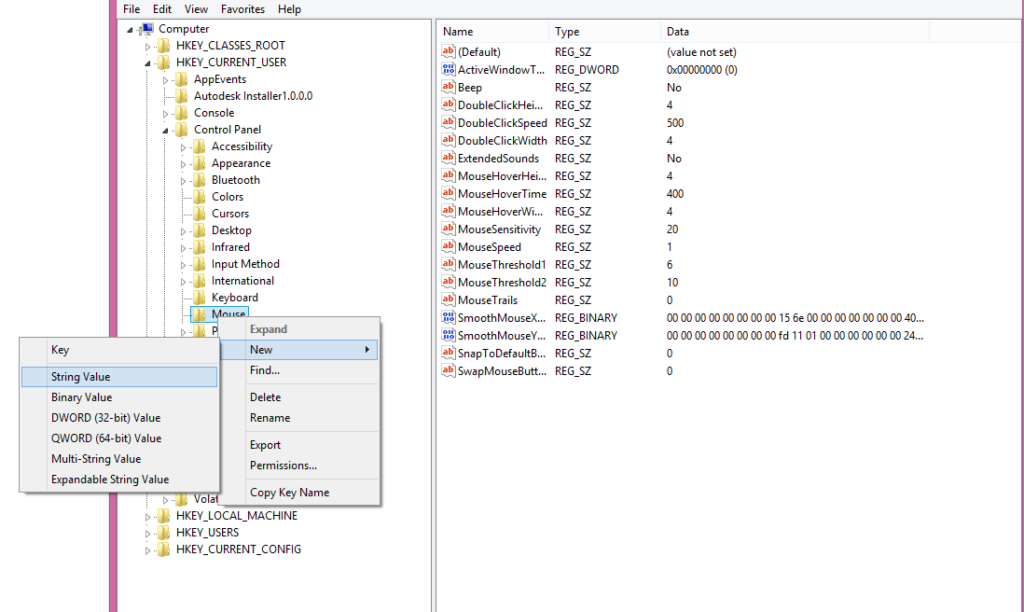
- If you cannot find the MouseTrails value, then Right-Click on the Mouse folder, go to New, and click on String Value. Name it ‘MouseTrails‘.
Depending on whether you want to enable or disable mouse pointer trails, perform the following steps.
To Enable:
- Type a number from 1 to 7 in the Value data field, 1 being the minimum length trails and 7 being the maximum length trails.

- Click the OK button to save the changes.
To Disable:
- Type the number ‘0‘ in the Value data space.
- Click OK.
- Once the changes have been made, you may exit the Registry Editor.
In case the changes are not applied, restart the computer.
That was it! You’ve made it to the end of our guide on how to enable or disable mouse printer trails on Windows 11. If you have more questions or tips for other readers, feel free to add a comment down below.
If this guide helped you, please share it. 😊
