Looking for easy ways to enable font providers in Windows 10?
Windows comes with over a hundred pre-installed fonts that allow you to customize how the text appears on your screen. Additionally, if you want to add more variety to expand your options, it also allows you to download custom fonts through Font Providers like Adobe and Microsoft typography team.
To download fonts from external sources, you must enable the Font Provider feature in Windows 10, and if you are reading this right now, there is a high chance you are looking for ways to do so.
We have listed some of the easiest methods you can follow to enable Font Providers in Windows 10. All the methods are simple and will not take much of your time.
Let’s get started.
1. Use the Group Policy Editor.
If you want to control the working environment of your operating system by customizing the operations as per your requirements, the Group Policy Editor is a tool you should know about.
Group Policy Editor is an administrative-level tool that allows the administrators to perform actions like blocking user’s access to the Control Panel, locking down computers, and much more.
If you want to enable Font Providers in Windows 10, try doing it via Group Policy Editor, as this setting is already available there. All you need to do is enable the setting.
Here is how you can do it:
- Open a Run dialogue box by pressing Windows + R keys simultaneously.
- Type ‘gpedit.msc’ in the text field of the dialogue box and hit Enter. Doing so will launch the Group Policy Editor window.

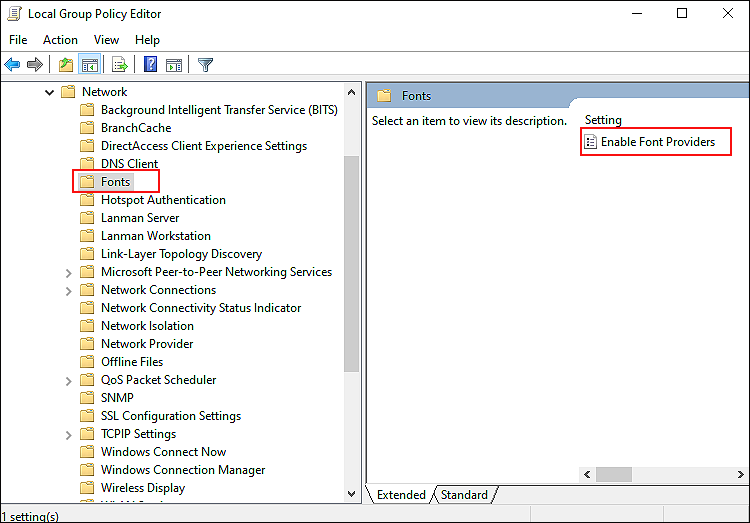
- Inside the window, navigate to the location mentioned below.
Computer Configuration\Administrative Templates\Network\Fonts

- In the right pane, locate Enable Font Providers and double-click on it.
- Choose Enabled and click on the Apply/OK button to save the changes.
That’s it. Doing so will enable Font Providers in Windows 10 successfully.
2. Try Using CleanMyPC.
If the methods mentioned in this guide are not working for you, then there is a chance that your system is infected with a corruption error that is preventing you from making changes within your operating system.
Since this is something Windows users have to frequently put up with, there is no need to panic. The easiest solution to this issue is to deep clean your PC using a reliable cleaning tool, and if you are looking for suggestions, we highly recommend using CleanMyPC.

Being a one-stop-shop for all your PC-related needs, CleanMyPC will not just clean the corrupt files but also help you improve your PC’s overall speed and performance. All that you need to do is install the tool and run a scan using it. CleanMyPC will identify the issues and attempt to fix them with little to no user input.
Install CleanMyPC now and give your PC a much-needed performance boost!
3. Use Windows Registry.
Like the Group Policy Editor, Windows Registry also allows the users to tweak Windows settings according to the requirements.
Windows Registry contains the information that the operating system frequently uses while performing tasks. This includes information about the apps installed, hardware drivers, user profiles, and much more.
If you find enabling Font Providers via the Group Policy Editor complicated, you can try it via Windows Registry.
Here is what you need to do:
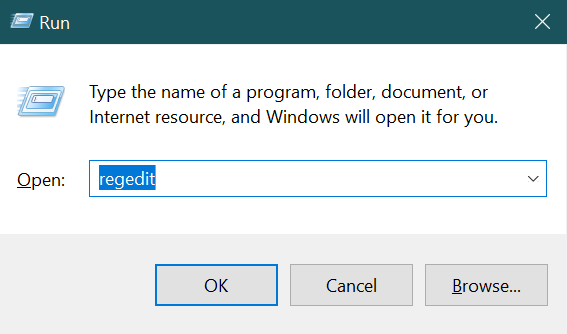
- Open a Run dialogue box by pressing Windows + R keys simultaneously.
- Type ‘regedit’ in the text field of the dialogue box and hit Enter. This will open the Windows Registry.

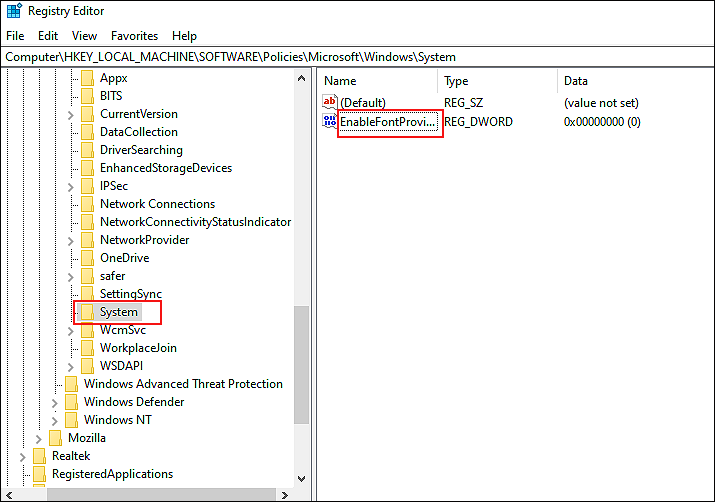
- Inside the Windows Registry, navigate to the location mentioned below.
HKEY_LOCAL_MACHINE\Software\Policies\Microsoft\Windows\System

- In the right pane, you need a new value. For this, right-click anywhere in the right pane and select the New > DWORD (32-bit Value).
- Name this newly created value as EnableFontProviders and double-click on it.
- Under Value data, type 1 and hit Enter.
As simple as that!
Hopefully, doing so will enable Font Providers on Windows 10. If you want to disable them in the future, simply follow the process above and under Value Data, type 0.
This wraps up our guide on ways to enable Font Providers in Windows 10. We hope that one of the methods mentioned in this guide did the trick for you. If you still have any questions, please let us know in the comment section below. We will try our best to assist you!
If this guide helped you, please share it. 🙂


