

Don’t know how to enable Hyper V on Windows 11?
Hyper V is the Windows hypervisor software through which you can create virtual machines from within the host OS. By doing so, you’re creating a virtual environment that acts like a regular computer but with virtual components, including RAM, disk space, connections, etc.
Virtual machines are very popular in business environments as you’re getting a safe, isolated environment to test new softwares, tools, services, and so on. You can also install an OS different from the one in the host machine in case you need a certain feature from a certain OS.
And with Hyper-V already incorporated in Windows 11, you won’t need to install any other third-party software like VirtualBox or VMware Workstation. If you don’t know how to enable the feature or you’re having trouble doing so, this guide is all you need. We’ll walk you through each step in detail, so follow through.
Now let’s begin!
1. Check for System Compatibility.
Before you jump to the various ways to enable Hyper V on your computer, make sure that your Windows OS supports the feature in the first place. Now we know that Windows releases its updates in multiple editions to cater to different purposes. Currently, Hyper V is only available in Windows 11 Pro, Education, and Enterprise.
Therefore, if your system runs on Windows 11 Home, you cannot utilize this amazing feature. However, there are several workarounds that you may find to get Hyper V on Windows 11 Home, though it may be a bit troublesome.
2. Prerequisites to Enable Hyper V on Windows 11.
Since Hyper V is officially available on Windows 11 Pro, Education, and Enterprise, we recommend you update your edition in case your computer runs on Windows 11 Home.
After that, ensure you have enough RAM space to take up the VM workloads without compromising your computer’s performance. Clear memory storage of around 4 GB to run several Virtual Machines on your computer.
Once that is settled, you need to ensure hardware compatibility as well. To enable Hyper V, you need a 64-bit CPU that supports SLAT (Second Level Address Translation) with Intel or AMD 64-bit processors embedded.
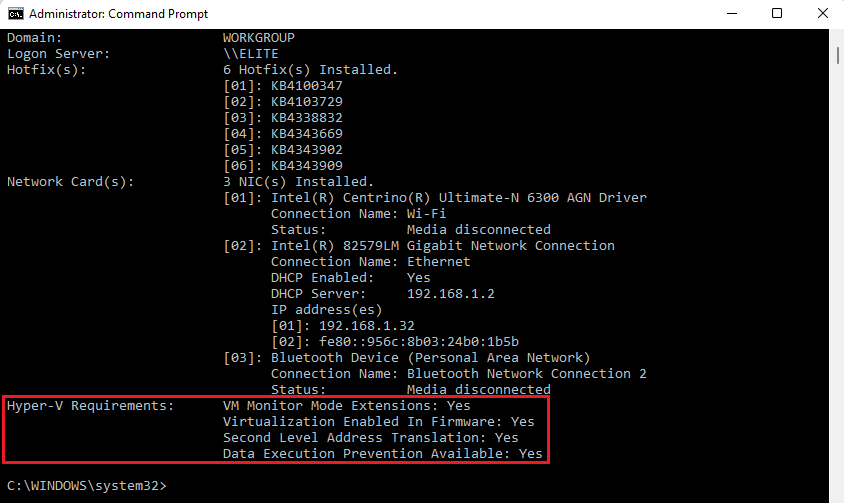
Here’s a quick way to ensure your system’s hardware compatibility:
- Launch the Command Prompt on your computer by right-clicking on the Start Menu and choosing Command Prompt from the list.
- When it opens, type systeminfo and hit the Enter key. Then check the Hyper V Requirements section. If all the listed items say Yes, you can go ahead and enable Hyper V. However, if any of the listed items say No, you need to go back and try to meet the requirements t run Hyper V on your system.
3. Enable Hardware Virtualization From BIOS Menu.
Since Hyper V depends on Hardware Virtualization, you need to enable the latter on your computer. If you skip these steps, the option to enable Hyper V will be grayed out. You can access Hardware Virtualization/ Virtual Technology from the BIOS menu.
Though it’s a necessary feature to create Virtual Machines on your computer, it is disabled by default.
Follow the steps below to enable it:
- Begin by shutting down your PC. To do so, go to the Start menu and click on Shut Down.
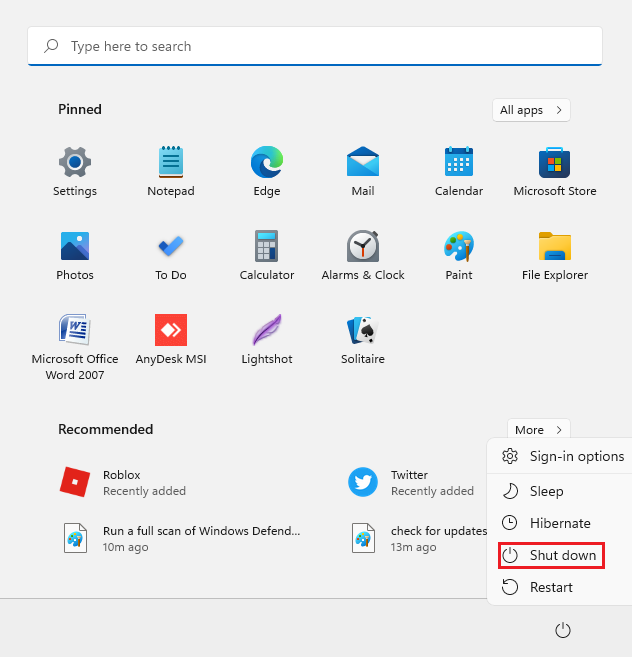
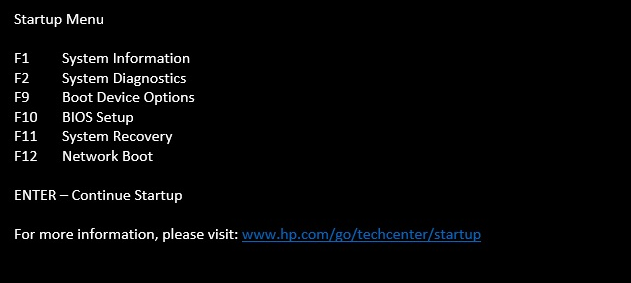
- Next, restart your computer by pressing the Power button. As it restarts, begin pressing the Esc key to access the Startup menu.
- Once in the Startup menu window, press the F10 key from your keyboard to get to the BIOS setup.
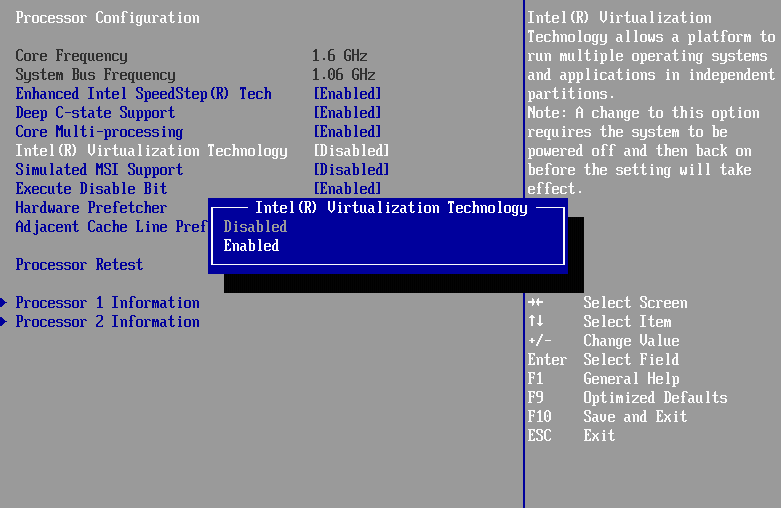
- Now, click on the Configuration tab from the top.
- Press the downward arrow key to go down to Virtualization Technology.
- Then, press the Enter key and choose Enabled.
- Now, save the changes you just made by pressing the F10 key, then click on Exit from the top.
- Finally, wait for your computer to restart.
4. Use the Control Panel to Enable Hyper V.
Once Hardware Virtualization is successfully enabled, you can enable Hyper V and start creating Virtual Machines for whatever reason. You can do this in several ways. One method includes using the Control Panel to access the Windows Features dialog.
Below are the steps you need to follow:
- Launch the Run command by pressing the Win + R keys from your keyboard.
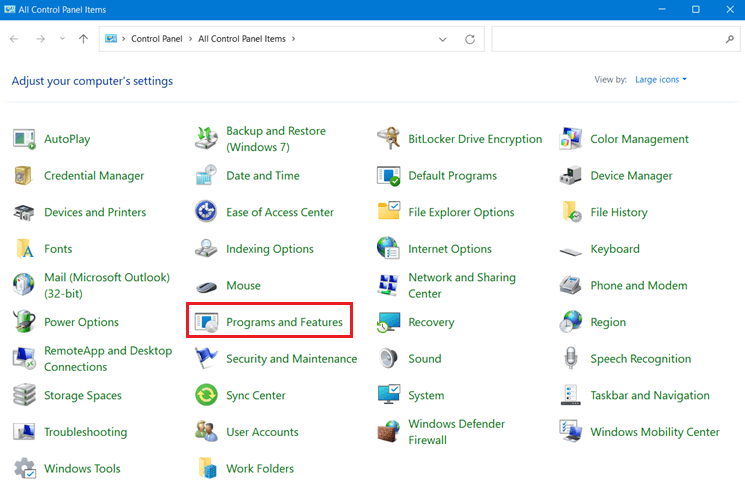
- In the search bar, type in ‘control’ and click on OK to launch the Control Panel.
- Now, select Programs and click on Programs and Features.
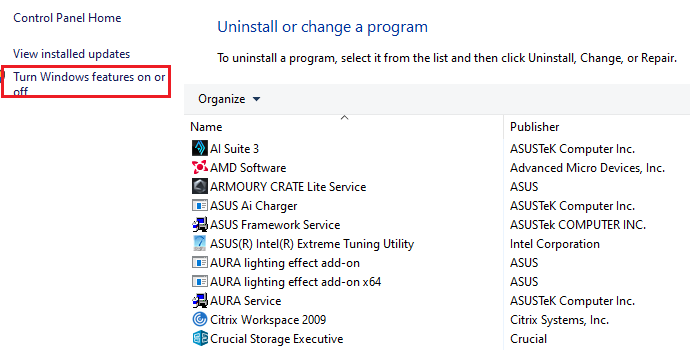
- From the left pane, choose Turn Windows features on and off.
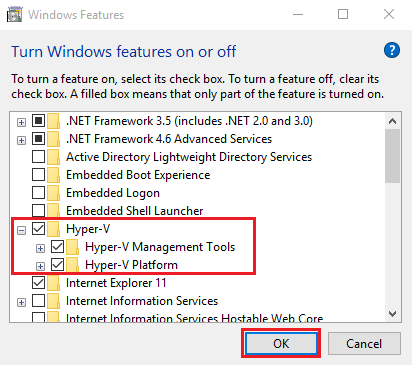
- A Windows Features dialog will appear. From that, click on Hyper-V to expand it and check the box next to it.
- Then, click on the boxes next to Hyper-V Management Tools and Hyper-V Platforms.
- Click on OK.
- Finally, restart your computer.
5. Use Command Prompt to Enable Hyper V.
If you don’t prefer following numerous steps, Command Prompt offers you a fast and efficient way to enable Hyper V by running only a few commands. The DISM command-line tool is a great way to access optional Windows features and enable them.
Follow the steps below to do so:
- Open the Start menu and type in ‘cmd’ in the search bar.
- Click on Command Prompt from the search results, and select Run as administrator from the screen’s right side.
- Enter the following command and press the Enter key:
DISM /Online /Enable-Feature /All /FeatureName:Microsoft-Hyper-V
- Finally, reboot your PC and check if Hyper V on Windows 11 is enabled or not.
6. Use PowerShell to Enable Hyper V.
Though PowerShell is quite similar to Windows Command Prompt, it wouldn’t be a lie to call it a more advanced version of it. So, for users that prefer using PowerShell as their command-line tool for Windows, here are instructions for enabling Hyper V on your system.
Simply follow through:
- Begin by pressing the Win key and type in ‘powershell’ in the search bar.
- From the right side of Windows Powershell, select Run as administrator.
- Type in this command and hit the Enter key:
Enable-WindowsOptionalFeature -Online -FeatureName Microsoft-Hyper-V-All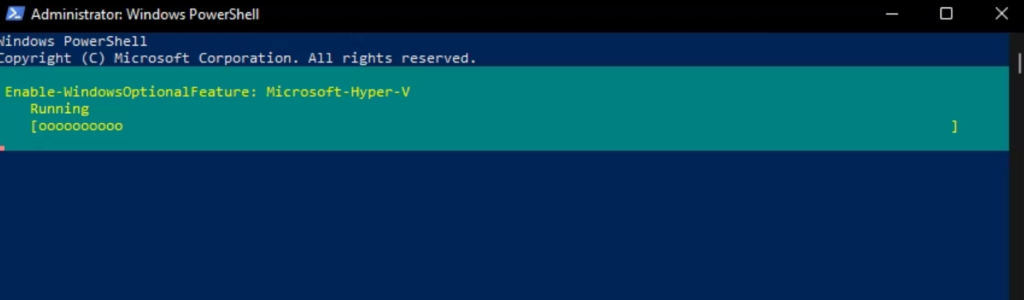
- Lastly, press the Y key from your keyboard. Your computer will reboot to enable Hyper V on Windows 11.
7. Ensure Hyper V Is Enabled.
After carefully following the instructions, you should have successfully enabled Hyper V on your computer by now. However, if you still want to ensure before proceeding to create VMs, here are a few quick tips to do it:
- Press the Windows key + R to open the Run dialog box. Type services.msc and hit OK. Then scroll down to Hyper V services and check to see if their Status mentions Running.

- Open Windows PowerShell and execute the following command. If the State mentioned Enabled, then you’re good to go.
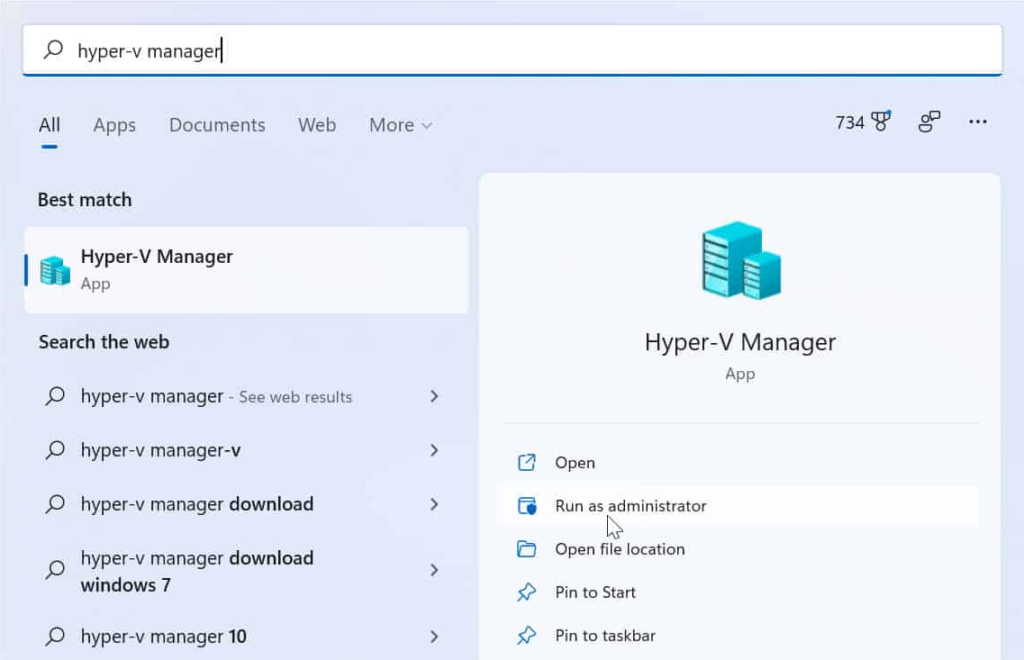
Get-WindowsOptionalFeature -Online -FeatureName Microsoft-Hyper-V- Use the Windows Search option and search for Hyper V Manager. If the result appears and you can launch the application, it means that Hyper V is successfully enabled.
This ends our guide on how to enable Hyper V on Windows 11. We’ve covered all the different ways to do so. But if you still have any confusion, do not hesitate to refer to our comment section to communicate with us.
If this guide helped you, please share it. 😊
