

Looking for easy ways to enable ‘Lock the taskbar’ in Windows 10 on your PC?
Taskbars are special toolbars that are present at the bottom of Windows operating systems. You can move and resize the taskbar by changing its position to the top, right, or left edge of the screen. Additionally, you can increase the height of the taskbar as well, just not its width.
Since the taskbar is our gateway to accessing and launching essential applications, they are very important and if someone tries to mess up with them, there can be serious consequences. For that reason, Windows provides the option to lock the taskbar.
Keeping the taskbar locked ensures that the changes you have made will remain intact. It will prevent you or other users from resizing or moving it. In this guide, we will walk you through several methods of doing so in detail.
Let’s get started!
1. Use Windows Registry.
Microsoft Windows Registry is a hierarchical database used to maintain low-level settings of Windows programs and processes.
Information such as what applications are installed on the computer and which types of documents can be created with them, what property sheet settings are assigned to folders and application icons, and what hardware is present are stored in the Registry. Windows refers to this information when performing relevant operations in your operating system.
The information is stored in the form of keys, and by modifying the relevant Registry keys, you can make the desired changes.
Here is how you can use Windows Registry to enable the taskbar locking feature:
- Press Windows + R keys simultaneously on your keyboard to open a Run dialogue box.
- Inside the text field of the dialogue box, type ‘regedit’ and hit Enter. This will launch Windows Registry on your PC.
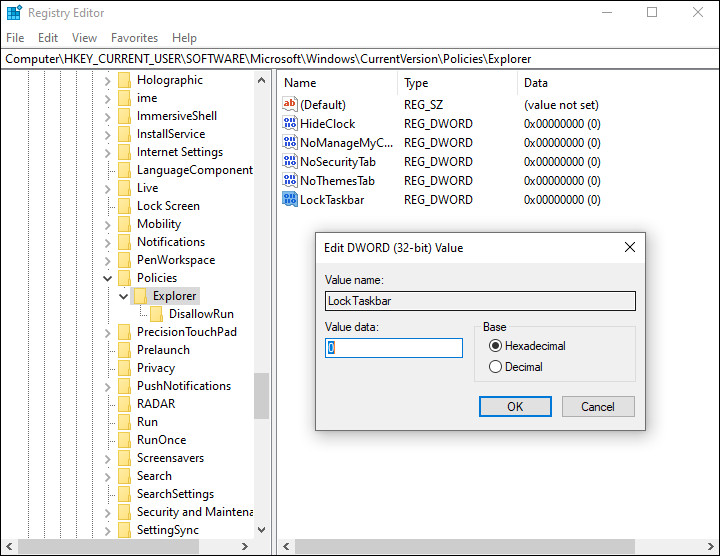
- Once you are inside the Registry Editor, navigate to the location mentioned below.
HKEY_CURRENT_USER\Software\Microsoft\Windows\CurrentVersion\Policies\Explorer
- If you cannot locate the Explorer key, then right-click on the Policies key and select the New > Key option.
- Rename this key as Explorer and double-click on it.
- Now right-click anywhere in the right pane and select the New > DWORD (32-bit) Value option.
- Rename this newly created value as LockTaskbar.
- Double-click on LockTaskbar and under Value data, type 1.
Once done, restart your PC to save the changes.
2. Try Using CleanMyPC.
It is possible that your system is corrupt if you have followed both steps in this guide and are still unable to achieve the desired results.
Performing a deep cleaning of your PC is the best way to eliminate any bugs or corruption issues. Using a good PC cleaner may be beneficial in this scenario, as manual cleaning could take a lot of energy and time.
In case you’ve never used a PC cleaner before, we recommend CleanMyPC.

CleanMyPC helps you resolve all PC problems quickly and effectively. It comes with a wide range of tools that include (but are not limited to) a multi-uninstaller, speed boost, and registry cleaner. These tools can optimize your system and fix most problems.
If this looks like something your PC desperately needs, install CleanMyPC now and get your PC up and running like new!
3. Use Group Policy Editor.
The Group Policy Editor is a Windows-based administration tool that lets users customize the settings of their operating systems. You can set password requirements, startup programs, and determine what applications or settings users can modify.
The information in the Group Policy Editor is stored in the form of policies and by modifying the relevant policies, you can make your desired changes.
- Press Windows + R keys simultaneously on your keyboard to open a Run dialogue box.
- Inside the text field of the dialogue box, type ‘gpedit.msc’ and hit Enter. This will launch Group Policy Editor on your PC.
- Once you are inside the Group Policy Editor, navigate to the location mentioned below.
User Configuration\Administrative Templates\Start Menu and Taskbar\
- Now locate and double-click on Lock the Taskbar in the right pane.
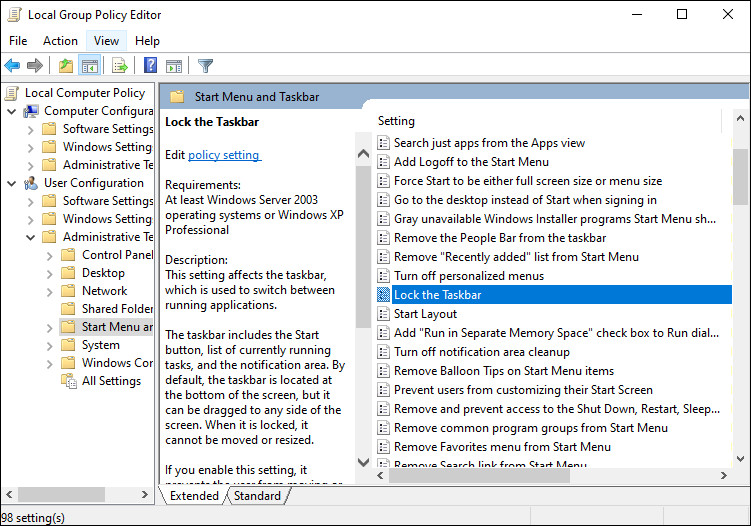
- Select Enabled and click on Apply to save the changes.
- Now check if the desired changes have been made. If not, then type cmd in the search bar and click on Run as administrator.
- Type the command mentioned below in the Command Prompt window and hit Enter to execute it.
gpupdate /force
This should make the changes without any issues.
This brings us to the end of our guide on disabling ‘Lock the taskbar’ in Windows 10. We tried walking you through all the steps in detail and hope that one of the methods mentioned in this post did the trick for you. In case you still have any confusion about the steps, please let us know in the comment section below!
If this guide helped you, please share it. 🙂
