

Wondering how to enable or disable automatic driver updates in Windows 10?
Those of you who install every single Windows update the moment it comes out – we salute you. Windows could undoubtedly use more cannon fodder. But if you are a part of the ‘We install updates manually’ club, we have good news for you.
Windows allows you to enable/disable the automatic installation of updates. Thus, whether you’d like Windows to handle the process for you while you do things that are more important or want to skip downloading a defective update, you can do so.
This guide will show you how you can enable or disable automatic driver updates in Windows 10.
Let’s get started!
1. Use Group Policy Editor.
The Group Policy Editor enables administrators to configure various aspects of an operating system.
As an operating system component, Group Policy Editor stores policies that govern the behavior of Windows programs and processes. These policies can be tailored to meet individual needs, which is what we will be doing in this method.
Here is what you need to do:
- Press Windows + R keys on your keyboard simultaneously to open a Run dialogue box.
- Inside the text field of the dialogue box, type ‘gpedit.msc’ and hit Enter. This will launch the Group Policy Editor on your PC.

- In the newly launched window, navigate to the location mentioned below.
Computer Configuration/Administrative Templates/Windows Components/Windows Update
- Locate and double-click on Do not include drivers with Windows Updates in the right pane.
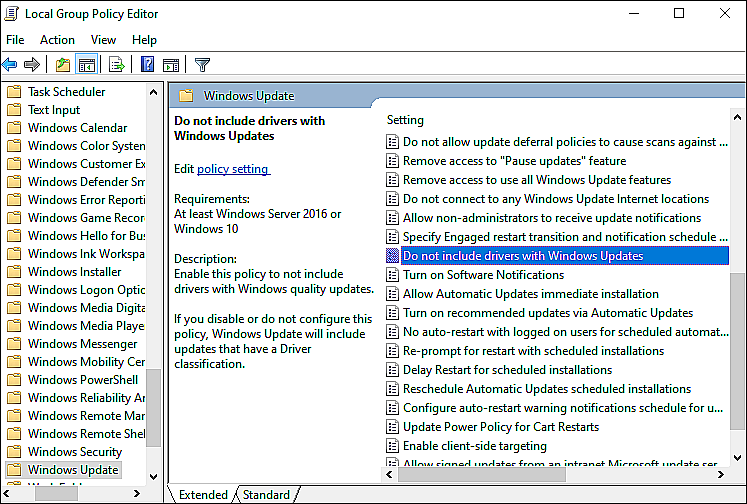
- To enable it, select Enabled/Not Configured, and to disable it, choose Disabled.
- Finally, click on OK/Apply and restart your PC to save the changes.
By doing so, you will be able to make the desired changes in no time.
2. Try Using CleanMyPC.
This guide’s troubleshooting steps may not work if your computer is infected with a corruption error hampering your ability to perform specific tasks. During this situation, it’s best to use a PC cleaner to clean your computer before applying these methods thoroughly.
CleanMyPC is ideal for people who have never cleaned their PC before and are uncertain about what they should look for.

This PC cleaner is simple to use, eliminates unnecessary files, and addresses any other problems your PC may be experiencing. It comes with a wide range of system maintenance tools: a Multi Uninstaller, Cleaner, Speed Booster, and much more.
Once you have installed the tool, run a scan using it. CleanMyPC will identify all the errors in your PC and attempt to fix them automatically without your involvement. Install CleanMyPC now to enjoy all these perks!
3. Use Registry Editor.
Windows Registry is one of the most valuable tools for users who wish to gain better control over their operating systems. A user with a deep understanding of Windows Registry can access this tool for managing and customizing their operating system.
In Windows Registry, data is stored in the form of Registry keys, and here, we will modify the key associated with driver updates to make the desired changes.
The steps below need to be carried out with extra care since even a slight mistake can lead to severe issues within the Registry.
Here is what you need to do:
- Press Windows + R keys simultaneously to open a Run dialogue box.
- In the text field of the dialogue box, type ‘regedit’ and hit Enter. This will open Windows Registry on your PC.

- Once you are inside the Registry Editor, navigate to the location mentioned below.
HKEY_LOCAL_MACHINE\SOFTWARE\Policies\Microsoft\Windows
- Right-click on the Windows key and select the New > Key option.
- Name the key WindowsUpdate and hit Enter.
- Now double-click on it and right-click in the right pane.
- Select the New > DWORD (32-bit) Value option and rename this value as ExcludeWUDriversInQualityUpdate.
- Double-click on ExcludeWUDriversInQualityUpdate, and under Value data, type 1 to exclude driver updates. To enable driver updates, type 0.
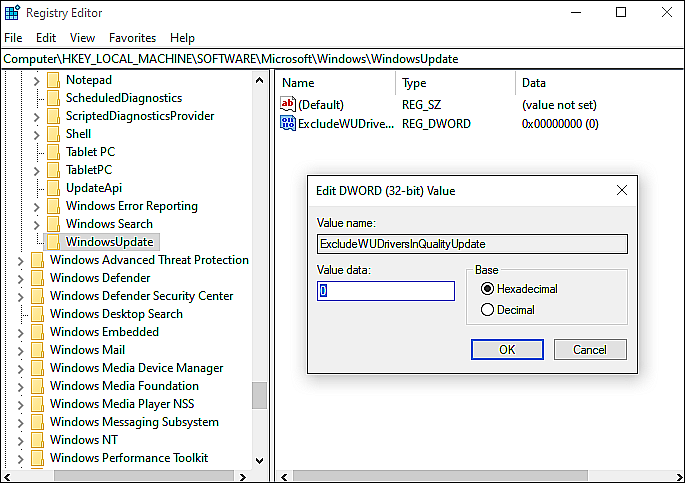
- Finally, hit Enter and close the Registry Editor.
By following the steps mentioned above, you should be able to enable or disable automatic driver updates in Windows 10.
This wraps up our guide on enabling/disabling automatic driver updates in Windows 10. We hope that one of the methods mentioned above helped you fix the issue in no time. If you have any questions regarding the methods listed above, please let us know in the comment section below.
If this guide helped you, please share it. 🙂
