

Wondering how to enable or disable notifications on Windows 11?
Microsoft has gone all out with Windows 11 – rounded corners everywhere and a centered taskbar that reveals the new Start menu that happens to be very similar to an Android app launcher.
The notification center has also been completely revamped with rounded corners (yep, here too) and pastel colors. Rather than appearing above Quick Settings in the Action Center hub, it is now available in the date and time system tray icon.
However, while notifications help us stay up to date with everything that is going on within the system, they can also be distracting. In this guide, we will walk you through different methods you can use to enable/disable notifications on Windows 11.
Let’s get started!
1. Modify Windows Settings.
The simplest way to accomplish the task at hand is through Windows Settings.
This method, however, can be used by all standard users to enable/disable notifications on Windows 11. If there are multiple users on your PC, prevent them from customizing such features using Windows Registry.
Here is what you need to do:
- Press Windows + I keys simultaneously on your keyboard to open Windows Settings on your PC.
- In the Settings window, select System from the left panel.
- Now click on Notifications in the right pane.
- You can now turn the toggle on/off against Notifications according to your preferences.
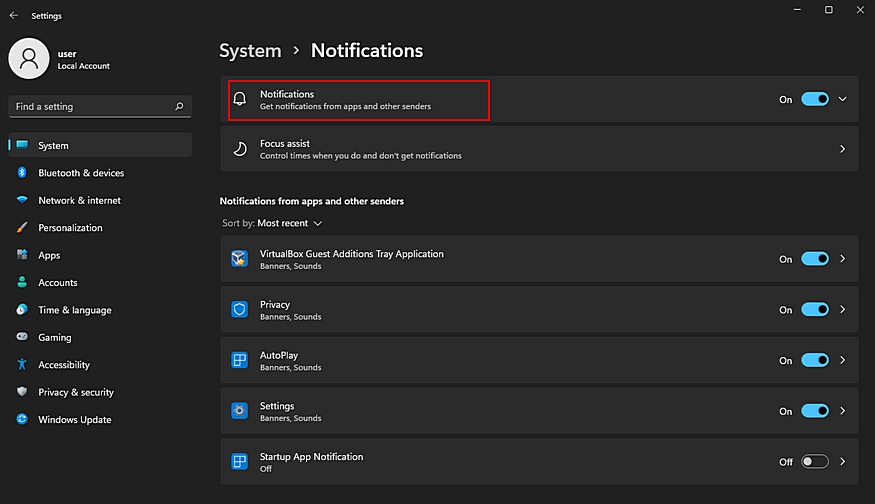
- If you want to turn notifications for specific apps or programs, scroll down in the Notifications page to the Notifications from apps and other senders section.
- You can now turn the toggle on/off against programs according to your preferences.
As simple as that!
2. Modify Windows Registry.
In Windows, the Registry refers to a database that stores low-level details about an operating system’s processes and applications. Windows relies on the Registry Editor for important information while performing relevant operations. This makes the Registry Editor an important component of our operating system.
In this method, we will use the Windows Registry to modify notification settings on Windows 11. Make sure, however, that you are logged into Windows as an administrator before proceeding with the method mentioned below.
- Press Windows + R keys simultaneously on your keyboard to launch a Run dialogue box.
- In the text field of the dialogue box, type regedit and hit Enter. This will launch Windows Registry on your PC.

- Once you are inside the Registry Editor, navigate to the location mentioned below.
HKEY_CURRENT_USER\Software\Microsoft\Windows\CurrentVersion\PushNotifications
- Now right-click anywhere in the right pane and select the New > DWORD (32-bit) Value option.
- Rename this newly created value as ToastEnabled and double-click on it.
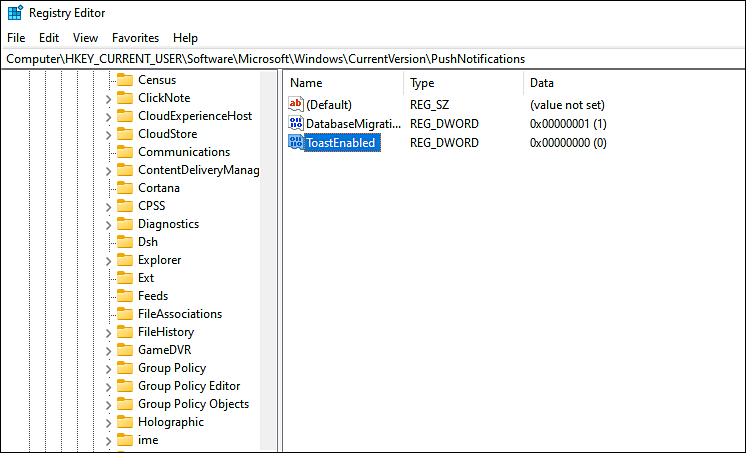
- If you want to disable notifications at a system level on Windows 11, then type 0 under Value data and hit Enter.
- If you want to enable notifications at a system level on Windows 11, type 1 under Value data and hit Enter.
Finally, restart your PC to save the changes.
3. Use Notification Center.
In case you already have a notification from the app whose notifications you want to modify, you can use the Notification Center to make the desired changes.
Here is what you need to do:
- Press Windows + N keys simultaneously on your keyboard to launch Notification Center.
- Click on the More button (three dots) on the top of the app’s notification that you wish to turn off.
- Now click on the ‘Turn off all notifications for *name of the app*’ option.
Close the Settings app to save the changes
This brings us to the end of our guide on ways to enable/disable notifications on Windows 11. We tried walking you through all the steps in detail and hope that one of the methods mentioned in this post did the trick for you. In case you still have any confusion about the steps, please let us know in the comment section below!
If this guide helped you, please share it. 🙂
