

Wondering how to enable or disable the built-in Administrator account on Windows 11?
All Windows systems come with a built-in Administrator account that has elevated privileges to manage the resources of your computer. It’s not similar to your regular administrator account and is more powerful than that.
Unlike other accounts, a built-in Administrator account is not subject to prompts from UAC. Windows does not ask for confirmation before making significant changes in the built-in Administrative account. Moreover, this account is often targeted by hackers to gain access to your computer.
The use of this account on a regular basis can be risky, so it is a good idea to enable it only when needed and disable it immediately afterwards. There is an administrator account built into Windows 11 too, but it is hidden and must be activated manually.
In this guide, we will walk you through the methods of enabling and disabling the built-in administrator account on Windows 11.
Let’s get started!
1. Use Powershell.
PowerShell is a command-line shell and scripting language for automating tasks in Windows. It works by automating many repetitive, time-consuming administrative tasks. You can also use it for finding, filtering, and exporting information concerning computers in a network.
Here is how you can use Windows Powershell to make the desired changes:
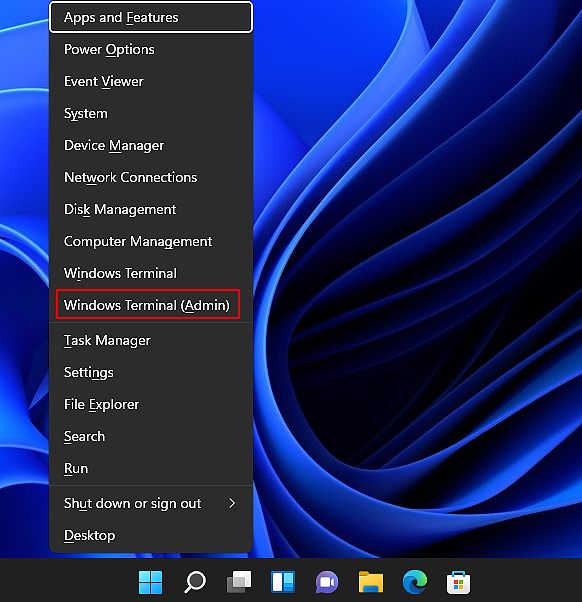
- Press Windows + X keys simultaneously to launch the Quick Selection menu and select Windows Terminal (Admin) from the list available on your screen.
- Select Yes in the User Account Control prompt to proceed.
- Inside the Powershell window, copy and paste one of the commands mentioned below according to your requirements. Hit Enter to execute it.
Disable Admin Account

Disable-LocalUser -Name "Administrator"

Enable Admin Account

Enable-LocalUser -Name "Administrator"
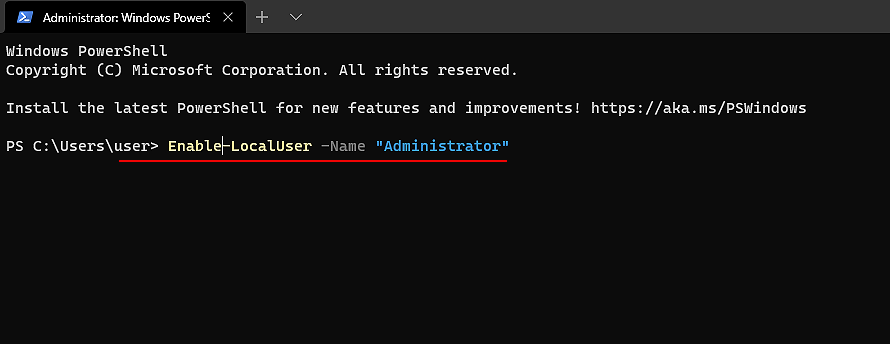
Note: If the administrator account on your PC is not named as ‘Administrator’, then replace ‘Administrator’ in the commands mentioned above with the name of the account.
- Close the Powershell window and restart your PC to save the changes.
This should make the desired changes in no time.
2. Use Command Prompt.
Command Prompt is a command-line interpreter embedded in Windows operating systems, much like Windows Powershell. In this method, we will execute relevant commands to enable/disable the built-in Administrator account on Windows 11.
Here is what you need to do:
- Open a Run dialogue box by pressing Windows + R keys simultaneously on your keyboard.
- Inside the text field of the dialogue box, type ‘cmd‘ and hit Ctrl + Shift + Enter to launch elevated Command Prompt on your PC.
- Inside the Command Prompt window, copy and paste one of the commands mentioned below according to your requirements. Hit Enter to execute it.
Enable Admin Account

net user Administrator /active:yes

OR

Disable Admin Account

net user Administrator /active:no
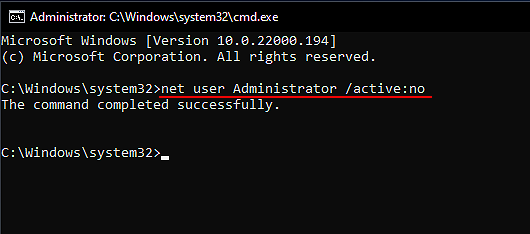
Note: If the administrator account on your PC is not named as ‘Administrator’, then replace ‘Administrator’ in the commands mentioned above with the name of the account.
- Finally, once the Command Prompt executes the command, close it.
Once you restart your PC, the built-in administrator account should be enabled/disabled.
3. Modify Local Users and Groups Utility.
The Local User and Group utility is a collection of tools that you can use to manage a computer. It allows the users to secure and manage user accounts and groups on your local computer. Therefore, you can assign permissions and rights, as well as limit the ability of users and groups to perform certain actions.
Furthermore, you can use this utility to enable/disable the built-in Administrator account without any issues.
Here is all that you need to do:
- Press Windows + R keys simultaneously on your keyboard to open a Run dialogue box.
- Type ‘lusrmgr.msc‘ in the text field of the dialogue box and hit Enter.

- Click Yes in the User Account Control prompt.
- Once you are inside the Local Users and Groups utility, select Users from the left panel and double-click on Administrator in the right pane.
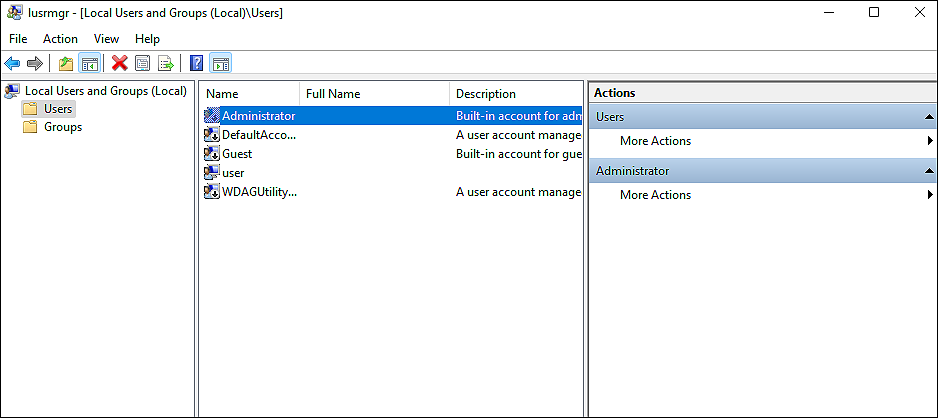
- In the newly-launched screen, go to the General tab and check or uncheck the box associated with Account is disabled.
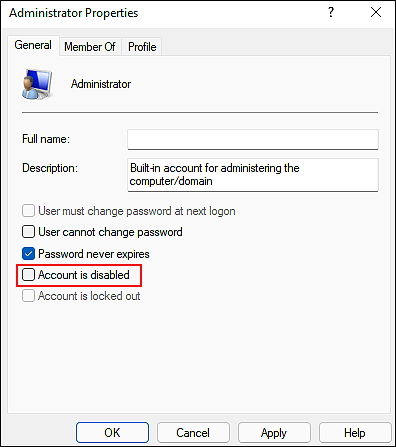
- Click Apply to save the changes.
As simple as that. If in the future you want to reverse the changes, simply follow the steps mentioned above and check/uncheck the box again.
4. Modify Local Security Policy.
The Local Security Policy is a collection of information about a computer’s security. It allows you to manage various security settings and policies on your Windows 11 computer.
If you like to customize the operations of your operating system according to your preferences, you might know about the Group Policy Editor (GPE). The working of the Local Group Policy is quite similar to GPE.
Here is how you can make the desired changes by modifying the Local Security Policy:
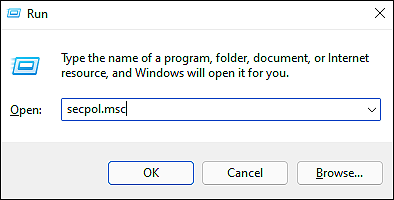
- Press Windows + R keys simultaneously on your keyboard to open a Run dialogue box.
- Inside the text field of the dialogue box, type ‘secpol.msc‘ and hit Enter to launch Local Security Policy.
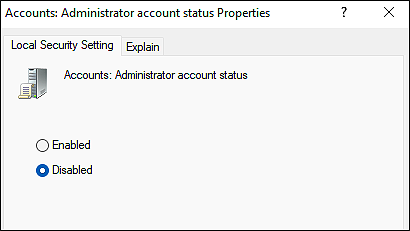
- In the newly launched window, expand the Local Policies menu and click on Security Options.
- Now locate and double-click on Accounts: Administrator account status in the right pane.
- Select Enabled or Disabled according to your requirements and hit Apply to save the changes.
Hopefully, the steps mentioned above will enable/disable the built-in Administrator account without any hassle.
5. Try Using CleanMyPC.
It could be that the steps in this guide do not work because your computer has corruption errors that prevent certain features from working. There is a simple solution to this scenario, so do not be concerned.
CleanMyPC will scan for issues on your computer, identify them, and try to resolve them automatically.

CleanMyPC’s wide range of system maintenance tools not only resolves this issue but also any other PC problem, such as slow performance and slow boot times. All that you need to do is install CleanMyPC and run a scan using it. It will take care of the rest!
6. Make Changes via CMD at Boot.
In this method, we will enable/disable the built-in Administrator account at boot using the Registry Editor.
Microsoft Windows Registry is a database containing low-level settings used by applications. It gives programs access to computer resources and lets you store customized settings for the operating system. Windows Registry stores information about program and process components as Registry keys. By modifying these keys, you can customize the system.
Follow the steps mentioned below to proceed:
- Boot using a compatible installation media and press Shift + F10 simultaneously in the initial setup screen to launch Command Prompt with administrative privileges.
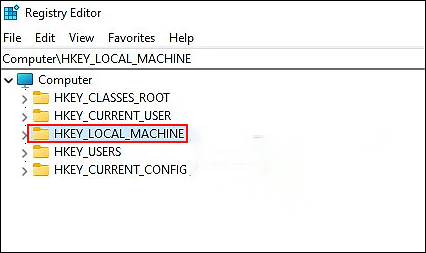
- Type ‘regedit‘ in the Command Prompt window and hit Enter to launch Windows Registry.
- Once you are inside the Registry Editor, select the HKEY_LOCAL_MACHINE key.
- With the HKEY_LOCAL_MACHINE key selected, click on File from the ribbon menu.
- Now click on Load Hive and navigate to the drive Windows is installed on. In most computers, it is the C drive.
- Next, navigate to the location mentioned below. Replace C with the drive name if you have installed Windows in a driver other than C.
C:\Windows\System32\config
- Next, locate and open SAM in the config window.
- Wait for the hive to load up in the Registry Editor and once it’s done, rename it as REM_SAV.
- Hit OK to save the changes.
- Now navigate to the following location in the Registry Editor.
HKEY_LOCAL_MACHINE\REM_SAM\SAM\Domains\Account\Users\000001F4
- After selecting the 000001F4 key, double-click on the F Binary value in the right pane.
- Change the 10 value to 11 from the 00000038 column and press OK to save the changes. This will enable the Built-in Admin account.
- To disable the Built-in Admin account, select the 11 value from the 00000038 column. Then press the Delete key.
- Finally, close the Registry Editor and click Continue to continue rebooting your PC.
These steps should make the desired changes at an administrative-level on your PC.
This wraps up our guide on enabling and disabling the built-in Administrator account on Windows 11. We hope that one of the methods mentioned in this guide did the trick for you. If you have any questions regarding the methods listed above, please let us know in the comment section below.
If this guide helped you, please share it. 🙂
