

Wondering how to enable XPS Viewer on Windows 10?
XPS is a file format similar to PDF that Microsoft released with the Windows Vista update in 2007. There wasn’t a big difference between the two in terms of features and interface, except that PDF offers enhanced portability.
Unfortunately, not many people were fans of XPS, and the company eventually abandoned the format. With the Windows 10 version 1803 update, users could no longer view XPS files unless the computer was upgraded from version 1709.
So, if you’ve set up a new device or performed a clean installation, XPS Viewer would not be available on your computer anymore. Lucky for you, we’ve compiled a list of methods to reinstall or enable the app even if Windows no longer supports it.
So, let’s get to it right away!
1. Enable XPS Viewer on Windows 10 via Settings.
You need dedicated viewing software to read, print, or change the permissions of any file format. Since the latest system update has disabled the XPS Viewer, you’d have to reinstall it to view such files on your computer again.
Here’s how you can do that using Windows Settings:
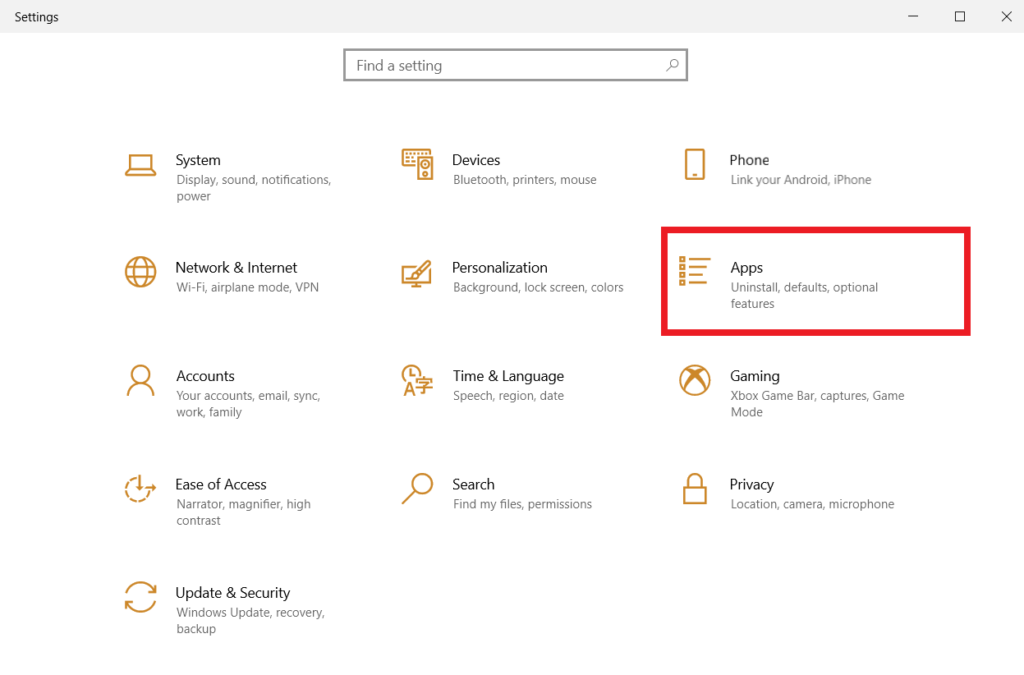
- First, press Windows+i on your keyboard or type ’settings’ on the search bar to enter Settings.
- Now, from the multiple options appearing on your screen, select Apps.
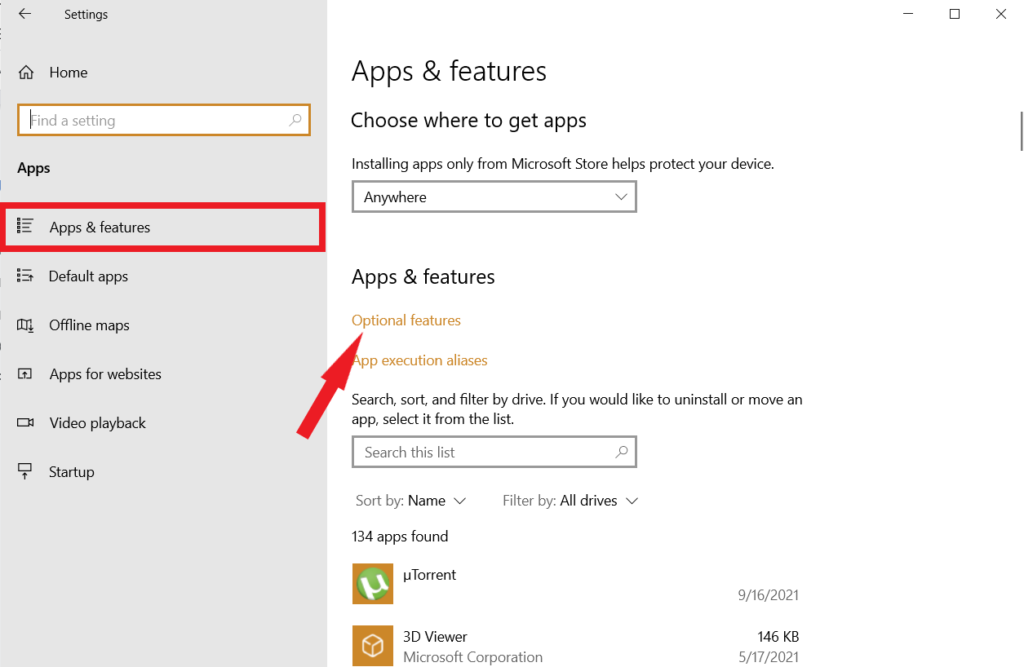
- From the panel on the left side, click on Apps & features tab.
- From there, go to Optional Features under Apps & features on the right panel.
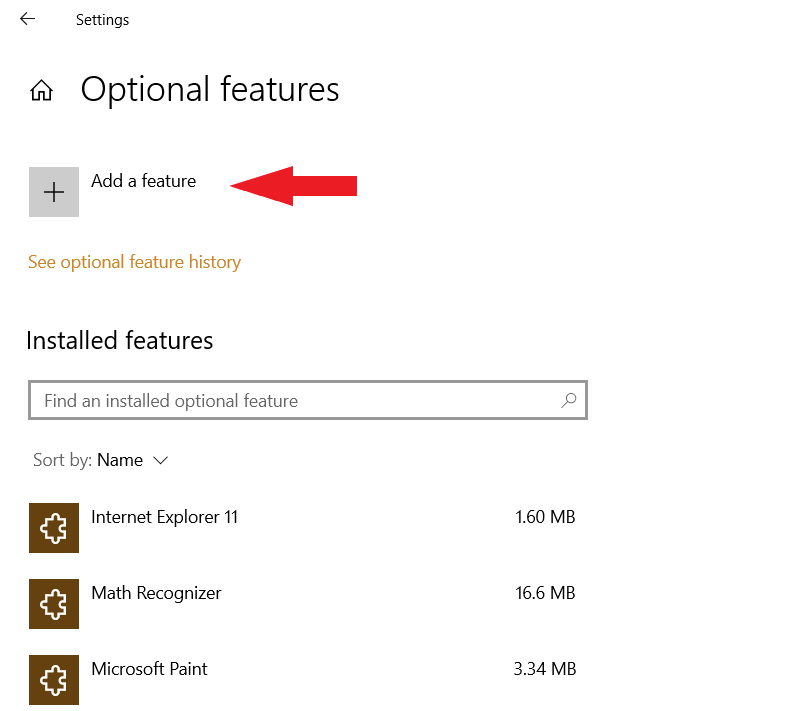
- Then, you’ll come across a list of features already enabled on your computer with an Add a feature option at the top-left corner of the window. Click on it.
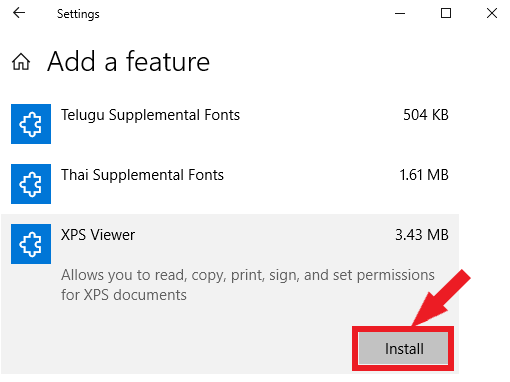
- Use the search bar or scroll down to find XPS Viewer, then select it.
- Finally, click the Install button, and your computer will start downloading the feature.
Once downloaded, you should be able to open an XPS or OXPS file easily.
2. Use Command Prompt To Enable XPS Viewer.
Sometimes, users are unable to find the XPS Viewer listed when scrolling through the list of features in the Settings. Other times, the feature fails to install on your computer.
Whatever the reason, you don’t have to worry. Another method to enable XPS Viewer on Windows 10 is done through the Command Prompt. To do so, you’ll need to run the software as an administrator.
Here are the steps you need to follow:
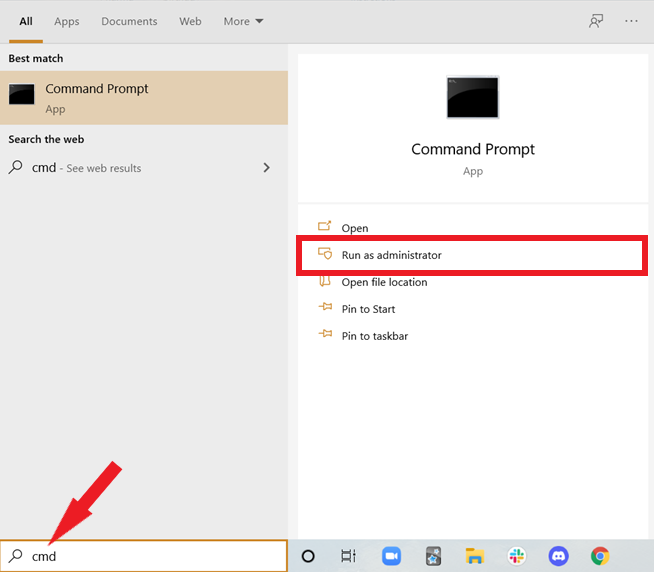
- To begin, open the Start menu by clicking on the Windows icon located at the bottom-left of the screen or by pressing the Windows key on your keyboard.
- Now, type cmd in the search bar.
- Then, click on the Run as administrator option to run the app under full rights.
- When the Command Prompt window opens, type the following command and press Enter.
Dism /Online /Add-Capability /CapabilityName:XPS.Viewer~~~~0.0.1.0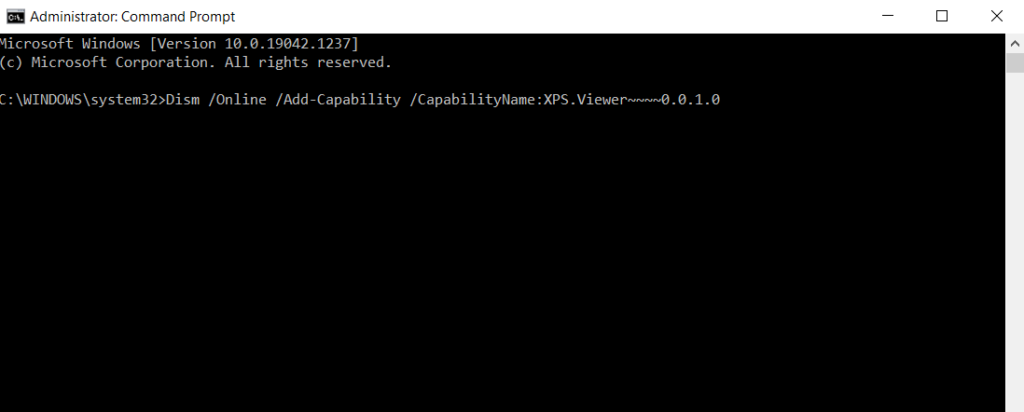
After that, XPS Viewer should get installed on your computer.
3. Use Windows Powershell To Enable XPS Viewer.
If you’re an old Windows user, you must be familiar with Windows PowerShell. It was first released in 2006 and is quite similar to Command Prompt. You can use this automation software to enable XPS Viewer.
Simply input the required command in the associated scripting language to perform the task.
These are the steps you should follow:
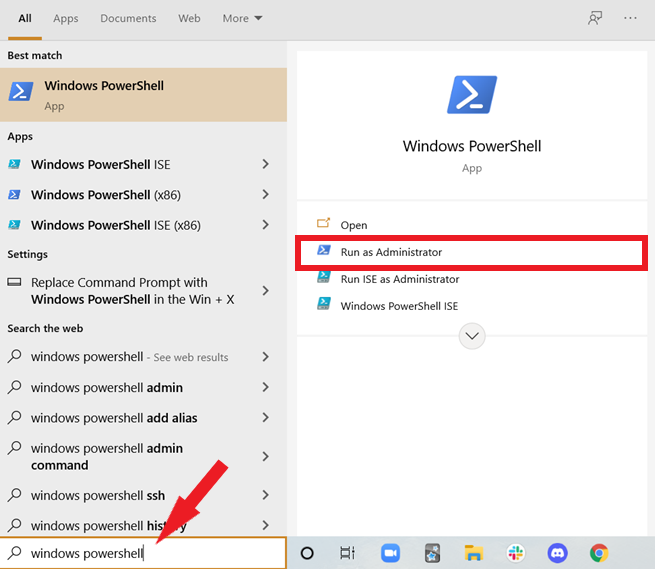
- Start by pressing Windows key+i or directly click on the Search Bar at the bottom left of the screen.
- Then, type Microsoft Powershell so that a list of options appears on the right panel.
- From there, click on Run as administrator since you need special permissions to perform tasks.
- When the app opens and you come across the PowerShell console, type the following command:
dism / Online / Add-Capability /CapabilityName:XPS.Viewer~~~~0.0.1.0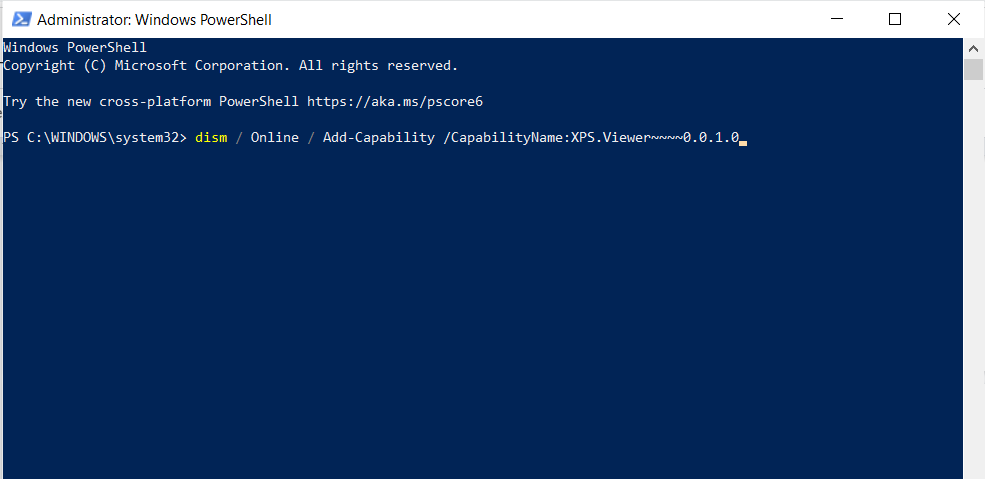
- Finally, press Enter to begin the installation.
XPS Viewer will then be downloaded on your computer and can easily be accessed on the Desktop.
4. Enable XPS Viewer From Windows Update.
If your computer has Windows 10 Pro or Windows Enterprise, the method to install XPS Viewer can be pretty different. Moreover, you’ll need to alter a few more settings in the Group Policy Editor if the computer you’re using belongs to a domain.
This is what you need to do:
- To start, type ’Run’ in the search box and click Open. You can also press the Windows key and R simultaneously as a shortcut.
- When the Run command box opens, type gpedit.msc and click OK.

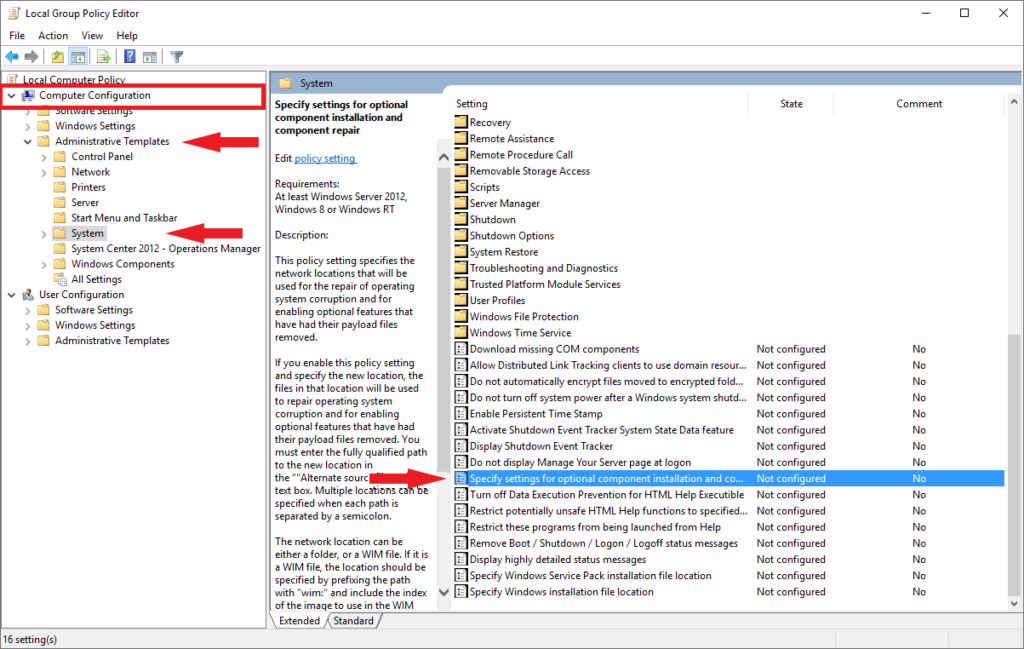
- Scroll down the left pane and click on the drop-down arrow of Computer Configuration.
- Now, click on Administrative Templates and then on System.
- Then, select Specify settings for optional component installation and component repair on the right pane.
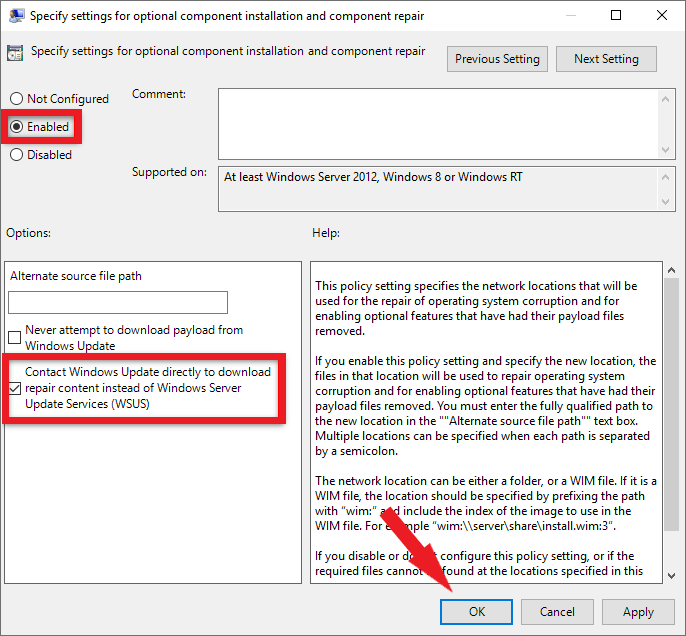
- In the next window, select Enabled and check the box that says Download repair content and optional features directly from Windows Update instead of Windows Server Update Services (WSUS).
- Finally, click on Apply, then OK, and restart your computer.
You can then install the XPS Viewer like you would on any other computer with Windows 10.
5. Use Microsoft XPS Document Writer (MXDW).
Microsoft XPS Document Writer is a driver installed in Windows OS. You can use this to protect the XPS files’ content and print the documents even when Microsoft doesn’t support the format.
You need to enable the driver manually by following the steps below:
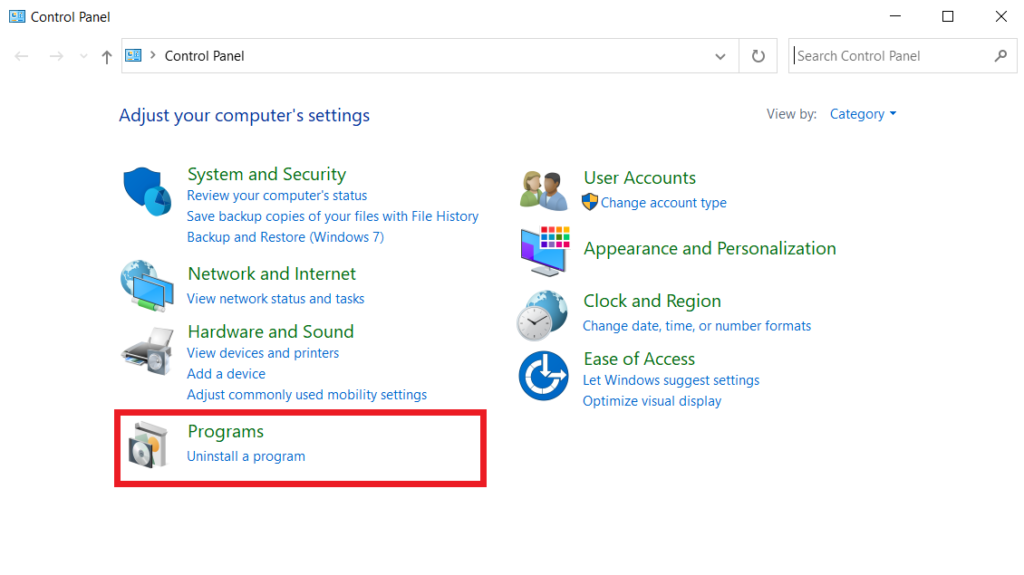
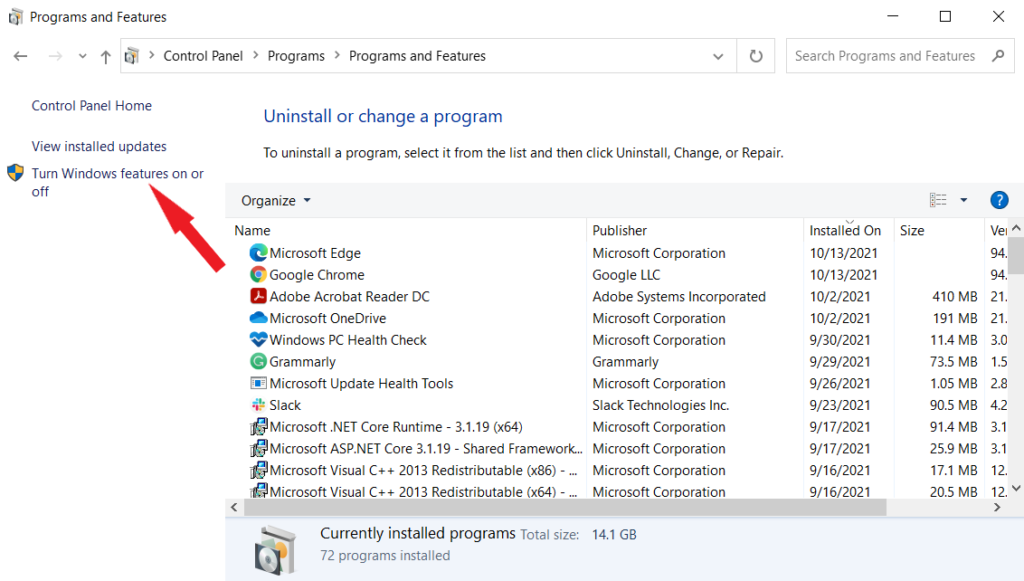
- First, type ’Control Panel’ in the search bar and click Open.
- Then, select Programs at the bottom-left of the window.
- From there, go to Programs and Features.
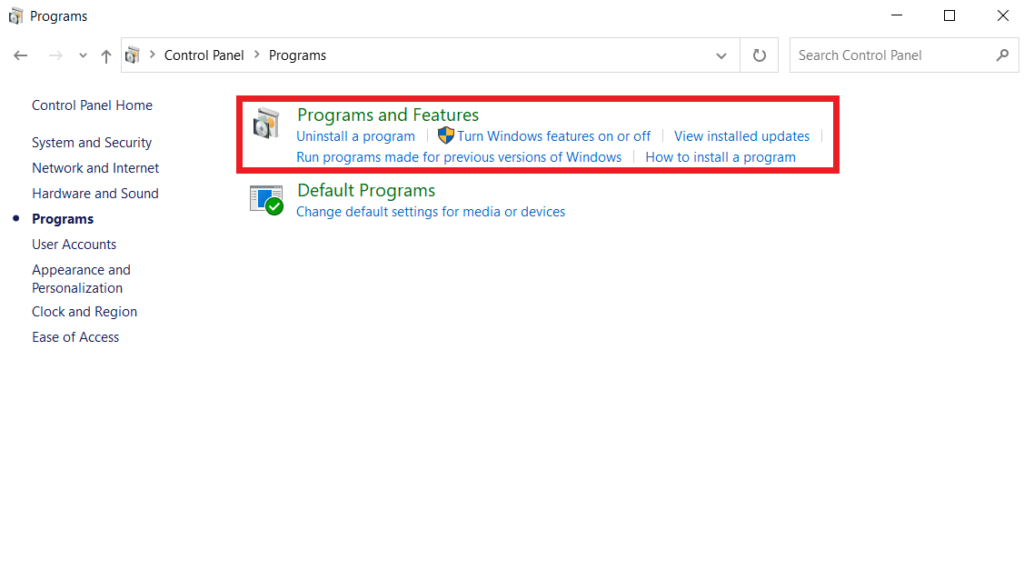
- Now, from the left pane, select Turn Windows Features on or off.
- Finally, a pop-up window will open. Scroll down and check the box next to Microsoft XPS Document Writer and click OK.
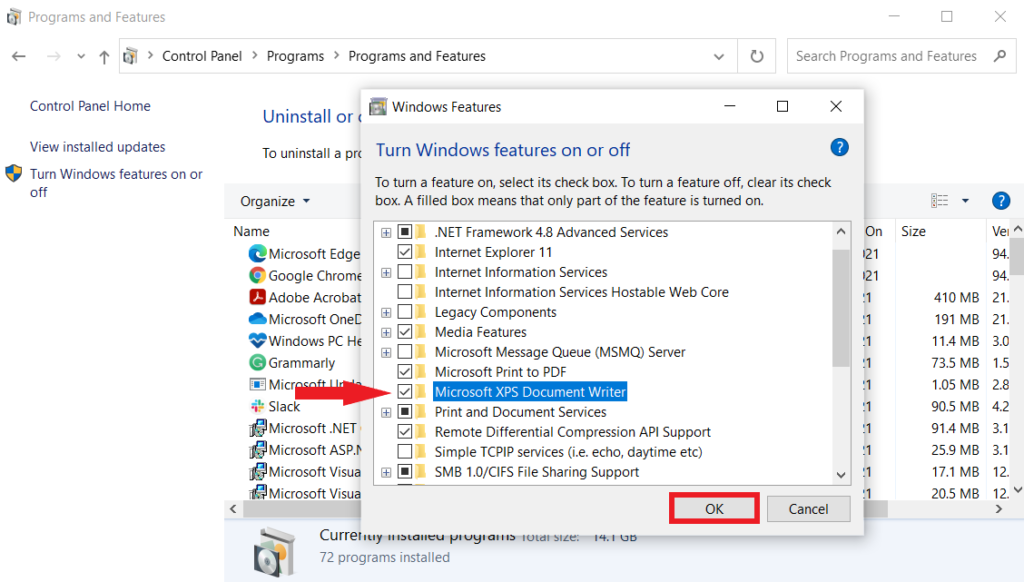
It will take only a couple of seconds for the MXDW to get installed. After that, a Print to XPS option will appear in print pages, and you can select it to save files in XPS format.
6. Use PDF Converter.
Although Microsoft no longer supports the XPS Viewer, you can still easily install it using one of the above methods. However, since there will be no more maintenance or updates on the program, it’s better to convert your XPS files to PDF format, so they remain readable even if the XPS Viewer crashes.
Here’s how to do it:
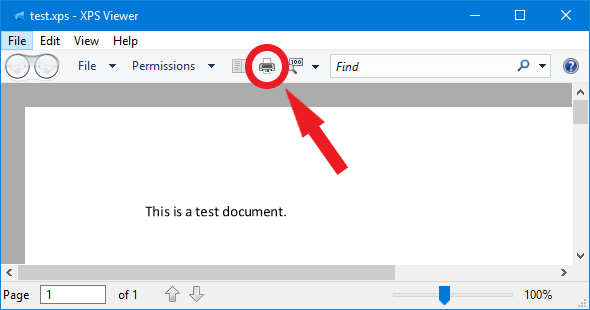
- First, right-click on the file you wish to convert and select Open with XPS Viewer.
- Then, click on the Printer icon at the top panel or press Ctrl+P on your keyboard.
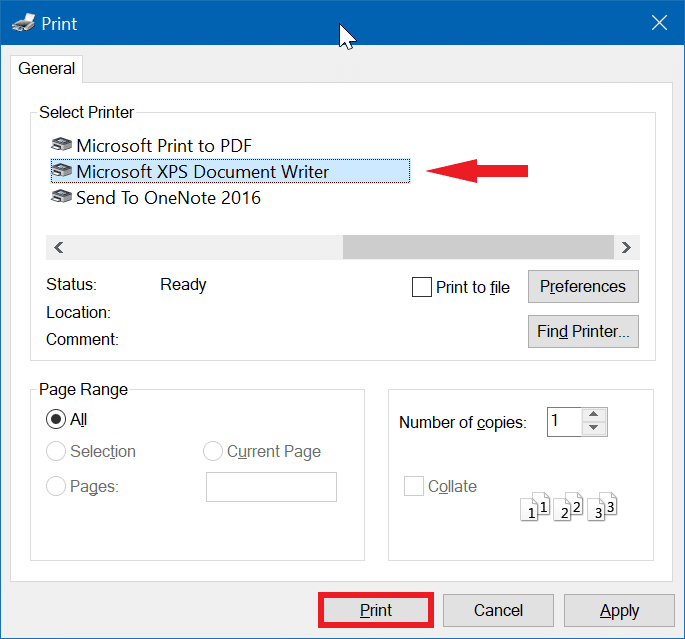
- A selection box will then appear on your screen. From there, in the General tab, go to Microsoft Print to PDF under Select Printer.
- Lastly, click the Print button.
This will convert the format of your XPS file to PDF. Repeat the steps to convert the remaining files on your computer.
There you have it! A complete guide on how to enable XPS Viewer on Windows 10. Hopefully, at least one of the methods has proven to be successful. If you still have any confusion, leave a comment down below, and we’ll do our best to help you through it.
If this guide helped you, please share it. 🙂
