

Is your hard drive running out of space, leading to files in Windows 10 automatically compressing?
All operating systems are prone to errors, and Windows 10 is no exception.
Recently, several users reported that their Windows 10 files were automatically compressed and that they could not undo the changes. We had a look into this matter and discovered that this issue can be caused by a variety of reasons, including less storage space and a corrupt icon database.
If you are experiencing a similar issue, keep reading because we have listed some of the most effective troubleshooting methods in this guide.
Let’s get started.
1. Delete the Temp Files and Perform a Disk Cleanup.
The most common reason behind the automatic compression of files in Windows is less storage space. When your device is running out of space, your operating starts compressing the files to make space for newer installations and downloads.
You can increase the disk space by deleting the temporary files in your operating system, and then performing a disk cleanup.
Here is what you need to do:
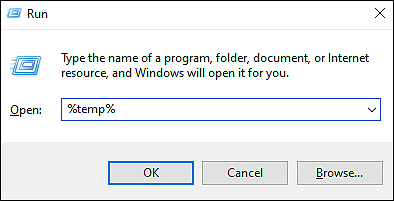
- Open a Run dialogue box by pressing Windows + R keys simultaneously.
- Type ‘%temp%‘ in the text field of the dialogue box and hit Enter.
- Delete all the contents in the folder.
- Now launch a Run dialogue box again and type ‘temp‘ in the text field.
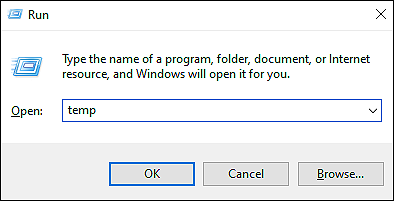
- Hit Enter to launch the folder and delete all the contents of this folder too.
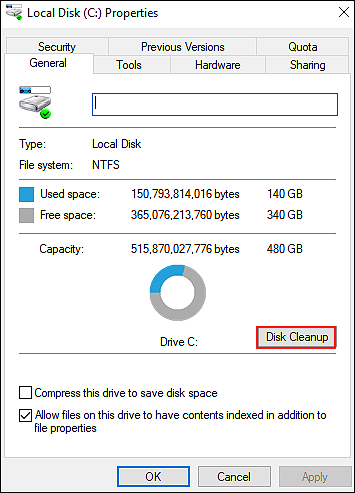
- Now navigate to This PC and right-click on the system drive. In most case, it is the C drive.
- Select Properties and click on the Disk Cleanup button.
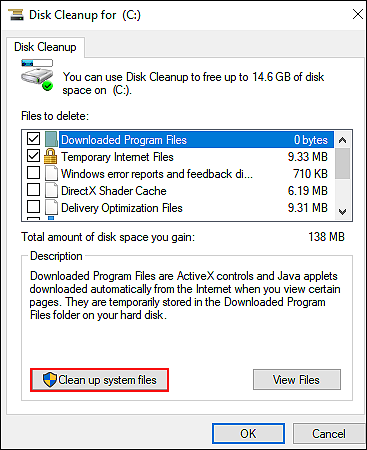
- Checkmark all the boxes except the ones against essential folders.
- Click on Clean up system files and then hit OK.
- Once the process is complete, reboot your PC and check if the issue is resolved.
Hopefully, this will stop Windows 10 from automatically compressing files.
2. Update Windows.
In case you have not installed the latest updates on your PC for quite some time, your operating system may be compressing files to make room for new updates.
If this scenario is applicable, then the best way to resolve the issue at hand is by installing all the pending updates, so that Windows does not automatically compress files to create more space. Moreover, since the latest updates are packed with bug fixes, installing them will also help you get rid of any bugs or corruption errors in the system.
Once you have completed all pending updates, Windows will no longer compress your folder contents.
3. Disable Compression.
There is a chance that the compression feature of Windows has been enabled on your operating system, which is causing the issue under consideration.
Luckily, you can disable this feature in a few simple steps, which will hopefully stop the automatic compression of files in Windows.
Here is what you need to do:
Disable Compression via Command Prompt.
The first way to disable compression is via Command Prompt. In this method, we will be executing the relevant commands with administrative privileges to make the desired changes.
Here is what you need to do:
- Type cmd in the search bar and click on Run as administrator to launch Command Prompt with administrative privileges.
- Inside the Command Prompt, type the command mentioned below and hit Enter.
fsutil behavior set disablecompression 1
- Once the command is executed, reboot your PC.
The issue under consideration should resolve after you reboot your PC.
Disable Compression via Group Policy Editor.
In the second method, we will be making changes in the Group Policy Editor.
Group Policy Editor is a Windows feature that allows advanced-level users to customize their operating system. Information about Windows programs and processes is stored in the form of policies here, and by modifying the relevant policies, users can make their desired changes.
Here is how you can disable automatic compression using the Group Policy Editor:
- Open a Run dialogue box by pressing Windows + R keys simultaneously on your keyboard.
- Type ‘gpedit.msc‘ in the text field of the dialogue box to launch Group Policy Editor.

- Inside the Group Policy Editor window, navigate to the location mentioned below.
Computer Configuration\Administrative Templates\System\Filesystem\NTFS
- In the right pane, locate Do not allow compression on all NTFS volumes and double-click on it.
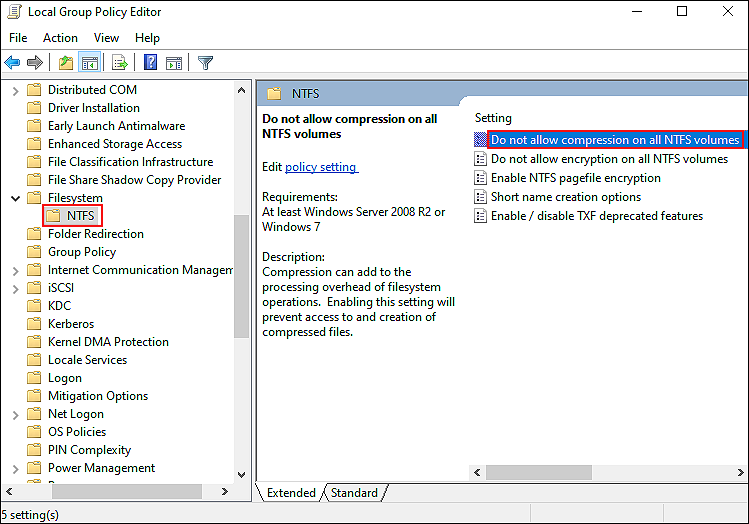
- Select Enabled and then click on OK to save the changes.
By modifying the policies, you should be able to prevent Windows from compressing files automatically.
4. Rebuild Icon Cache Database.
The issue under consideration can also occur if the icon cache database on your operating system is corrupt. Corrupt databases result in two blue arrow icons being displayed on the folders, which compresses them automatically.
In this case, we encourage you to go ahead and rebuild the icon cache database. Doing so will remove the corruption errors within the database, thus resolving the error in the process.
Here is what you need to do:
- Close all the opened folders on your operating system.
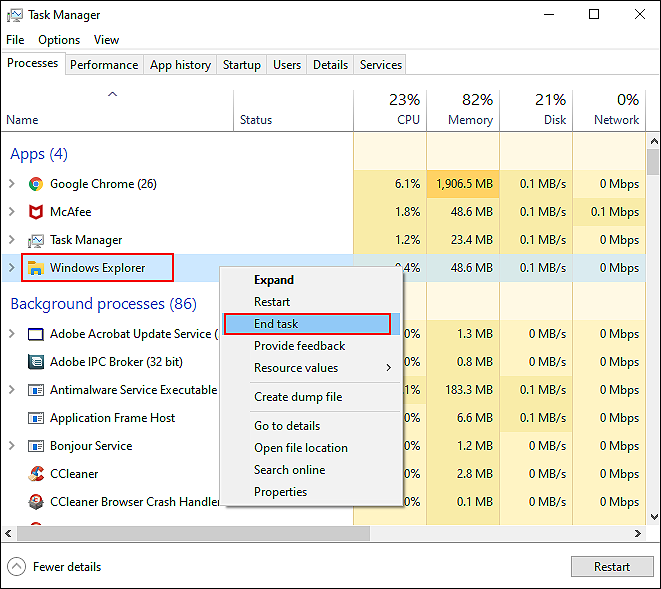
- Type Task Manager in the search bar and click on Open to launch the Task Manager window.
- Right-click on the Windows Explorer option in the task manager and click on End Task.
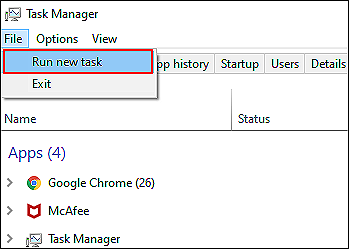
- Once the tasks are closed, click on File from the ribbon menu and select Run new task.
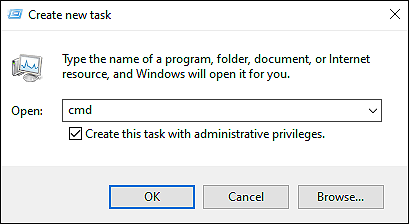
- In the next window, type cmd.exe in the text field and checkmark the box associated with Create This Task With Administrator Privileges. Doing so will launch elevated Command Prompt.
- In Command Prompt, type the commands mentioned below and hit Enter to execute them.
CD /d %userprofile%\AppData\Local
DEL IconCache.db /a
EXIT
- Once the commands are executed, go back to the Task Manager and repeat the 4th step.
- Type explorer.exe in the text field and hit Enter.
- Now restart your PC and check if the issue is resolved. If not, proceed with the 10th step.
- Type cmd in the search field of the taskbar and click on Run as administrator to launch elevated Command Prompt.
- Type the command mentioned below in the Command Prompt window and hit Enter to execute it.
ie4uinit.exe -ClearIconCache
If corrupt icon cache database was causing the issue at hand, rebuilding the database will resolve it without any issues.
5. Try Using CleanMyPC.
As we mentioned earlier, the issue at hand is likely to occur when your operating system is trying to create more space on the drives. Some users were able to resolve the issue by eliminating the junk files that were taking up space on their PC using a PC cleaner, so we recommend you try it out.
A PC cleaner will scan your system for the unwanted files, identify them, and eliminate them with little to no user input. We recently tested some of the best cleaners in the market and found CleanMyPC to be the best, which is why if you are looking for a recommendation, we suggest you go for CleanMyPC.

CleanMyPC comes with a wide range of system maintenance tools that can take care of most of your PC-related issues like slow performance and corruption errors. All that you need to do is run a scan using it, and the rest will be taken care of!
If this is something your PC desperately needs, install CleanMyPC now and get your PC up and running like new!
6. Perform an In-place Upgrade.
In the event that none of the above methods has worked for you, then this implies that the corruption error on your operating system cannot be fixed using conventional troubleshooting methods.
If this is the case, it would be best to perform an in-place upgrade, as this will fix all the problems within Windows, without affecting any of your files.
- Download Media Creation Tool.
- After successful installation, open the app and click on Upgrade this PC now.
- Follow the instructions on the screen.
- In the Ready to Install window, select the items you want to keep on your PC after installation.
- Click Next and follow the instructions visible on the screen to start Windows installation.
That’s it. This should resolve the issue once and for all.
This brings us to the end of our guide on preventing files in Windows 10 from automatically compressing. We hope that one of the methods mentioned in this guide did the trick for you and the issue is resolved by now. If you have any questions about the troubleshooting steps, please let us know in the comment section below.
If this guide helped you, please share it. 🙂
