Looking for easy ways to find missing Microsoft Teams Add-in for Outlook in Windows 10?
The Microsoft Office suite includes a number of useful features that are designed to make users’ work life easier. With its ability to adapt to your needs, it is one of the best applications that enables users to reach their business and personal goals.
One such amazing feature of Office is the Add-ins feature that makes switching from one application to another easier. We find this particularly helpful when we want to schedule Teams meetings in Outlook but recently, several users reported that they cannot find the Microsoft Teams Add-ins for Outlook in Windows 10.
We had a look into this matter and found out that this issue can be caused by a number of reasons, including outdated office installation, corruption errors, lack of multi-factor authentication.
If you are facing a similar issue, you are in the right place because, in this guide, we have listed some of the most effective methods to resolve the error under consideration.
Let’s get started.
1. Register Microsoft Teams DLL Files.
DLL files are program files that contain instructions that other software can use to perform certain tasks. However, the DLL files must be registered for certain programs to create a path to the program’s file in the registry where it can be looked up.
Several users managed to resolve the issue of missing Microsoft Teams Add-ins by registering Microsoft Teams DLL files on their PC, which is why we encourage you to give it a shot.
Here is what you need to do:
- Type This PC in the search bar and click on Open.
- Inside the newly launched window, navigate to the location mentioned below. Keep in mind that the address may vary according to the version of Microsoft Teams on your PC.
C:\Users\<your user name>\AppData\Local\Microsoft\\Teams\TeamsMeetingAddin\1.0.20244.4\x86
- Locate Microsoft.Teams.AddinLoader.dll in the window.
- Once you have found it, type cmd in the search bar and hit click on Run as administrator to launch elevated Command Prompt.
- Now paste the command mentioned below in the Command Prompt window and hit Enter. The command we are using is similar to the path mentioned in Step 2. In case the path to Microsoft.Teams.AddinLoader.dll on your PC is different, you must type that in Command Prompt.
C:\Users\<your user name>\AppData\Local\Microsoft\\Teams\TeamsMeetingAddin\1.0.20244.4\x86
- Next, copy the command mentioned below and paste it into the Command Prompt window. Hit Enter to execute the command.
regsvr32 Microsoft.Teams.AddinLoader.dll
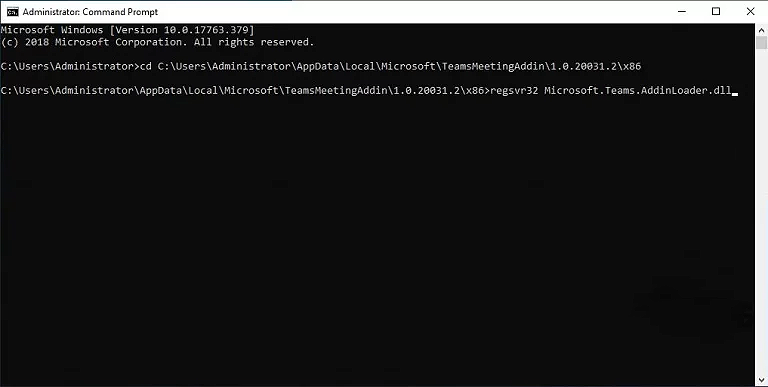
- Once the command is executed, a pop-up will appear on your screen stating that the action has been completed successfully. Click OK.
- Finally, restart your PC to save the changes.
The Microsoft Teams Add-in for Outlook on Windows should be available now.
2. Enable Essential Add-ins.
When Outlook detects that certain features are interfering with its regular operations, it disables them. This can also occur with Add-ins, and there is a chance that Outlook itself disabled the Add-ins that caused the error.
If this is the case, all you need to do is simply enable the Add-ins back by modifying Outlook settings.
Here is how you can do that:
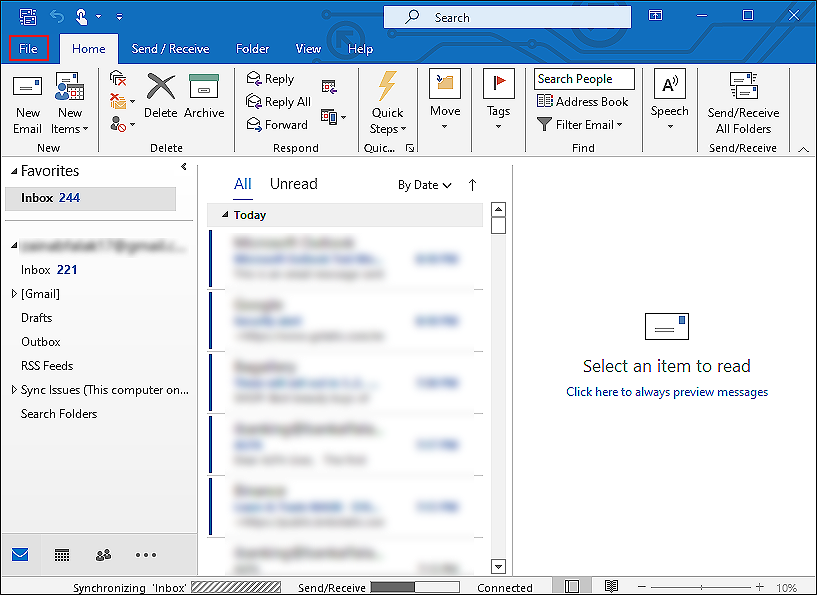
- Type Outlook in the search bar and click Open to launch the program.
- Locate the File option and click on it.
- Select Options. Doing so will launch a window where you can modify the settings.
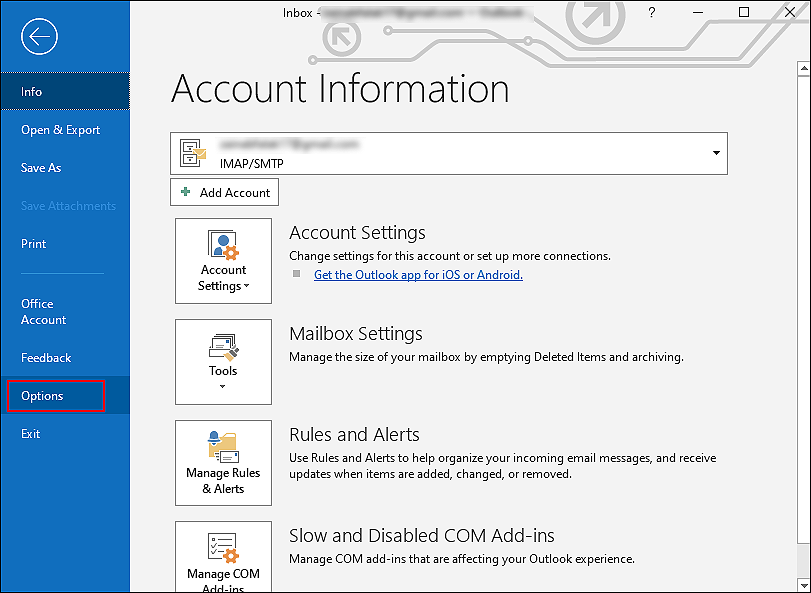
- Locate Add-ins from the left panel and click on it.
- Now find the Microsoft Teams Meeting Add-in for Microsoft Office in the Active Application Add-ins list. If not, check the Disabled Application Add-ins list and then click on COM Add-ins from the dropdown menu at the end of the window.
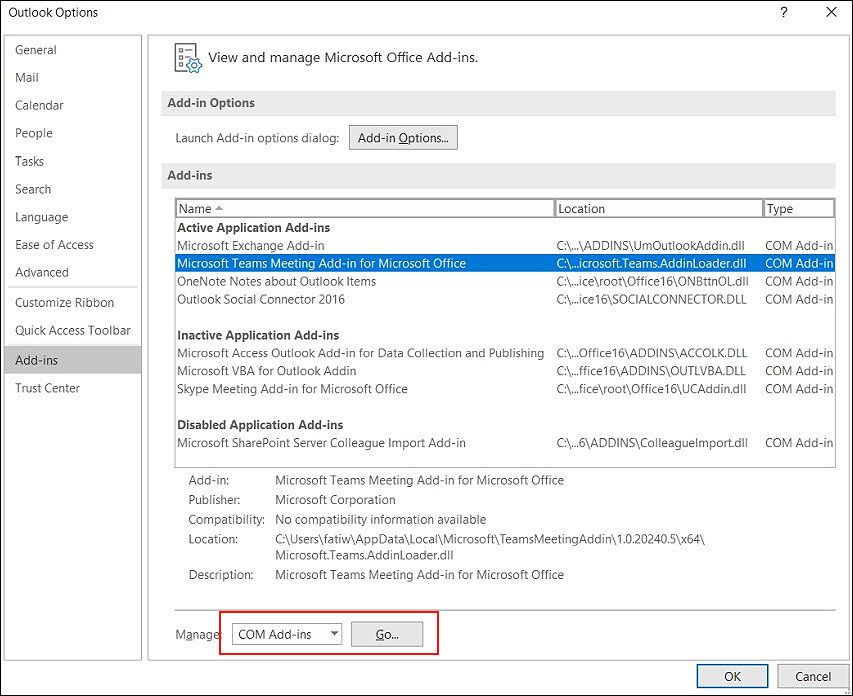
- Click on the Go button against it and in the next window, locate Microsoft Teams Meeting Add-in for Microsoft Office.
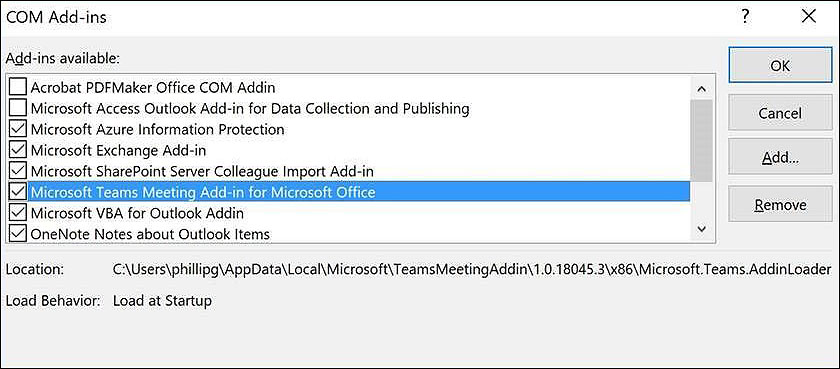
- Checkmark the box against it and click on OK.
- Once done, restart your PC and check if the issue is resolved.
This should fix the issue in no time. If the problem persists, proceed to the next method below.
3. Try Using CleanMyPC.
It could be worth cleaning your PC and removing any junk system files if you haven’t done that recently as they might be contributing to the problem at hand.
Junk files might seem harmless, but they have the potential to cause serious issues within the operating system and its programs like Microsoft Teams. It is best to eliminate these junk files using a PC cleaning application, in which case we recommend CleanMyPC.

A CleanMyPC scan will detect any issues on your PC and will repair them automatically. In our experience, it has significantly enhanced our PC’s performance by cleaning up space and eliminating junk files.
CleanMyPC offers a wide range of tools for optimizing PC performance. Further, the interface is user-friendly, so you will not have to spend hours learning how to use it.
Install CleanMyPC now and get your PC up and running like new!
4. Modify Meeting Policies.
Meetings policies are used by the administrators to control the features available to the participants of the meeting. If the Outlook Add-ins feature is disabled in the Meeting Policies, you will not be able to access the Add-ins in your Outlook.
Here is how you can enable the Meeting policies to fix the issue at hand:
- Launch Microsoft Teams Add-in center on your browser.
- Locate Meeting policies in the left panel and in the right pane, look for Allow the Outlook Add-in option.
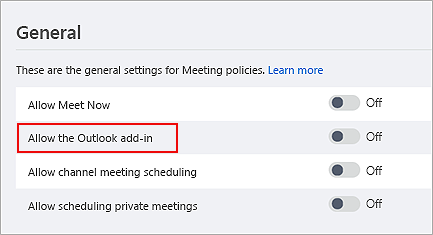
- Turn the toggle on against Allow the Outlook Add-in option to enable it and restart the Microsoft Outlook client to check if the issue is resolved.
That’s it.
This brings us to the end of our guide on fixing missing Microsoft Teams Add-in for Outlook in Windows 10. We tried walking you through all the steps in detail and hope that one of the methods mentioned above did the trick for you. In case you still have any confusion about the methods, please let us know in the comment section below!
If this guide helped you, please share it. 🙂


