

Wondering how to fix update error code 0x800707e7 on Windows 10?
Installing Windows updates is essential to keep your operating system up and running like new, but the process might not be as seamless as it sounds for users.
Recently, several users reported that their screens display the error code 0x800707e7 when they attempt to install certain pending updates. It most commonly occurs during the installation of features updates, quality updates, or even during the upgrade from Windows 7. We had a look into this issue and discovered that it can be caused by a number of reasons including the ones mentioned below:
- Invalid indexing location
- Conflicting applications
- Unknown/corrupt users profile
- Corrupt Software Distribution and Catroot2 folder
If you are facing a similar issue, you are in the right place because in this guide, we will walk you through relevant troubleshooting steps in detail.
Let’s get started!
1. Run the Windows Update Troubleshooter.
A number of troubleshooting tools are built into Windows that can be used to fix issues like the one at hand. They scan for problems in the operating system, identify them, and fix them with little or no user interaction.
Windows Update Troubleshooter is one of these handy applications, which identifies the reasons why your operating system cannot install or update applications and fixes them automatically.
Here is how you can run the Windows Update Troubleshooter to fix the error under consideration on your PC:
- Open a Run dialogue box by pressing Windows + R keys simultaneously on your keyboard.
- In the text field of the dialogue box, type ‘ms-settings:troubleshoot‘ and hit Enter. This will launch the Troubleshooting window in the Settings app.
- Now locate Windows Update under Get up and running and click on the Run the troubleshooter button.
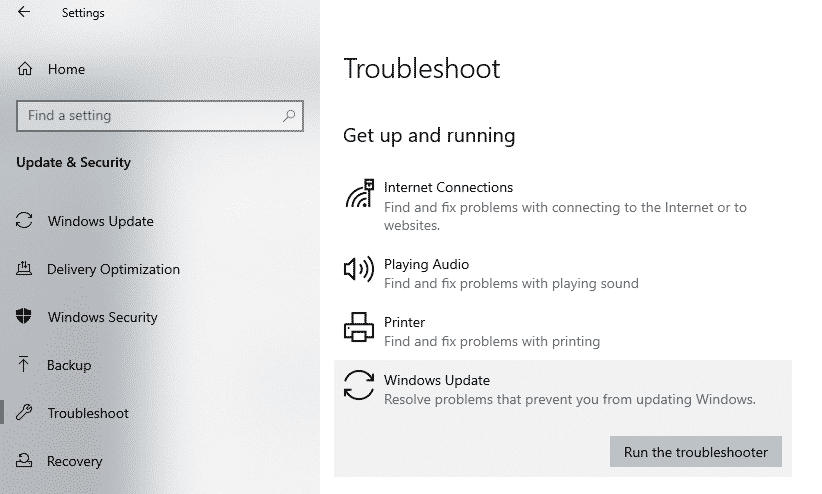
Wait for the troubleshooter to complete its scan. If it detects any issues, it will suggest fixes. In that case, follow the on-screen instructions to complete the process.
2. Reset Windows Update Components.
The Windows Update components can become corrupted at times, preventing the most recent updates from installing on the system.
In most cases, you can restore Windows Update components to their original state by resetting them. This will restore them to their error-free state.
Many users have resolved the issue by resetting the Windows Update components, so we encourage you to do the same. Hopefully, it will fix Windows Update error 0x800707e7 in Windows 10.
Here is what you need to do:
- Type cmd in the search bar and click on Run as administrator to launch Command Prompt with administrative rights.
- Now type the commands mentioned below and hit Enter after each to execute them. These commands will stop all the Windows Update Services.
net stop wuauserv
net stop cryptSvc
net stop bits
net stop msiserver
- Once done, type the commands mentioned below one by one.
net start wuauserv
net start cryptSvc
net start bits
net start msiserver
- Finally, restart your PC and check if resetting the update components resolved the error.
If corrupt Windows Update components cause the problem, resetting them will fix it in no time.
3. Run SFC and DISM Scans.
As we discussed above, corruption errors within the system can cause the error.
Thanks to Windows built-in troubleshooting utilities, issues like this can be identified, located, and resolved with little to no manual intervention. Two more utilities are System File Checker (SFC) and Deployment Image Servicing and Management (DISM.exe) tool. Both of these are command-line tools, which means that you can use them via Command Prompt.
To eliminate any corruption errors that might be impairing your computer’s performance, run SFC and DISM scans. Doing so should help you fix the error at hand.
4. Manually Update PC.
The Windows Update channel offers a smooth and automatic procedure for installing Windows updates. It may be possible to resolve the issue under consideration by manually installing these updates, which will use different OS directories and resources.
- Visit the Windows 10 section of the Microsoft website.
- To begin the update process, click on Update Now under the Windows Update assistant.
- After that, run the setup file for the assistant as an administrator and check if you can update the system without seeing error 0x800707e7.
As simple as that!
5. Set the Index Location to the Default Path.
In some cases, users like to customize their operating systems; however, in the process, they change their Indexing Location path. Some Windows Updates will fail if the path cannot be found, since they require it to exist on the OS drive or to be the default location.
Here is how you can set the index location to the default path:
- Type Control Panel in the search bar and click Open to launch Windows Control Panel.
- Inside the Control Panel window, expand the View by option and select Small icons.
- Now click on Indexing Options from the list of options available.

- In the Indexing Options window, hit the Advanced button.
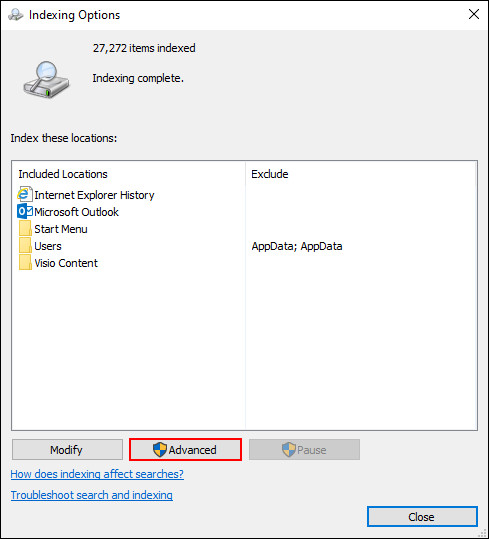
- Next, check if the current location under Index location is set as follows.
C:\ProgramData\Microsoft
- Click OK to save the changes and then reboot your PC.
Now check if the issue is resolved.
6. Uninstall the Conflicting Applications.
Oftentimes, applications (like SQL Server) create hidden user profiles on your system for their operations. However, those profiles can interfere with the update process and result in the error code 0x800707e7. You may be able to resolve this issue by uninstalling conflicting apps (such as antivirus, etc.). Below are the applications that have been reported as causing the issue by users:
- SQL Server
- Kaspersky Antivirus
- Microsoft’s Zune Software
- Nvidia Drivers
In this method, we have discussed the uninstallation of Kaspersky antivirus. You can follow the same procedure for other applications as well:
- Type Apps & Features in the search bar and click Open.
- Look for Kaspersky in the right pane and click on it.
- Now on Uninstall and follow the on-screen instructions to proceed with the uninstallation process.
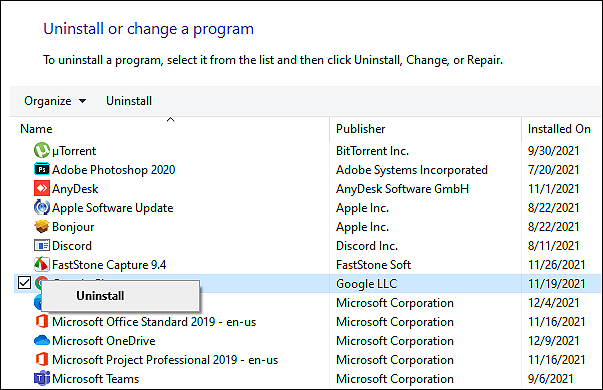
Finally, reboot your PC.
7. Delete Unknown User Profiles from the System Properties.
There may be corrupt or unwanted user profiles (from uninstalled software) on your system that prevent the update from installing. This problem can be resolved by deleting the corrupt or unwanted user profile.
However, before you proceed, we recommend creating a restore point. Doing so will help you restore the current state of your system in case anything goes wrong.
- Press Windows + R keys simultaneously to open a Run dialogue box.
- In the text field of the dialogue box, type \users and hit Enter.
- Now check if there are any user profiles that you do not recognize or no longer need. If you find any, then backup the contents of the folders you do not need.
- Next, type Advanced System Settings in the search area of your taskbar and hit Open.
- In the System Properties window, click on Settings under User Profiles.
- Select the unknown profiles one by one in the next window and delete them.
Finally, reboot your PC and check if the issue is resolved.
8. Modify Windows Registry.
There is also a chance that a corrupt user profile entry within Windows Registry is resulting in the error at hand.
In this method, we will walk you through the process of deleting the corrupt entries:
- Press Windows + R keys simultaneously on your keyboard to open a Run dialogue box.
- Inside the text field of the Registry Editor, type regedit and hit Enter.
- Once you are inside the Registry Editor, navigate to the location mentioned below.
Computer\HKEY_LOCAL_MACHINE\SOFTWARE\Microsoft\Windows NT\CurrentVersion\ProfileList
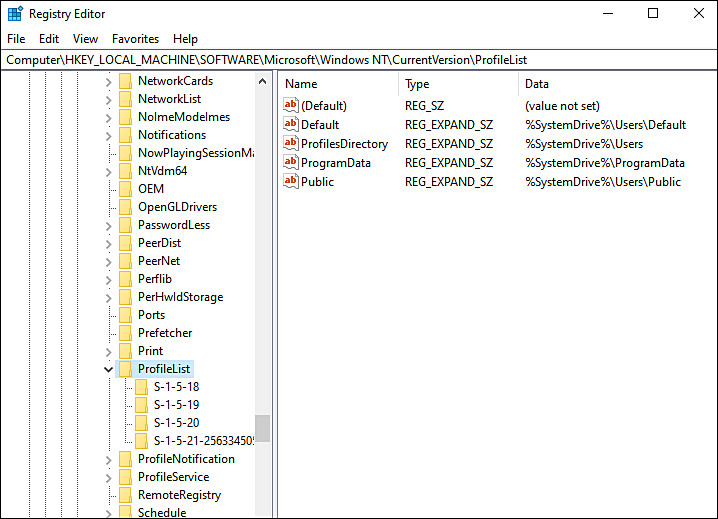
- Now identify and delete the user accounts that you no longer need. You can do that by exploring the ProfileImagePath key in the right pane to find problematic profiles.
Note: If you notice a key with a .bak extension, delete that as well.
- Next, repeat the same process for the location mentioned below.
Computer\HKEY_LOCAL_MACHINE\SOFTWARE\WOW6432Node\Microsoft\Windows NT\CurrentVersion\ProfileList
- Finally, reboot your PC to save the changes.
9. Try Using CleanMyPC.
If running SFC and DISM commands did not fix the issue for you, try running a PC cleaner.
In general, corruption issues result from junk files in your system, so if you haven’t cleaned them up in a while, now is the time. We recently tested some of the best cleaners in the market and found CleanMyPC to be the best.

The program includes a variety of tools for system maintenance that can do much more than just remove junk files. The tools listed here include (but are not limited to) Multi-Uninstaller, Registry Cleaner, and a Speed Booster. You must install CleanMyPC and then run a scan through it to fix the problem. If any issues are found, it will take care of them without much user input.
Install CleanMyPC now and get your PC up and running like new!
10. In-place Upgrade.
In the event that none of the methods listed above have helped you to resolve your issue, it implies that conventional troubleshooting methods cannot help you.
We recommend performing an in-place upgrade in this case, since it will repair all the problems within Windows without affecting your files.
- Download Media Creation Tool.
- After successful installation, open the app and click on Upgrade this PC now.
- Follow the instructions on the screen.
- In the Ready to Install window, select the items you want to keep on your PC after installation.
- Click Next and follow the instructions visible on the screen to start Windows installation.
That’s it.
This brings us to the end of our guide on fixing the error code 0x800707e7 on Windows 10. We tried walking you through all the steps in detail and hope that one of the methods mentioned in this post did the trick for you. In case you still have any confusion about the troubleshooting steps, please let us know in the comment section below!
If this guide helped you, please share it. 🙂
