

Wondering if there’s a way you can get full dark mode with LibreOffice?
For the past several years, Microsoft Office has been the first choice of users when it comes to creating word files, spreadsheets, and presentations. And, why wouldn’t it be? After all, it comes packed with everything you’ll need from an office suite.
With that being said, one of its disadvantages is that the software costs you money. Even though it won’t be an issue for big companies, those on a budget should try having a look at its open-source substitutes.
If you’re aware of the open-source market, you might have already heard of LibreOffice. This free software offers most of the functionalities you’d get from Microsoft Office. As a matter of fact, migrating from MS Office to LibreOffice shouldn’t be that difficult either.
However, there’s a feature offered by Office365 that’s called the dark mode. With its help, the application will reduce its usage of the white color to comfort those having a medical condition such as Myodesopsia.
In this article, we’ll first tell you if such a feature is available in LibreOffice. If it is, then we’ll teach you how to enable it.
So, without further ado, let’s dive right in!
Does LibreOffice Have a Dark Mode?
Step 1: Enable Dark Mode (For Ubuntu Users).
Step 2: Select Dark Theme (If You’re on Flatpak or Windows).
Step 3: Change Application Colors.
Does LibreOffice Have a Dark Mode?
Although there is no official ‘dark mode’ feature in LibreOffice, it is possible for users to enable dark mode in Ubuntu. This way, all elements of the software should adopt a dark theme except for the page, which will still be white.
Luckily, there is a way with which you can even change the color of the page. However, the procedure will get a bit longer. So, it’s entirely up to you whether you are okay with just enabling Ubuntu dark mode or want to go the extra mile.
Either way, you’d have to follow our instructions given below. For this tutorial, we’re using Ubuntu v20.04 with LibreOffice v7.1. However, the procedure shouldn’t be that different for other versions as well.
Step 1: Enable Dark Mode (For Ubuntu Users).
If you’re on Windows, you should skip this step and move on to Step 2. As we mentioned earlier, LibreOffice doesn’t come with a dark mode. However, users can enable dark mode in Ubuntu to get a similar effect.
This should give a black color to the title bar, menu bar, toolbar, status bar, and other elements of all installed applications. Just make sure to follow our instructions clearly, and you’ll be good to go.
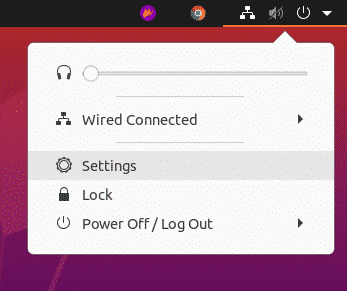
Here’s how you can enable dark mode in Ubuntu:
- First of all, you’d have to open Settings from the system menu located at the top-right corner of your screen.
- The next step is to click the Appearance tab.
- From the Window Colors sections, you’d just have to select Dark.
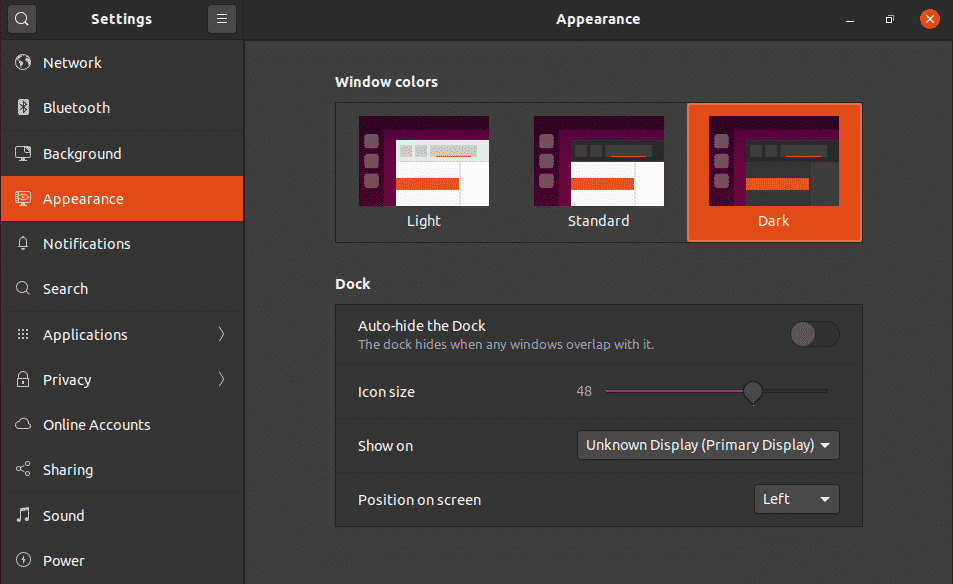
- With this, the Dark theme should be activated for the desktop and all software installed.
Now, when you open any LibreOffice tool, you should notice that the dark theme has been applied to plenty of its elements. However, if you want to get a dark page as well, your best bet would be to follow our next step.
Step 2: Select Dark Theme (If You’re on Flatpak or Windows).
If you’re a Windows user or have a Flatpack package of LibreOffice, there’s an issue you might encounter. You might find the header area or menu area of the application to be white.
If you also noticed it and feel like it’s ruining your overall experience, you need not worry since there’s a simple solution to this problem.
Just following these steps carefully should do:
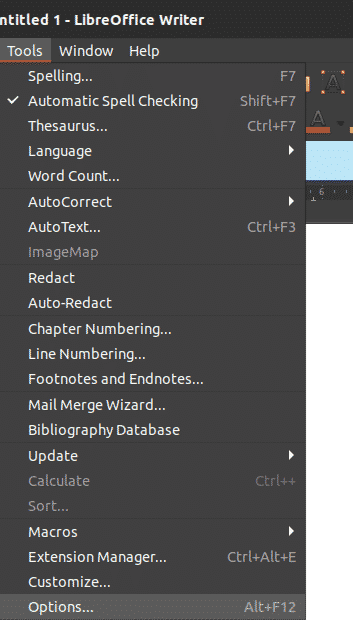
- Firstly, open any tool from the LibreOffice suite.
- The second step is to open Options, which you can find in the Tools tab.
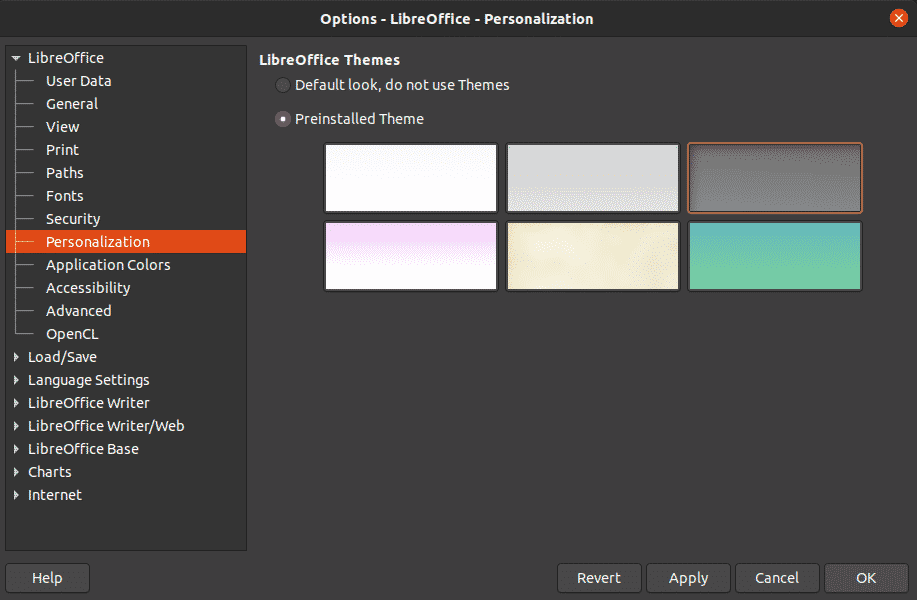
- Once the Options menu appears, you have to click the Personalization tab from the sidebar.
- Lastly, you’ll just have to opt for the Dark theme and click OK, and you’ll be good to go.
With this, you should now be able to see a darker shade in the header area of your LibreOffice tools. But, if you aren’t on Windows or using the Flatpak version, there should be no issue in the first place.
Step 3: Change Application Colors.
If you don’t think you can do without a dark page, the good news is that the Application Colors option of LibreOffice is sure to be helpful.
With the help of this feature, your eyes will face even less strain since the pages could also be in black.
If we have you interested, let’s have a look at the steps:
- The first step is to open Writer or any other LibreOffice tool on your PC.
- Once it opens, you need to click on Tools and go for Options.
- From the Options window, you have to click Application Colors, which you can find in the sidebar.
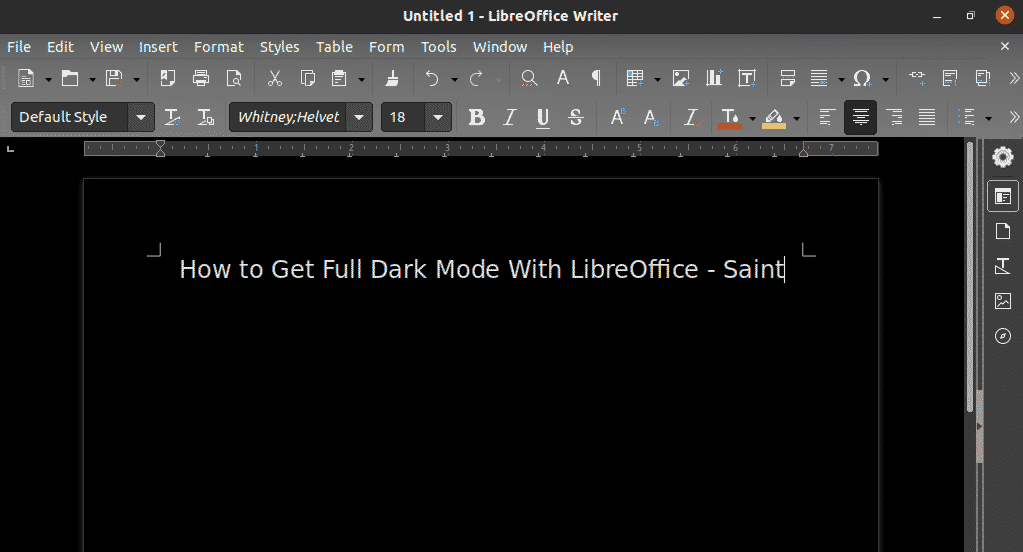
- The next step would be to change the colors of the Document background and Application background to Black.
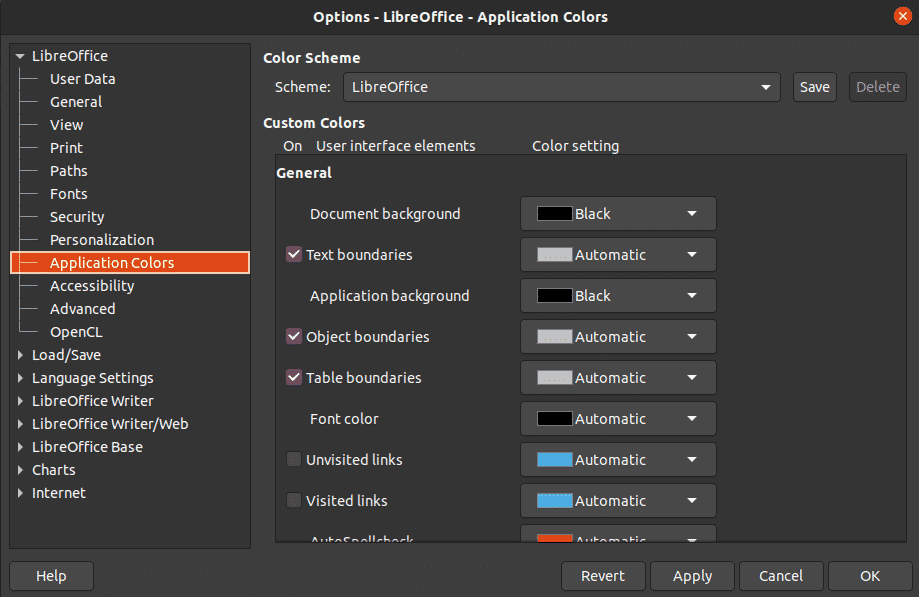
- With this, whenever you open a new document, it should have a black background.
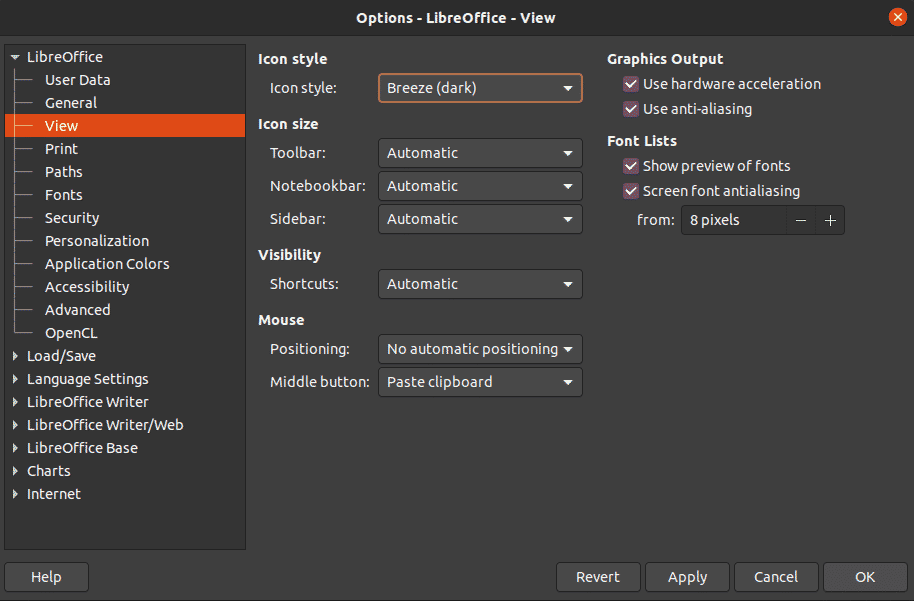
- Moreover, if you can’t see any dark-colored icons, you’d have to click the View tab in the sidebar.
- From the icon style dropdown menu, you should either select Yaru or any other dark-themed icon pack if you have one on your system.
By following these steps, you should now have a full dark mode for your LibreOffice tools. Moreover, it is possible to go for a different color combination than the one we’ve mentioned.
As of late, you might have been able to see the dark mode being added in more and more applications. The reason for this could be to help users spend more time on these applications without putting too much strain on their eyes.
Although LibreOffice doesn’t come with a dark mode of its own, it does have an Application Colors option, which serves the same purpose. And, as you could probably tell from this tutorial, it’s pretty easy to get a full dark mode with LibreOffice.
Lastly, we suggest following all the steps carefully. However, if you still run into any issues, feel free to mention them in the comment section below, so you might find some help.
If this guide helped you, please share it. 🙂
