

Wondering how to hide App and browser protection area in Windows 10?
Windows Security features Microsoft’s App & browser control to protect users against malicious downloads, websites, or files. It is a Windows security feature that works in the background to ensure that your system remains clear of any viruses or corruption errors while you browse the internet.
However, since this is mainly an administrative-level feature, it might be a good idea to hide it from standard users if multiple individuals use your PC, as you do not want them to be messing with it. This is especially important in offices where a single computer is used by several employees.
In this guide, we will walk you through the methods of hiding App and browser protection area in Windows 10. All the methods are easy to execute and should not take much of your time.
Let’s get started!
1. Use Windows Registry.
An operating system’s Registry is a database used to store low-level details about its processes and applications. Windows relies on the Registry Editor for important information while performing relevant operations, which makes the Registry Editor an important component of our operating system.
In this method, we will modify Windows Registry to hide App and browser protection area.
Here is what you need to do:
- Press Windows + R keys simultaneously on your keyboard to open a Run dialogue box.
- Inside the text field of the dialogue box, type ‘regedit’ and hit Enter. This will launch Windows Registry on your PC.

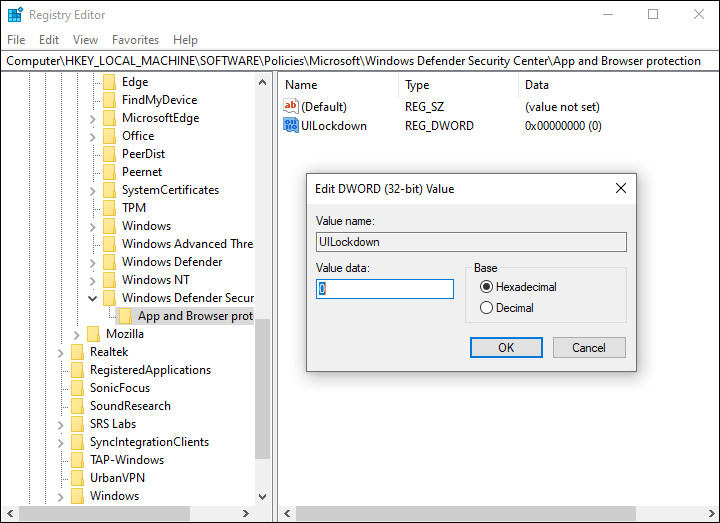
- Once you are inside the Registry Editor, navigate to the location mentioned below.
HKEY_LOCAL_MACHINE\SOFTWARE\Policies\Microsoft\Windows Defender Security Center\App and Browser protection
- If you cannot locate the App and Browser protection key, then right-click on the Windows Defender Security Center key and select the New > Key option.
- Rename this key as App and Browser protection and double-click on it.
- Now right-click anywhere in the right pane and select the New > DWORD (32-bit) Value option.
- Rename this newly created value as UILockdown.
- Double-click on UILockdown and under Value data, type 1.
Once done, restart your PC to save the changes.
2. Try Using CleanMyPC.
There is a possibility that your system is infected if you cannot execute any of the methods described in this guide. Prior to troubleshooting, it would be best if you clear the junk files.
Using a professional PC cleaner can help you remove computer clutter. One recommendation we have is CleanMyPC.

In addition to removing junk files, CleanMyPC has a range of tools that can address other PC problems. After you install the tool and run an initial scan, the tool will automatically find and fix problems without your input.
CleanMyPC is also quite easy to use. Even if you’ve never used a PC cleaner before, you’ll have no problem using it.
3. Use Group Policy Editor.
Another easy way of hiding the App & Browser Protection area in Windows 10 is by using the Group Policy Editor.
Group Policy Editor (GPE) is also a utility provided to help users customize the behavior of their operating systems from an administrative level. The information in GPE is stored in policies, and by modifying the relevant policies, you can make the changes you desire.
Here is how you can use the Group Policy Editor to hide the App and browser protection area:
- Press Windows + R keys simultaneously on your keyboard to open a Run dialogue box.
- Inside the text field of the dialogue box, type ‘gpedit.msc’ and hit Enter. This will launch Group Policy Editor on your PC.

- Once you are inside the Group Policy Editor, navigate to the location mentioned below.
Computer Configuration\Administrative Templates\Windows Components\Windows Security\App and browser protection\
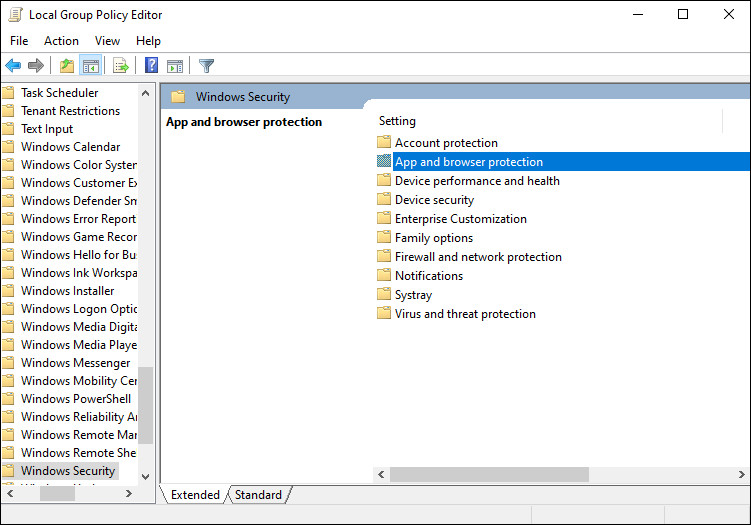
- Now locate and double-click on Hide the App and browser protection area in the right pane.
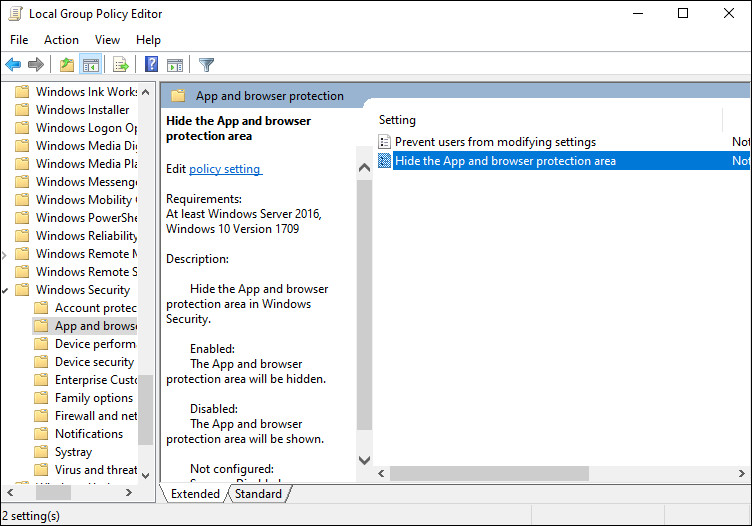
- Select Enabled and click on Apply to save the changes.
- Now check if the desired changes have been made. If not, then type cmd in the search bar and click on Run as administrator.
- Type the command mentioned below in the Command Prompt window and hit Enter to execute it.
gpupdate /force
As simple as that!
This brings us to the end of our guide on ways to hide App and browser protection area in Windows 10. We tried walking you through all the steps in detail and hope that one of the methods mentioned in this post did the trick for you. In case you still have any confusion about the steps, please let us know in the comment section below!
If this guide helped you, please share it. 🙂
