

Wondering how to create or add an offline local user account on Windows 11?
It has always been Microsoft’s preference that you log into your computer with a Microsoft Account, and it has also become more difficult to avoid. Microsoft no longer offers the option to create a local user account on a new PC. Instead, it forces you to sign up for a Microsoft Account, but there seems to be no option to create one. Fortunately, we still have a solution available.
However, before we get to work, let’s first have a brief look at what an offline Local Account exactly is.
Offline accounts do not offer synchronization services like Microsoft accounts, nor can they access apps that are integrated with Microsoft accounts.
Additionally, you will not be able to transfer your settings from one PC to another. This means you would have to start all over every time with the data when you switch PCs. You will also have to sign in to your Microsoft account whenever you download an app from the Microsoft Store. One benefit of a local account however is that you can remove the account password on Windows 11 and allow the operating system to boot directly. However, it may not be the safest option from a security perspective.
Now let’s see how to create or add an offline Local User account on Windows 11.
1. Modify Windows Settings.
The first and probably the easiest method of creating and adding a local user account is via Windows Settings. You will find a dedicated relevant option there.
Here is all that you need to do:
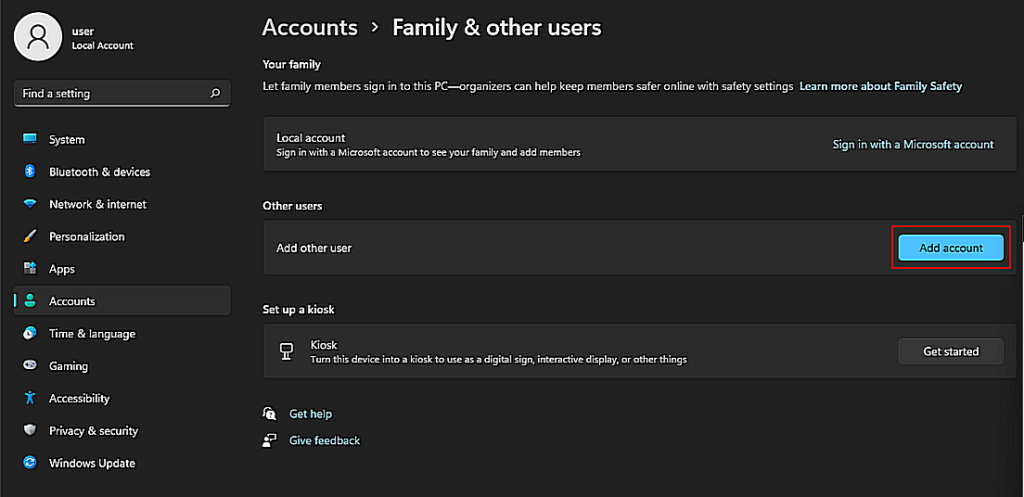
- Press Windows + I keys simultaneously on your keyboard to open Windows Settings.
- Inside the Settings window, click on three bars on the top-right corner and select Accounts from the list of options available.
- Now click on Family & other users in the right pane and in the next window, hit the Add account button under Other users.
- Next, click on the I don’t have this person’s sign-in information hyperlink in the first prompt.
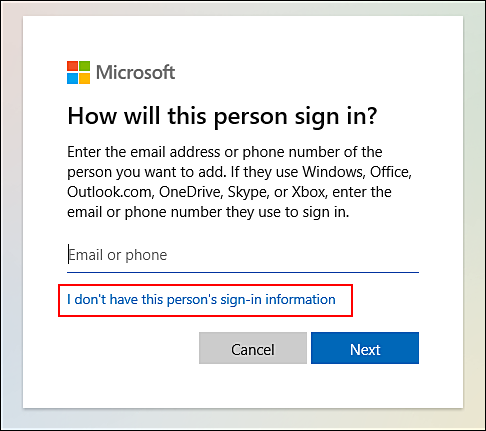
- In the next prompt, click on Add a user without a Microsoft account.
- Once you are inside the Create a user for this PC page, enter the required details and click on the Next button.
- Finally, hit the Next button one last time and wait for the process to complete.
This should add/create an offline user account.
2. Add a New Local Account via User Accounts
Windows comes with a User Account menu that allows you to add, remove, and customize your accounts.
Here is how you can add a new local account via User Accounts:
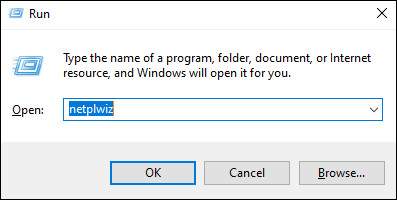
- Press Windows + R keys simultaneously to open a Run dialogue box.
- Inside the text field of the dialogue box, type netplwiz and hit Enter to launch User Accounts menu.
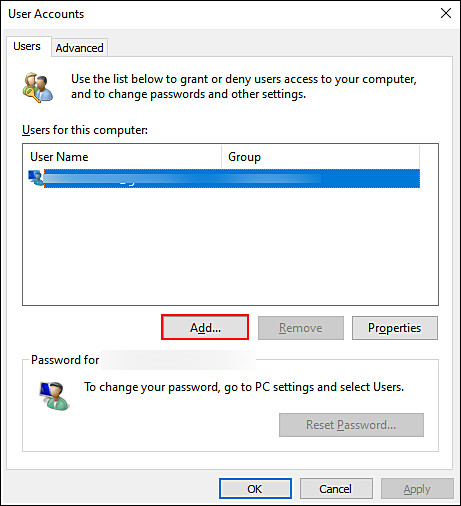
- Once the User Account window is launched, navigate to the Users tab and checkmark the box associated with Users must enter a user name and password to use this computer.
- Now click on the Add button under Users for this computer.
You can now sign in with your Microsoft Account.
3. Use Command Prompt.
If you prefer using the Windows command prompt, here is how you can add an offline local account to Windows 11 using the command prompt:
- Press Windows + R keys simultaneously on your keyboard to open a Run dialogue box.
- In the text field of the dialogue box, type cmd and press Ctrl + Shift + Enter keys simultaneously on your PC to open Command Prompt with administrative privileges.
- Next, type the command mentioned below in Command Prompt window and hit Enter to execute it.
net user "Username" "Password" /add
Note: Replace username and password with your actual username and passcode.
- In case you want to create a local account without a password, execute the following command.
net user "UserName" /add
This should make the desired changes in no time.
4. Try Using CleanMyPC.
If you have tried the methods described in this guide and you are still unsuccessful, then your system may be corrupt.
To solve this issue, you should thoroughly clean your computer before continuing with this guide. By doing so, your computer will be free of bugs and corruption errors. Using a good PC cleaner when this happens can be a good idea since manual cleaning is time and energy-consuming.
We recommend CleanMyPC if you have never used one before.

CleanMyPC allows you to fix all kinds of PC issues in a quick and efficient manner. The program includes many tools, such as a Multi-Uninstaller, a Speed Booster, and a Registry Cleaner, which allow you to fix the majority of problems with your system and enhance its performance.
If this sounds like something you need for your PC, you can install CleanMyPC right now and see how much faster your PC will be!
5. Utilize the Lusrmgr Utility.
The Local User and Group Management utility (lusrmgr.msc) manages the local users and groups in Windows. This is a universal console that is utilized in all versions of Windows since Windows 2000.
Local user management’s primary purpose is assigning rights to individuals and groups on a computer. There are default roles such as administrator, power user, standard user, and guest. In this method, we will use the lusrmgr utility to perform the desired changes.
Keep in mind, however, that this method is only executable if you are running Windows 11 Pro, Windows 11 Enterprise, or Windows 11 Education.
Here is what you need to do:
- Press Windows + R keys simultaneously on your keyboard to open a Run dialogue box.
- In the text field of the dialogue box, type lrusrmgr.msc to open up the Local Users and Groups utility.
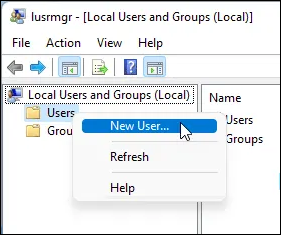
- Inside the Local Users and Groups utility, click on Users from the left pane.
- Now in the right pane, click on More Actions and select New User.
- You’ll need to enter the username, password, as well as password confirmation in the new prompt.
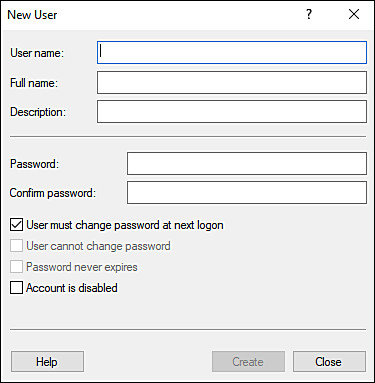
- To make this password permanent, uncheck the box associated with User must change password at next logon, then click Create. A new local account will be created using the user and password you previously specified.
Finally, restart your PC to save the changes.
This wraps up our guide on ways to create or add an offline local user account on Windows 11. We hope that one of the methods mentioned in this guide did the trick for you. If you have any questions regarding the methods listed above, please let us know in the comment section below.
If this guide helped you, please share it. 🙂
