

Do you encounter installation problems on GeForce Experience?
Being able to finally upgrade your video card is one of the most exciting things for any PC gamer. This means more frames per second, more games you can run, and more hours of nonstop fun.
While upgrading your GPU is as simple as installing the card and updating your drivers, there are some problems that could occur along the way. Unfortunately, this is the case for some users who experience installation problems with GeForce Experience.
GeForce Experience is a companion software developed by NVIDIA for their GeForce series graphics cards. This tool allows users to manage performance optimizations for gamers, record gameplay, and several other features.
If you want to get the full experience of NVIDIA’s platform, installing GeForce Experience is a must.
To help out, we’ve decided to make a guide for fixing installation problems on GeForce Experience.
Let’s dive right in!
1. Restart Your PC.
If you have encountered an error while installing GeForce Experience on your computer, try restarting it before attempting to install the software again. This should flush your system cache and eliminate errors that occurred during runtime.
Here’s what you need to do:
- On your keyboard, press the Windows key to open the Start Menu.
- After that, access the Power Options tab.
- Finally, choose Restart to reboot your system.
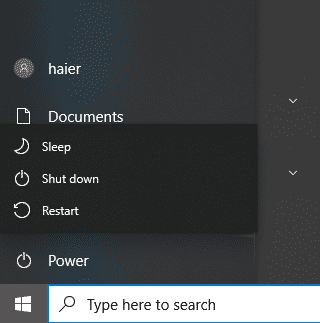
Run the installer again to check if you can install GeForce Experience without issues.
2. Ensure Your Graphics Card Is Enabled.
One of the most common reasons you cannot install GeForce Experience is if your NVIDIA graphics card is not getting detected by the software. To rule this out, head to the Device Manager and ensure your GPU is enabled.
Follow the steps below to guide you through the process:
- On your keyboard, press the Windows + X keys to open the Quick Menu.
- After that, click on Device Manager to launch it.
- Lastly, expand the Display Adapters tab.
Check if your video card shows up on the list. If not, it’s possible that your GPU is not properly connected. Reseat the video card from the slot and restart your PC.
3. Check Your Connections.
If your GPU is not getting detected by your computer, there’s a good chance that your HDMI or Display Port cable is connected to the motherboard. This will force your system to use the integrated graphics of your CPU, which is not what you want.
To fix this, make sure that your HDMI, DVI, or VGA cable is connected to the ports available at the back of your video card.
Restart your computer afterward and see if you can now install GeForce Experience.
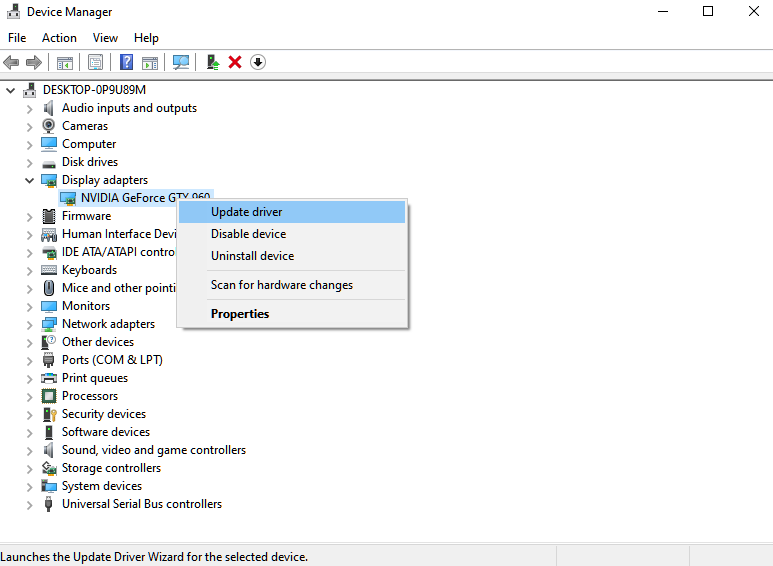
4. Update Your Display Drivers.
Outdated or incompatible display drivers could also be the reason you cannot install GeForce Experience on your computer. In this case, we suggest updating your drivers to the latest version to rule out any compatibility issues.
Here’s what you need to do:
- On your keyboard, press the Windows + X keys to open the Quick Menu.
- Now, click on Device Manager.
- Expand the Display Adapters tab and right-click on your video card.
- Finally, choose the Update Driver option and follow the prompts.
Reboot your system to apply the changes and try installing GeForce Experience again.
5. Redownload the Installer.
There’s a possibility that you’ve lost your internet connection while downloading the GeForce Experience installer, which corrupted the installer. To ensure everything’s in order, re-download the installer on your computer.
Head to NVIDIA’s website and download a fresh copy of GeForce Experience’s installer.
6. Uninstall Samsung Magic Rotate.
For unknown reasons, Samsung’s Magic Rotate software causes issues with GeForce Experience. If you have this software installed on your computer to rotate your display, we strongly suggest uninstalling it.
See the guide below to delete Magic Rotate:
- Launch the Control Panel on your computer.
- Click on Uninstall a Program.
- Next, locate the Magic Rotate Software. Most of the time, it’s named 5_RAFF.
- Right-click on the software and choose Uninstall.
Once done, restart your system and try installing GeForce Experience.
7. Update Windows.
The version of Windows you are using might have an underlying issue or is not compatible with GeForce Experience. Whichever the case is, you can try updating your operating system to patch issues.
Here’s what you need to do:
- On your computer, access the Start Menu and go to Windows Settings.
- After that, click on Update & Security and click on Windows Update.
- Finally, click on Check for Updates and follow the prompts.
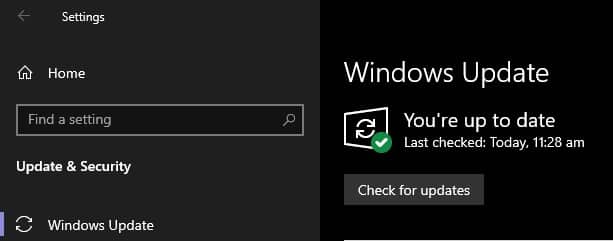
Restart your system and try installing GeForce Experience again.
That sums up our guide on how to fix installation problems on GeForce Experience. If you have questions, please drop a comment below, and we’ll do our best to help.
If this guide helped you, please share it. 🙂
