

Is your iPhone video stuck on ‘Preparing Video’ when editing it?
It is utterly a disgrace for Apple to sell their flagship devices that were later found to have numerous issues, thanks to the many users reporting it in the Apple discussions forums. The users are showing their frustration since they have bought overpriced yet faulty Apple devices.
It is truly unbelievable that an issue like an iPhone video stuck on ‘Preparing Video’ can happen when it seems to be an issue that can only happen on a cheaper device. Believe it or not, many users have been experiencing this issue for several months now.
Fortunately, if you are one of these users, you are in luck because we have put together a list of logical methods that you can try for yourself in order to resolve this issue.
Let’s get started!
1. Double Tap The Video.
One of the simplest methods to resolve this issue is to just double tap the video. Yes, you heard it right. Double tapping the video while you are editing it worked for many users.
When you double tap the video while it’s stuck, the progress will go back to 0%, but it will slowly make its way to 100% without getting stuck on the ‘Preparing Video’ status. Most of the time, the issue happens if you lock your iPhone or if you move away from the Photo application while it is still preparing.

Once you have done that, let us know if it fixed the issue for you. However, if the issue is still there, you can try to change the orientation of your iPhone to a different direction before double tapping the video. Hopefully, this has resolved the issue for you.
2. Turn Off iCloud Photos.
If double tapping the video did not work its magic on you, what you can do next is to turn off your iCloud Photos. What does this do?
If you are suffering from Internet connection issues, iCloud can suppress your ability to use the images or videos seamlessly due to the service constantly trying to sync different versions of your images and videos to the web while you are using them. Because of that, turning off iCloud Photos would be the most reasonable thing to do.
Here’s how you can turn off iCloud Photos:
- First, open up your iPhone’s Settings app.
- After that, click on your name, then select iCloud.

- Next, go to Photos, then turn off iCloud Photos.
Now, see if your iPhone video will still get stuck on ‘Preparing Video’ while you are editing it. If it still did not work for you, don’t lose hope as we still have some more suggestions for you.
On the other hand, if your iPhone doesn’t have any storage space left even after deleting your images and videos, you may use the same fix. This will help you solve two issues at once, so try it out!
3. Try A Restart Or Force Restart.
If you have double tap the video and turned off iCloud Photos, you may want to restart your phone afterward to check if this was just the problem. This is a common troubleshooting step that you must always do after tweaking some settings on your iPhone to ensure that the settings have been properly set.
If a single restart did not work, try it at least twice or thrice to be sure that your iPhone had restarted properly.
Here’s how you can restart your iPhone:
- First, press and hold the Power button (located on the right side of your iPhone) for a few seconds.
- After that, a prompt with a red slider showing ‘slide to power off’ will appear. Drag this slider to the right to turn off your iPhone.

- Finally, press down the Power button again until you see the Apple logo. This will turn your iPhone back on.
However, if doing multiple restarts still did not resolve it, you can do a force restart instead. This has been proven to be the most reliable solution to this issue. It may look like it has the same effect when doing a regular restart, but a force restart is a hardware-level reset.
A force restart, also known as a hard reset, physically stops your iPhone’s battery from connecting to your phone in order to turn it off. That is why the process also differs for every iPhone model.
Here’s how you can do a force restart on second-generation iPhones (8, 8 Plus, SE, and so on):
- First, press and quickly release your iPhone’s Volume up button.
- After that, do the same for the Volume down button.

- Next, press and hold the Side button until your iPhone turns off.
- Finally, wait for a few minutes until the Apple logo appears before releasing the Side button.
Here’s how you can do a force restart on iPhone 7 and 7 Plus:
- First, hold down your iPhone’s Volume down and Sleep/Wake buttons simultaneously to turn it off.
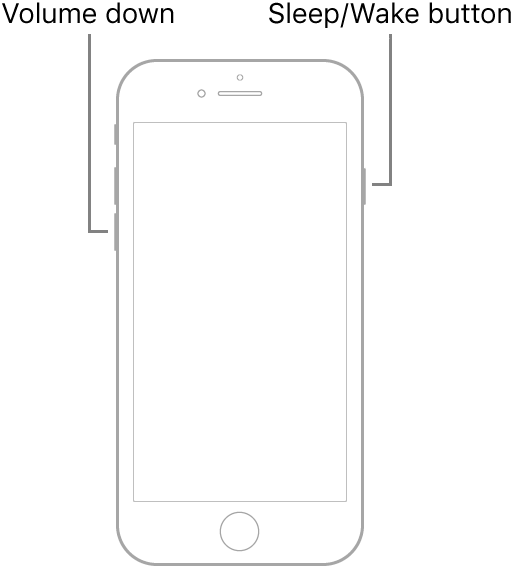
- After that, wait for a few minutes until the Apple logo appears before releasing both buttons.
Here’s how you can do a force restart on first-generation iPhones (6, 6s, 6s Plus, SE):
- First, hold down your iPhone’s Sleep/Wake and Home buttons simultaneously to turn it off.
- After that, wait for a few minutes until the Apple logo appears before releasing both buttons.

With that out of the way, let us know if this has already fixed your issue. Don’t forget to put it in the comments section!
4. Update To The Latest iOS Version.
Some users verified that they were able to resolve this issue after updating their iOS version to the latest. Although there are issues that can arise when updating, this does not happen to all users, so it will never hurt to try, right?
To prepare for the update, you should always be connected to a Wi-Fi network. At the same time, you should also have at least 50% battery life to prevent interruptions when downloading and installing the update.
Here’s how you can update to the latest iOS version:
- First, open up your iPhone’s Settings app and select General.
- After that, go to Software Update and check for an update.
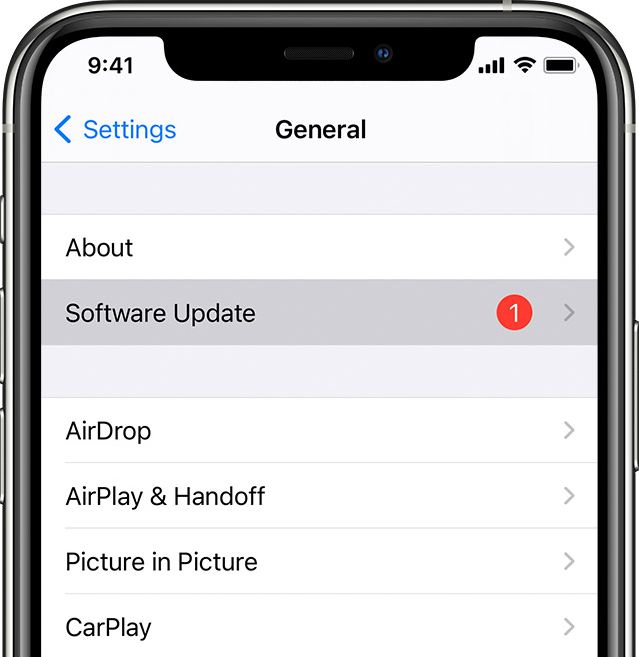
- Next, tap Install Now to begin the update (if one shows up), which will take a few minutes to an hour, depending on your network.
- Finally, wait for a few minutes for your iPhone to automatically restart once the update has been installed.
Now, you may examine if your iPhone video will still be stuck on ‘Preparing Video’ while you are editing it. But do not fret, as we still have a few more methods for you to explore.
In the meantime, if you are seeing the photo import failure ‘Something went wrong’ on your iPhone and are troubled on how to fix it, do you know that you can use the same fix? Go ahead and try it!
5. Put Your iPhone In Recovery Mode.
Anyhow, if after a restart or force restart and your iPhone video is still exhibiting the issue of being stuck on the ‘Preparing Video’ status, you can put your iPhone in ‘Recovery Mode’ and restore it using your Mac. Most of the time, this fixes alarming issues like this one and allows iTunes to fix any corrupted system components which may have triggered the issue.
Mainly, make sure that your Mac or iTunes application is always on the latest version. It will also save you time to update your Mac or iTunes to the latest version when the need arises.
Here’s how you can put your second-generation iPhones (8, 8 Plus, SE, and so on) in ‘Recovery Mode’:
- First, connect your iPhone to your Mac.
- After that, open Finder (if you are on Catalina) or iTunes (if you are on Mojave or lower versions).
- Next, press and quickly release your iPhone’s Volume up button.
- Then do the same step for the Volume down button.
- Now, press and hold the Side button until you reach the ‘Recovery Mode’.
- After that, a window should open up on your screen asking you to choose between Update or Restore. Select Update.

- Finally, wait for a few minutes until the update has been finished.
Here’s how you can put your iPhone 7 and iPhone 7 Plus in ‘Recovery Mode’:
- First, connect your iPhone to your Mac.
- After that, open Finder (if you are on Catalina) or iTunes (if you are on Mojave or lower versions).
- Next, press and hold the Top (or Side) and Volume down buttons simultaneously.
- Now, keep on pressing and holding both buttons until you reach the ‘Recovery Mode’ screen.

- After that, a window should open up on your screen asking you to choose between Update or Restore. Select Update.
- Finally, wait for a few minutes until the update has been finished.
Here’s how you can put your iPhone 6s (or earlier) in ‘Recovery Mode’:
- First, connect your iPhone to your Mac.
- After that, open Finder (if you are on Catalina) or iTunes (if you are on Mojave or lower versions).
- Next, press and hold the Top (or Side) and Home buttons simultaneously.
- Now, keep on pressing and holding both buttons until you reach the ‘Recovery Mode’ screen.
- After that, a window should open up on your screen asking you to choose between Update or Restore. Select Update.
- Finally, wait for a few minutes until the update has been finished.
Once you are done with all of that, check if your issue has been resolved. Fortunately, the same issue will not resurface, but if it does, you know the drill!
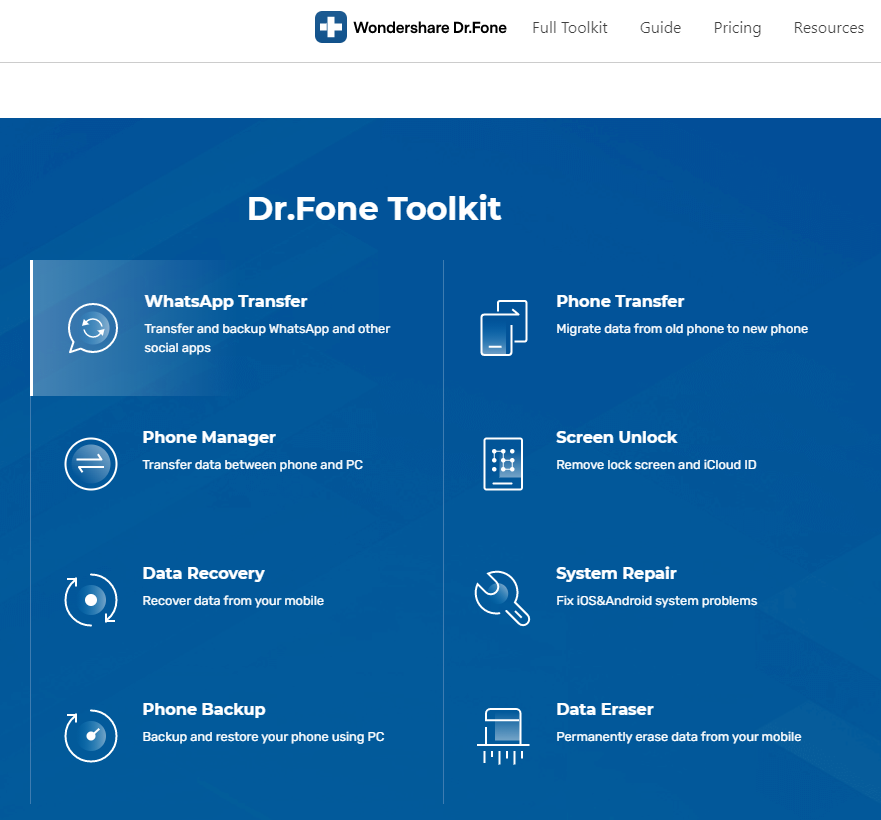
6. Use Dr. Fone.
If you are getting impatient and badly wants to fix this issue, but you are worried about losing your valuable data in your iPhone, then you must try Dr. Fone!
Dr. Fone has a tool called ‘System Repair’, which fixes iOS system problems. You can also use it on your iPad, and what’s best is that you can also use this on your Android device (if you have one). What’s great about Dr. Fone is that you can also use it for data recovery, phone transfer, and phone backup, and so much more.
In addition to that, it has been in the market for 17 years and is being used by over 50,000,000 users worldwide. The proof is really in the numbers, so check it out and see it for yourself!
7. Reset All Settings.
If all else fails, the last step in our list is to reset all your settings. Though you may think of skipping this, this is still worth trying if you still have the issue after doing our previous suggestions.
Even though it will restore your settings to the default and remove your Wi-Fi passwords, face recognition, location and privacy settings, and other saved settings, it will definitely not remove any of your data and files. But to be on the safe side, always create a back-up of your data and files beforehand.
Here’s how you can ‘Reset All Settings’:
- First, open your iPhone’s Settings app and go to General.
- After that, select Reset.
- Now, select Reset All Settings.

- Then, once you are prompted to do so, enter your passcode or Apple ID password.
- Next, confirm that you want to reset all settings on your iPhone.
- Finally, after a few minutes, your iPhone will automatically restart and load the default settings. Then you may change and adjust your settings to their previous values.
With that out of the way, your issue should now be fixed, turning you back into a contented iPhone user.
This concludes our article, but if you have any questions, you can comment them down below. We like to hear your feedback!
If this guide helped you, please share it. 🙂
