Can’t fix the Microsoft Word dictation tool not working on Windows 11?
Speech typing has definitely changed the game for many writers. This is because, on average, a person can type 40 words per minute but speak around 130. And with Microsoft utilizing the Azure Speech services for this feature, it is now more seamless and accurate than ever before.
With the extreme convenience that the dictation tool provides, it was only a matter of time before users got completely hooked. Unfortunately, it is not immune to occasional errors. This leads to users switching back to using the keyboard for writing documents and stressing their hand muscles until the issue is resolved.
Luckily, you’ve landed on just the right page. We’ve covered all the effective solutions to the Microsoft Word dictation tool not working on Windows 11, so you don’t need to look any further. Simply follow the guide and get the feature to work again.
Now let’s get started!
1. Check Your Office Subscription Status.
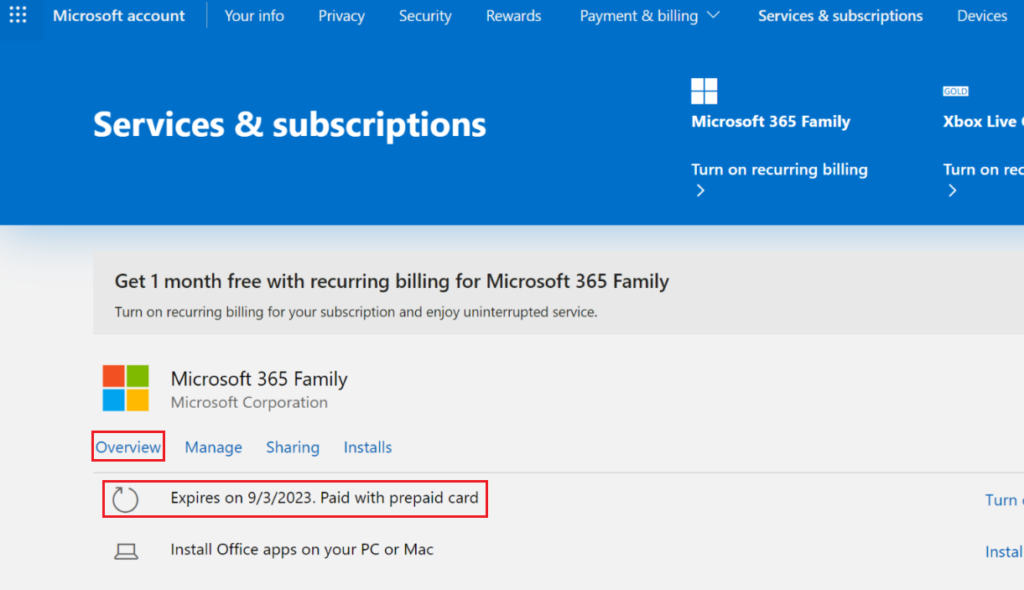
Before we move forward to the fixes, it’s important to know that the dictation tool is available only to those subscribed to Microsoft 365. If your subscription is expired or inactive, you will be unable to use the dictation tool in Word and other Office apps.
To check your subscription status, visit the Microsoft Services & subscriptions page. Login to your Microsoft account and head over to the Overview tab to check the expiration date of your subscription.
2. Check Your Microphone Permissions.
Windows lets you deal with the microphone accessibility for each app individually. So if you’re experiencing the Microsoft Word dictation tool error on Windows 11, there are high chances that you’ve not given the necessary permissions.
To verify if that’s the case, follow the steps below:
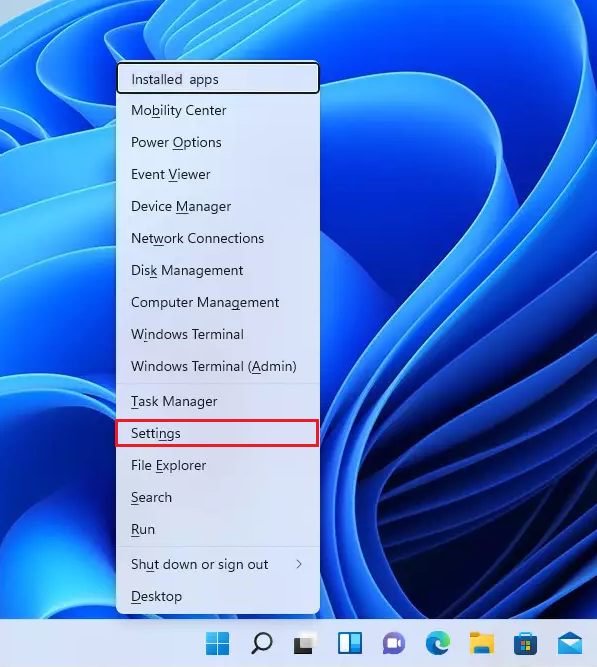
- Begin by right-clicking on the Start menu.
- Then, choose Settings from the list.
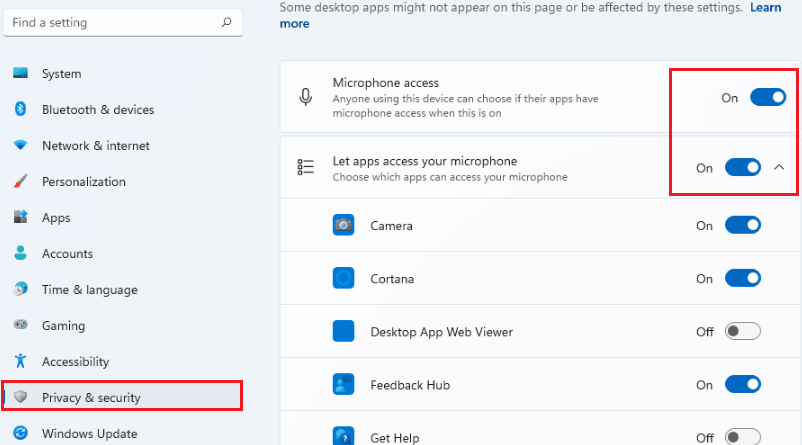
- Once the window opens, go to the Privacy & security tab from the left pane.
- On the right, scroll down to App permissions and choose Microphone.
- Toggle on Microphone access and Let apps access your microphone.
- Scroll down and toggle on Let desktop apps access your microphone.
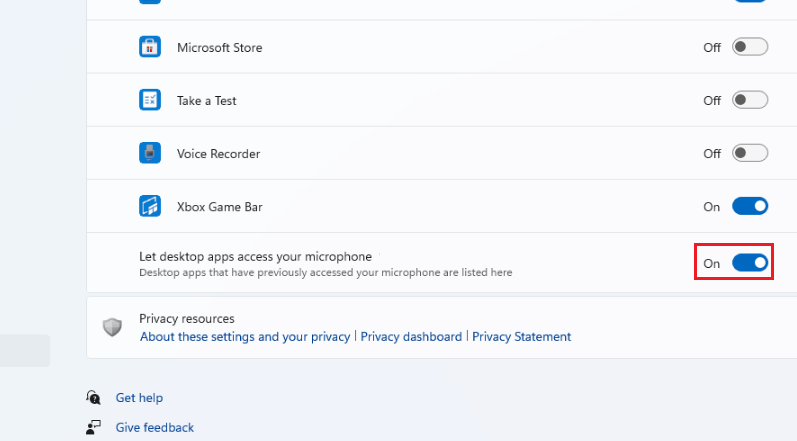
Restart Microsoft Word afterward and check if the issue is resolved.
3. Test Your Microphone.
You may also run into the Microsoft Word dictation tool not working on Windows 11 if the microphone encounters an issue or is damaged. In case you use an external peripheral, ensure the connection is secure. Other than that, you’ll also need to change it to your default audio input device for proper functionality.
For that, follow the steps below:
- Firstly, right-click on the speaker icon from the system tray and choose Sound settings.
- Under the Input section, choose your preferred microphone.
- Move the Volume slider to the right.
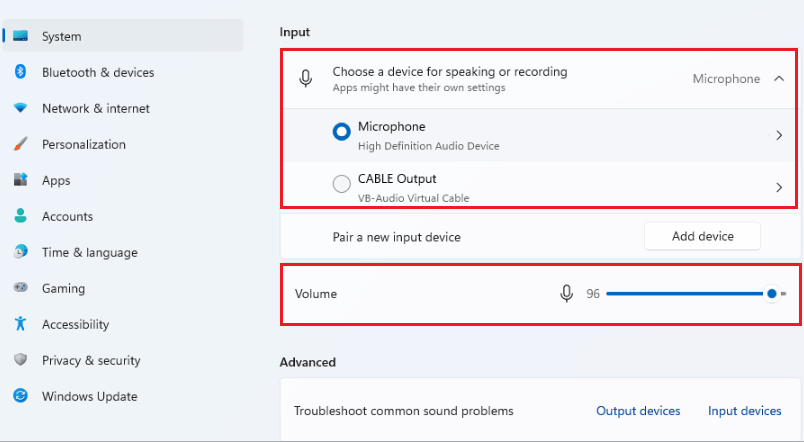
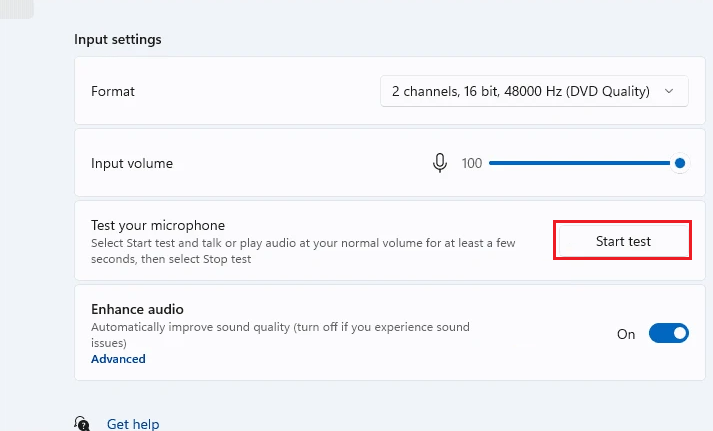
- Finally, select your microphone and click on the Start Test button next to test its functionality.
4. Ensure You’re Using the Correct Language.
Apart from enabling or disabling the speech detection feature, Windows also lets you select a language of your preference. It’s obvious how you can encounter an issue if you don’t use the same language while using the dictation tool.
5. Perform the In-Built Troubleshooters.
Windows provides in-built troubleshooters for various system-related problems. When you run this utility, your computer will automatically scan for potential software and hardware issues. Upon detection, it will either fix the issue automatically or provide you with the instructions to follow.
For the Microsoft Word dictation tool error on Windows 11, you need to follow the instructions below:
- Select the Search icon on the taskbar.
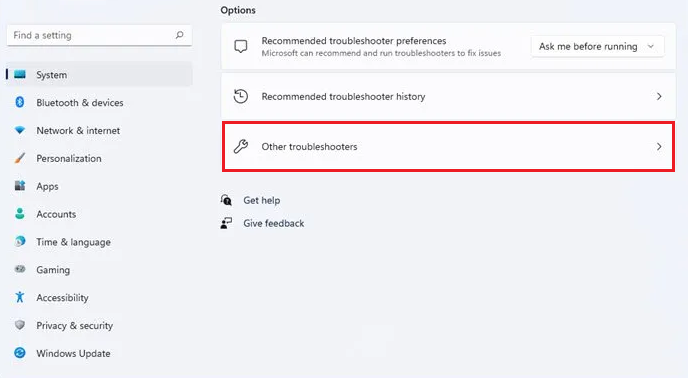
- Type troubleshoot settings in the search field and select the same from the results.
- When the window appears, go to Other troubleshooters.
- Scroll down and select the Run button for Recording Audio.
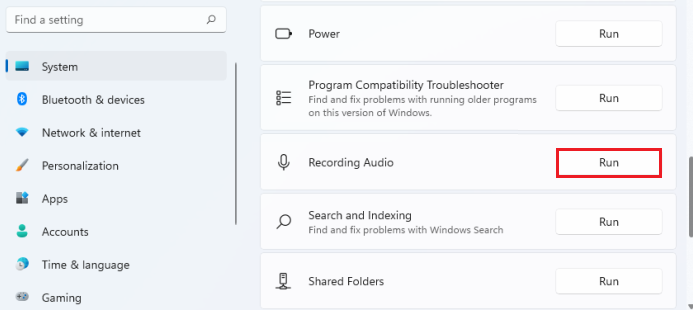
- Continue to follow the on-screen instructions to finish the process.
6. Repair Microphone Drivers.
When the problem doesn’t lie in the dictation tool but rather in your computer’s microphone, it’s possible that its related drivers are damaged, corrupted, or outdated. When that happens, you can update or reinstall the microphone drivers to resolve the issue.
Here’s how to do it:
- To start, press the Windows key + R from your keyboard.
- This will launch the Run dialog box. Type in ‘devmgmt.msc’ in the search field and hit the Enter key.
- Expand the options for Audio inputs and outputs.
- Right-click on your microphone and choose either Update driver or Uninstall device.
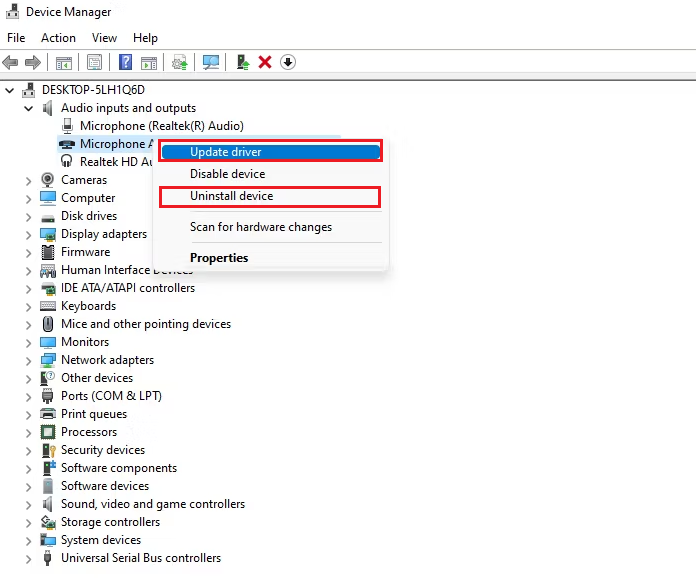
- Restart your computer afterward to apply the changes.
7. Repair Microsoft Office.
In case your microphone is working fine with all apps except for Microsoft Word, the problem could lie in the app. Since Microsoft Word is part of the Office Suite, you may use the associated repair tool to eliminate the potential culprit in Word.
Follow the steps below to do so:
- First, right-click on the Start menu to access the Power user menu.
- From there, choose Installed apps.
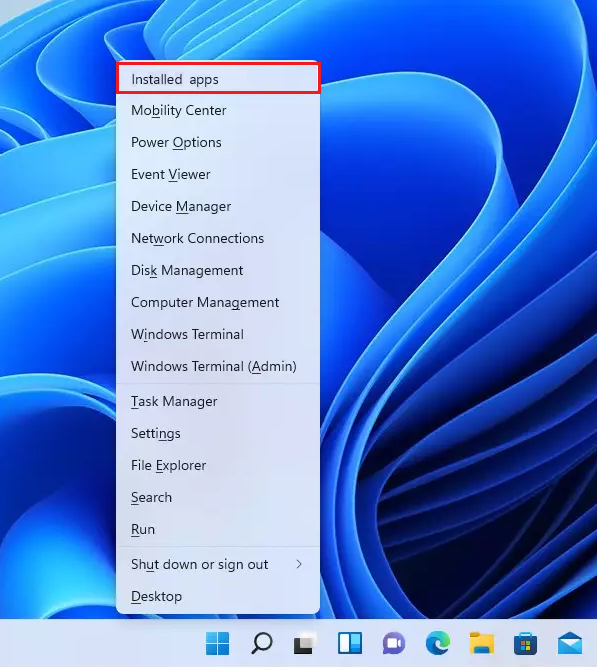
- Scroll down to Microsoft Office.
- Click on the three vertical dots icon next to it, then choose Modify.
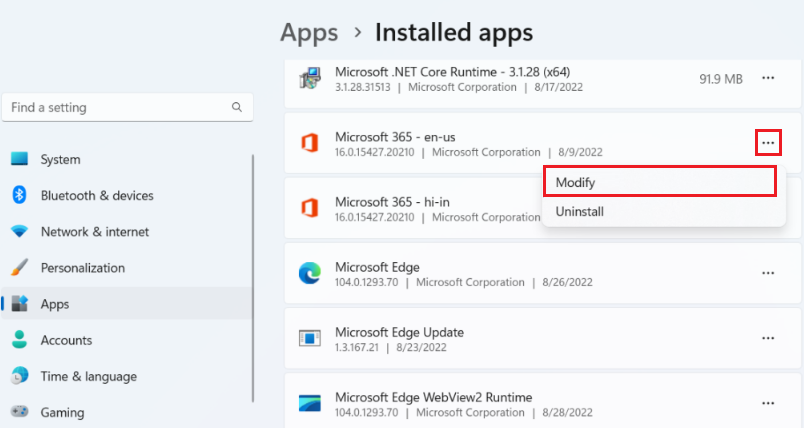
- Then, select Quick Repair and click on the Repair button.
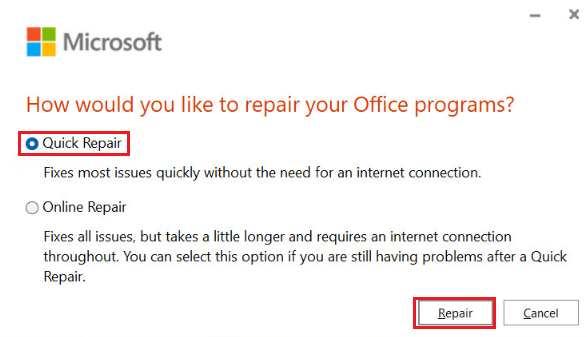
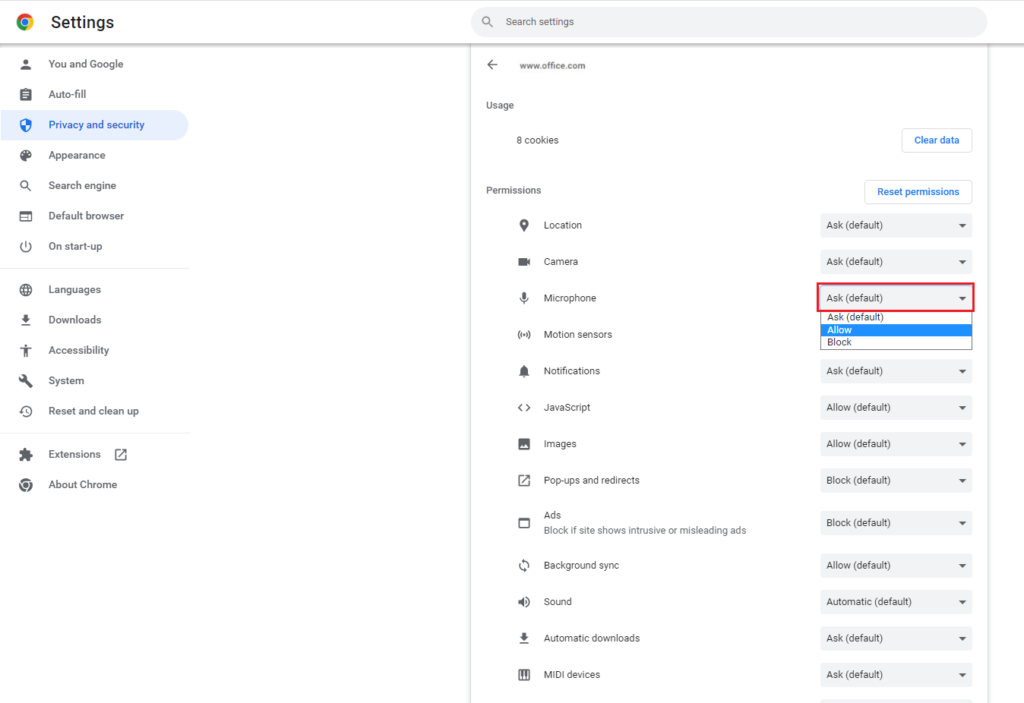
8. Allow Your Browser to Access the Microphone.
If the microphone is working just fine in your browser, you can use the Microsoft Word online version for the time being. But before that, make sure you’ve granted the microphone access to whatever browser you’re using, along with permitting the site to use the dictation tool.
Here’s how to do it:
- Access Microsoft Word for Web by logging into your Microsoft account.
- To the right side of the address bar, click on the lock icon, then choose Site settings.
- Scroll down to Permissions.
- Click on the drop-down menu for Microphone and choose Allow.
That was it! You’ve now made it to the end of our guide on how to fix the Microsoft Word dictation tool not working on Windows 11. If you still have any confusion, leave a comment down below. We’ll answer you as soon as possible.
If this guide helped you, please share it. 😊


