Seeing Mscoree.dll not found error on Windows 11 and want to fix it?
Although every Windows OS update ensures users a trouble-free experience, it looks as if that is nearly impossible. People end up facing some sort of error no matter how many updates the Microsoft team releases to avoid that.
Lately, one of the most reported complaints is the Mscoree.dll not found error on Windows 11. The message pops up whenever you try to run certain programs on your PC. Fortunately, the error is as quick to fix as it shows up. But first, you need to understand what factors could cause the problem.
Mscoree.dll is a Dynamic Link Library file that’s part of the .NET framework and hence coded in its programming language. If that file is corrupted, it will impact all programs running under that specific framework. However, the issue may also occur if the .NET framework is missing entirely.
So let’s learn how to resolve this matter!
1. Restart Your Computer.
Before moving to any serious fixes, let’s start with a quick system restart. This will help you remove any temporary bugs that may be causing the Mscoree.dll not found error on Windows 11. A fresh boot-up of a PC often resolves many unknown errors.
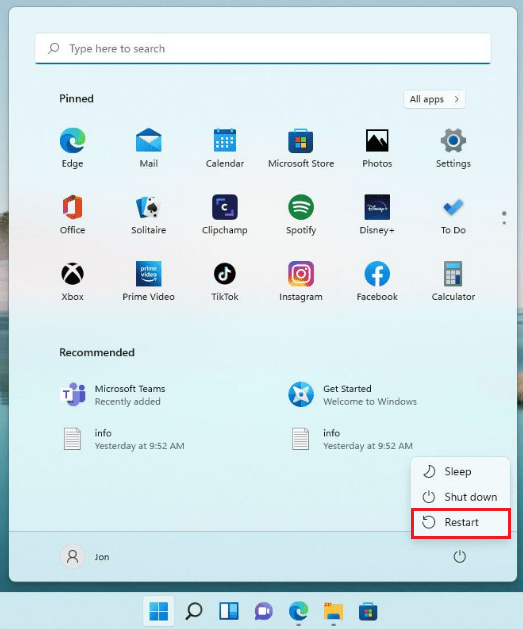
Here’s how to restart your PC:
- To start, click on the Start Menu.
- Now, select the Power icon present on the right side of the bottom bar.
- Lastly, click on Restart.
2. Run a Virus Scan.
The next step is to run a scan on your system for any viruses or malware as it could possibly be infected. Despite the fact that Windows automatically keeps a constant check for such threats, running a deep scan will only be helpful.
Follow the steps below to do it:
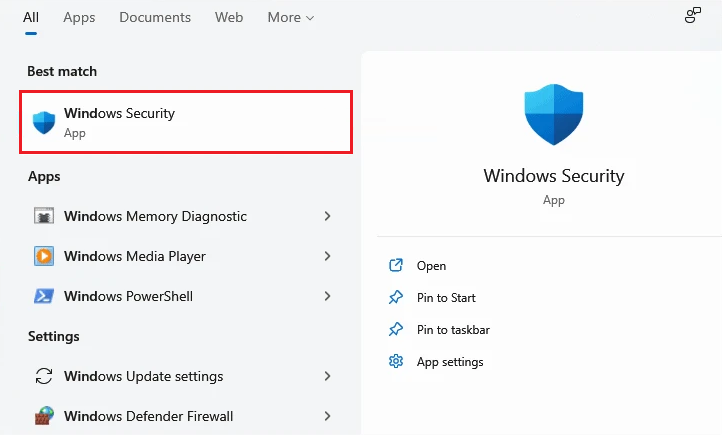
- Launch the Start Menu and type in ‘windows security’ on the search bar at the top. Then, click on the match from the search results.
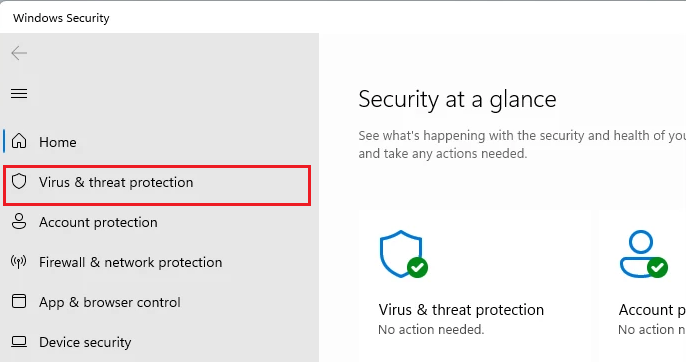
- Once it opens, go to Virus & threat protection from the left pane of the screen.
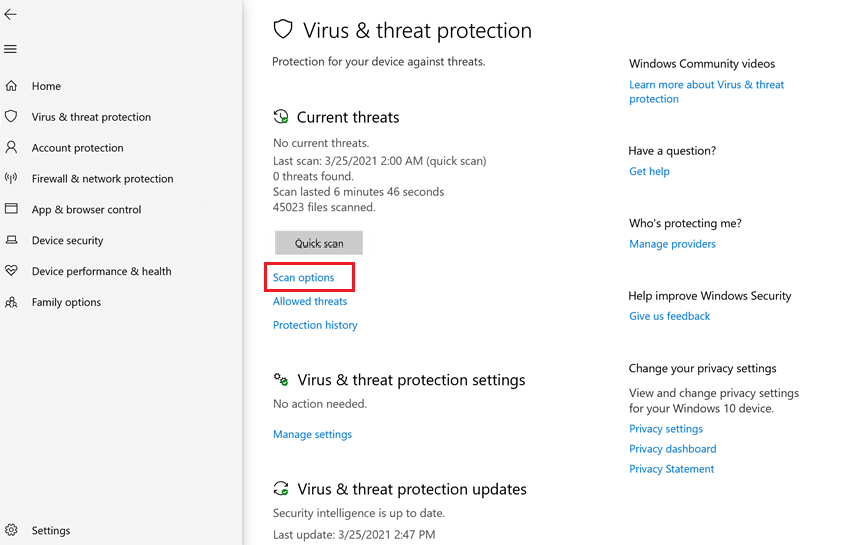
- Next, from the right side, click on Scan options present in the Current threats section.
- Now, select Microsoft Defender Offline scan and then click on Scan now.
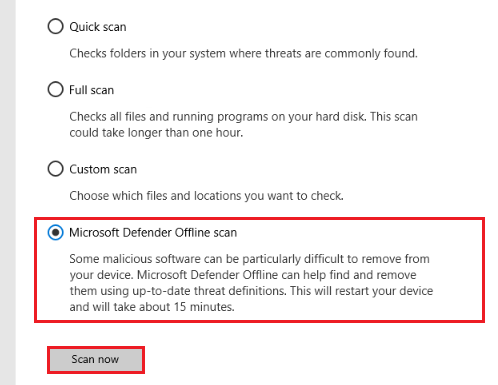
Your computer will restart once the scan is complete. After that, check whether the Mscoree.dll not found error on Windows 11 is fixed. If not, move to the following method in this guide.
3. Reinstall the Program.
The Mscoree.dll not found error tells you to reinstall the program you’re trying to run in order to solve the issue. So, this can be a great starting point when fixing the issue. However, keep in mind that this may or may not work, depending on where the actual cause lies.
Here’s what you need to do:
- Press Win + i from your keyboard to open Settings.
- After that, select Apps from the left pane, then click on Apps & features from the right pane.
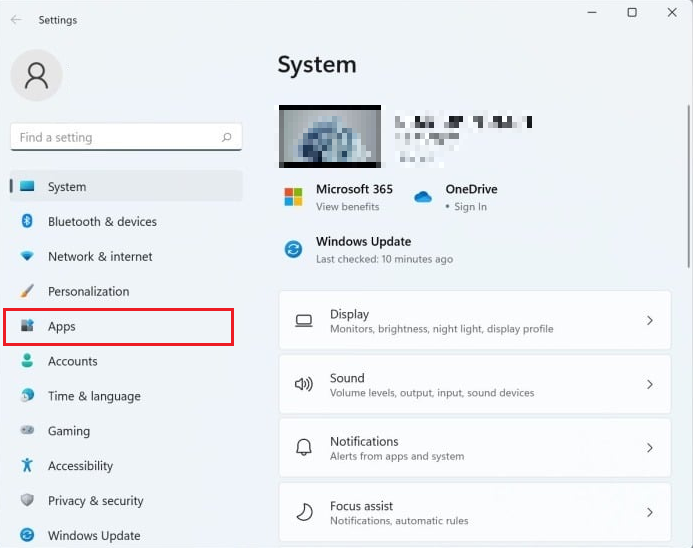
- Now, scroll down and find the app. Or, you can search for the app in the search bar at the top.
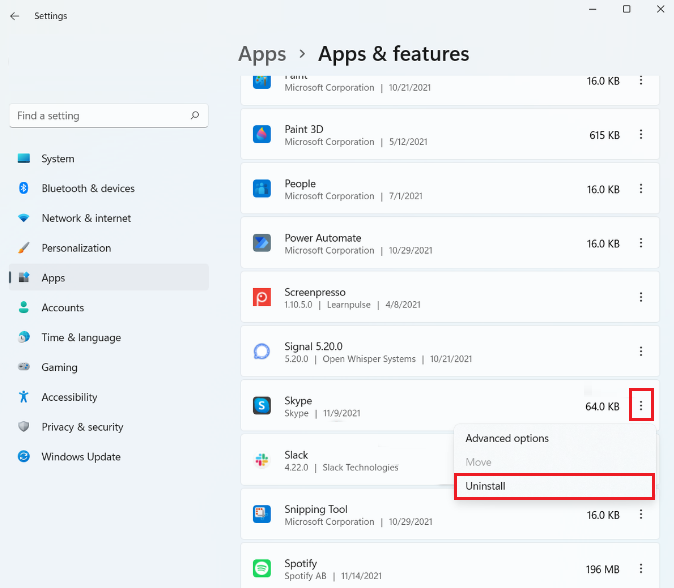
- Click on the three horizontal dots next to the App and select Uninstall.
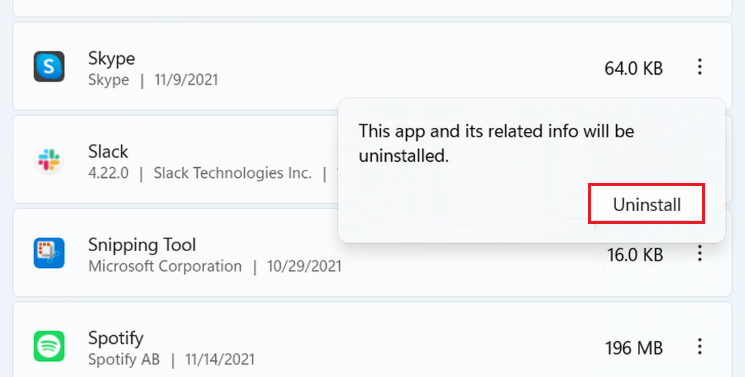
- Lastly, confirm by clicking on Uninstall again.
- Now, install the app again from a trustworthy website.
4. Perform SFC Scan.
If the Mscoree.dll not found error on Windows 11 occurs due to the file being missing or corrupted, you need to run an SFC scan. System File Checker, a.k.a. SFC, is a Microsoft utility that will repair and fix any faulty files on your Windows system.
Here’s what you need to do:
- Launch the Run command box by pressing Win + R keys.
- Now, type in cmd and simultaneously press Ctrl, Shift, and Enter keys from your keyboard to launch Command Prompt with administrative permission.
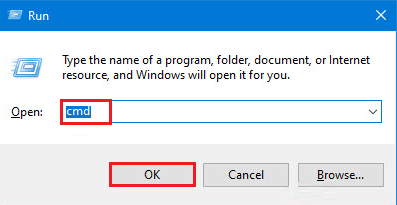
- Copy and paste or type the following command and hit the Enter key:
sfc/scannow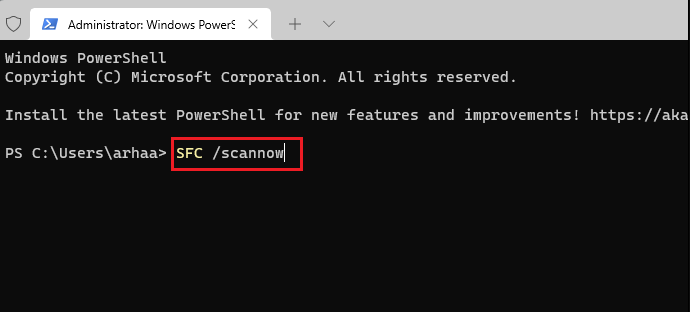
- Finally, wait till the process is complete as it may take a while.
5. Turn On the .NET Framework.
As stated earlier, the missing .NET framework will cause the Mscoree.dll not found error on Windows 11. But it’s not always that the framework is missing. You may have it disabled, resulting in all programs under that framework failing to launch.
Just follow the steps given below to re-enable .NET Framework:
- Firstly, click on the Start Menu.
- Then, type ‘turn Windows’ and select Turn Windows features on and off from the search results.
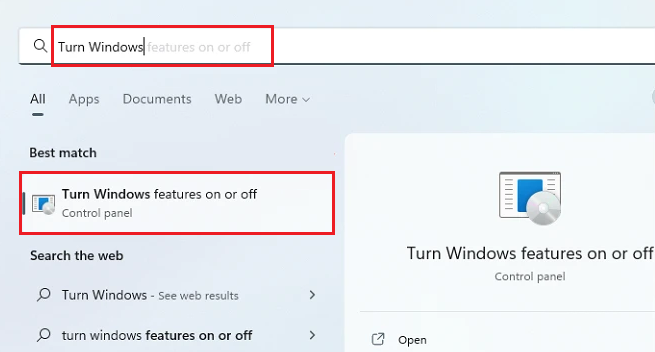
- Once a new window opens, look for .NET Framework 3.5 and click on + next to it to expand the option.
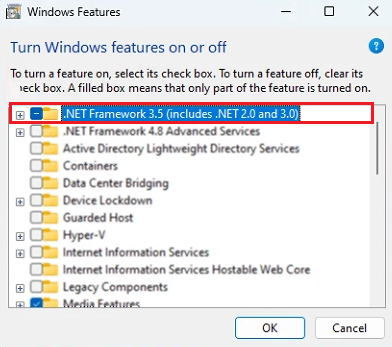
- Next, click on all the checkboxes next to the options that appear in the expanded section.
- Afterward, click on + next to .NET Framework 4.8 Advanced services to expand this option. Then select all the items by clicking on the checkbox next to them.
- Once done, select OK.
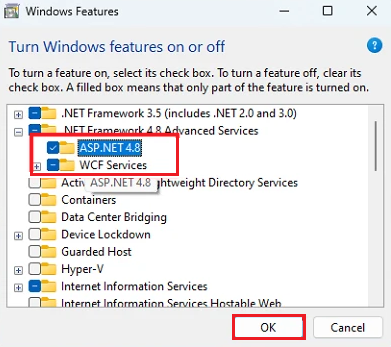
- From the next prompt, click on the Restart Now button. This will restart your PC.
After your computer restarts, check whether your problem is resolved or not.
6. Enable .NET Framework Using Command Prompt.
If you find the method explained above too complicated, you can enable the .NET framework from the Command Prompt as well. In fact, this method is more straightforward as you’re only required to run a few commands, and your PC will take it from there.
Below are the steps you need to follow:
- Go to the Start Menu and search for ‘Terminal’ on the search bar.
- Next, right-click on Terminal from the left pane and select Run as administrator.
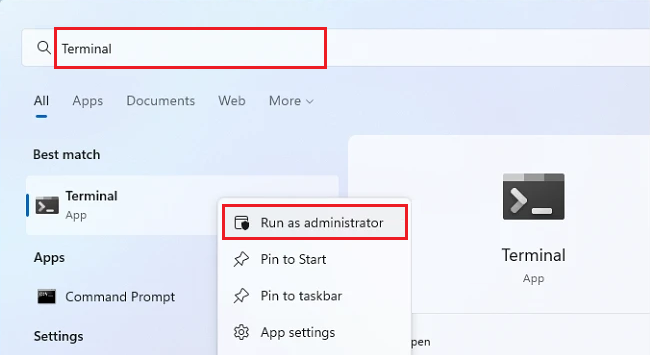
- Select Yes from the User Account Control window that shows up on your screen.
- Then, launch the Command Prompt window by simultaneously pressing the Ctrl + Shift + 2 keys.
- Now, copy and paste each of the following commands one by one and press the Enter key:
dism /online/ enable-feature /featurename:netfx3 /all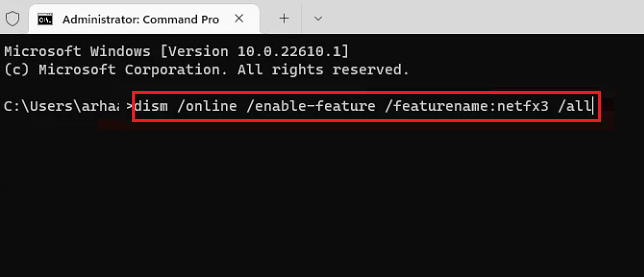
dism /online /enable-feature /featurename:WCF-HTTP-Activation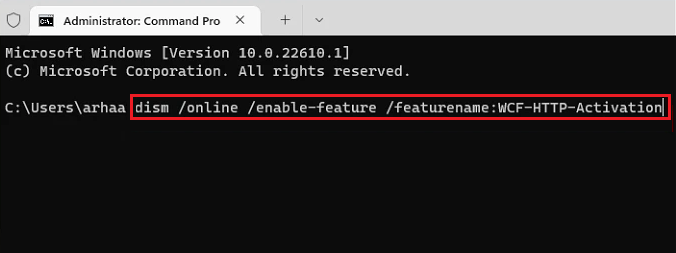
dism /online/ enable-feature/ featurename:WCF-nonHTTP-Activation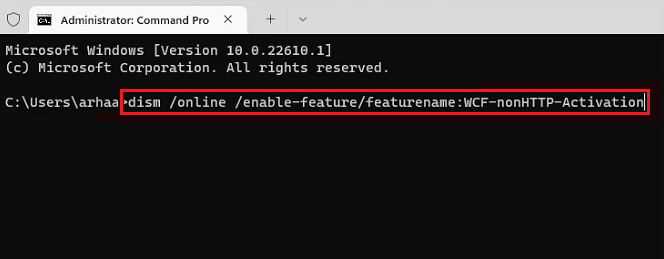
- Lastly, head to the Start Menu, click on the Power icon, and select Restart to restart your PC.
7. Update the Outdated Drivers.
Outdated drivers on your computer result in all kinds of issues, and the Mscoree.dll not found error on Windows 11 is one of them. To resolve such cases, the only direct way is to update the drivers, either automatically or manually.
Here’s how to do it:
- Open Windows Settings by pressing Win + i keys from the keyboard.
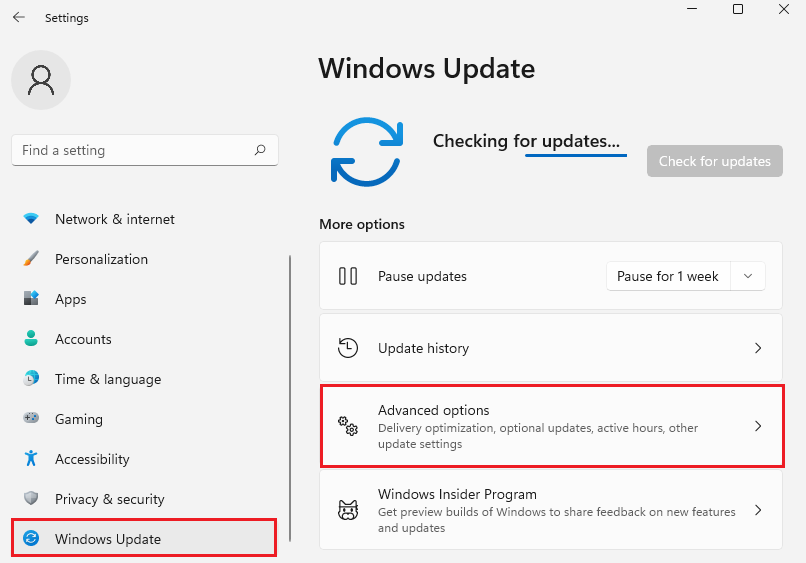
- Then, click on Windows Update from the left pane.
- Under the More options section, click on Advanced options.
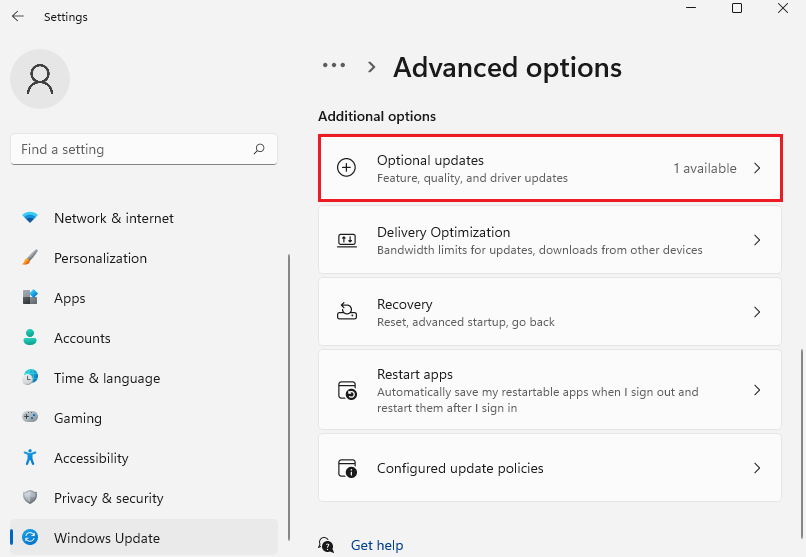
- From the next page, select Optional updates present under the Additional options section.
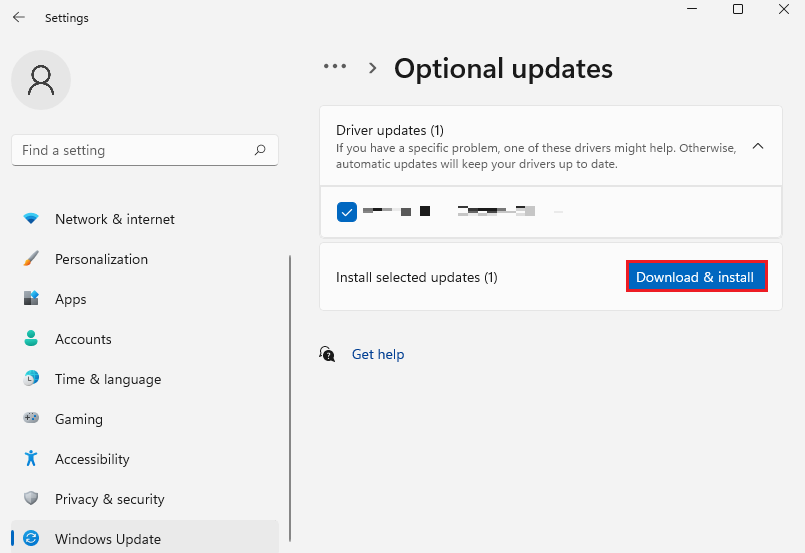
- Now, click on the checkbox next to the pending updates and then click on Download & install button to update the available drivers.
8. Perform a System Restore.
If you recently updated your system OS or installed a third-party program and immediately began receiving the Mscoree.dll not found error, you must go back to a restore point before performing the action. This will undo all the changes you made after that point and hopefully resolve the issue.
Follow the steps below to do so:
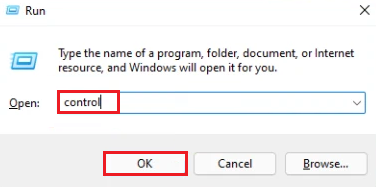
- Open the Run command by pressing Win + R keys.
- After that, type in ‘control’ and click on OK.
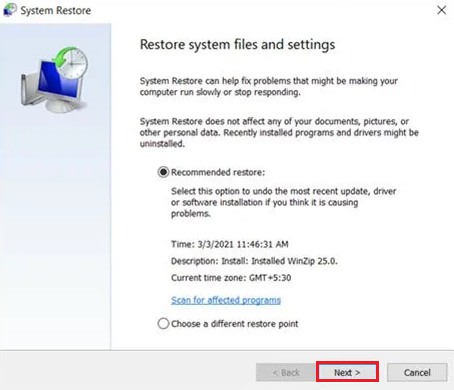
- Now, find and select Recovery, and then click on Open System Restore under the Advanced recovery tools section.
- Click on Next from the new window that opens.
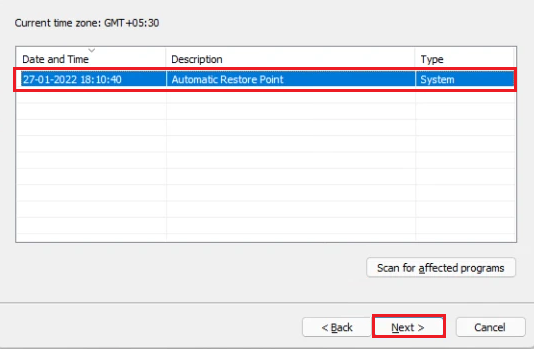
- Select a System Restore point that you wish to roll back to from the list and then click Next.
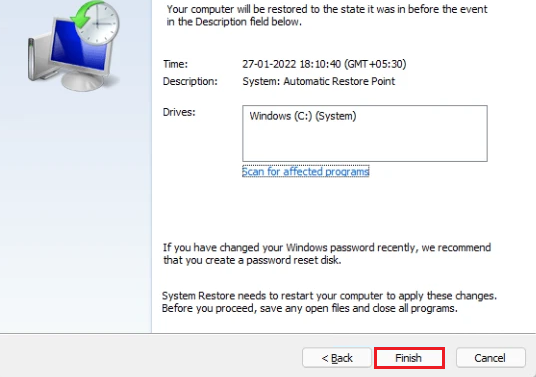
- At last, click on Finish.
9. Use a Registry Cleaner Tool.
Windows Registry is an assembly of databases that stores all references to the DLL files in your system. If it gets corrupted, Windows will fail to read the Mscoree.dll you’re trying to open, resulting in the not found error.
In that situation, you need to run a registry scan and download a Registry cleaner to eliminate any invalid Registry keys that could be causing the issue. Some of the most reliable tools include CCleaner and Wise Registry Cleaner.
This finishes our guide on how to fix Mscoree.dll not found error on Windows 11. Hopefully, by now, you’ve been successful in resolving the issue. For more queries, head over to the comment section. We’ll respond to you as soon as possible.
If this guide helped you, please share it. 😊


