Want a quick guide on how to organize Apple Notes with Tags?
When you have multiple notes on your iPhone or iPad, keeping them organized can be a challenge. You don’t want to scour the entire Notes app just to find a specific note. Fortunately, iOS 15 and iPadOS 15 come with a new note-taking feature: Tags.
Tags make it easier to keep all your notes tidy and organized. No more scrolling up and down just to locate a single note. That, alone, can boost your day-to-day productivity. But how to set it up? And how can you maximize this new feature of Apple Notes?
Today, we’ll guide you through the process of setting up tags and managing them. Hopefully, once you’re done reading this article, you’re able to use this new Apple Notes feature with ease. Here’s how to organize Apple Notes with Tags.
Let’s get to it!
1. Set Up to Organize Apple Notes with Tags.
Before we do anything, download the iOS or iPadOS 15 Public Beta version. Again, Tags is a new feature that the latest iOS and iPadOS software offer. It’s also available through the macOS 12 Monterey update. But in this article, we’ll focus on Tags on iPhones and iPads.

Tags on Apple Notes in iOS or iPadOS 15 are only supported in iOS and iPadOS 14.5. Keep this in mind if you wish to stop using the Public Beta version of iOS or iPadOS 15.
Once your device has the latest software, it’s ready to create new tags. Check out the next step below.
2. Create New Tags.
Before you move on to searching and managing multiple notes with tags, you must create new tags. The process is simple. But there are rules to keep in mind. That way, you can ensure Apple Notes recognizes and indexes the newly created tags.
Here’s how to create a new tag:
- On your device, launch the Notes app.
- Create a new note or select an existing one.
- On a note, type a hashtag (#) followed by a name or text for a tag. Don’t forget to add a space after the text to complete the new tag. Also, keep in mind the following:
- The tag is yellow if it’s complete.
- You’re free to add a tag in any part of the note.
- Using multiple tags is allowed for a single note.
- You can customize the font size of your tags.
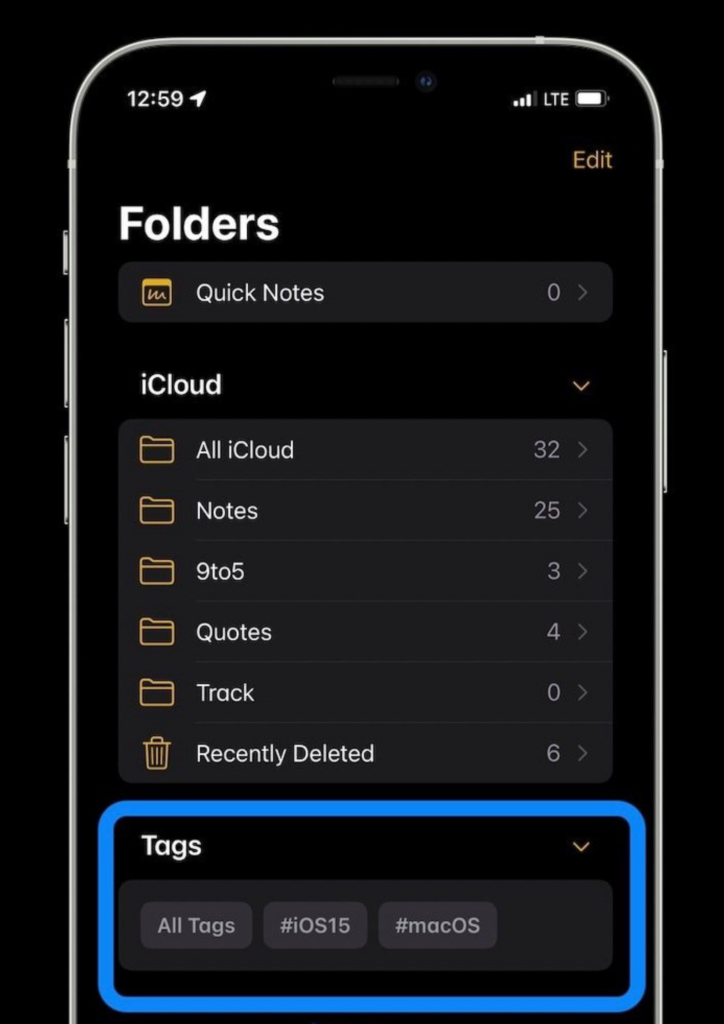
- Head back to the main Notes page. Check if you can see the new Tags section at the bottom of the screen. See if the newly created tags are on that section.
Again, don’t forget to always add a space after typing a tag to finish and turn it yellow. Only complete tags are searchable.
3. Manage Created Tags.
After creating tags, it’s time to learn to manage them. This step will come in handy whenever you want to organize your notes. You also need this method to quickly search for relevant tags you need to complete a daily task.
Here’s how to manage tags on Apple Notes:
- First, launch Notes.
- Next, go to the main page or Folders screen.
- The Tags section should appear at the bottom of the screen. Choose All Tags to view all the notes with tags. (If you see the specific tag you want to search, you can tap on it to see all the notes tagged with that text.)
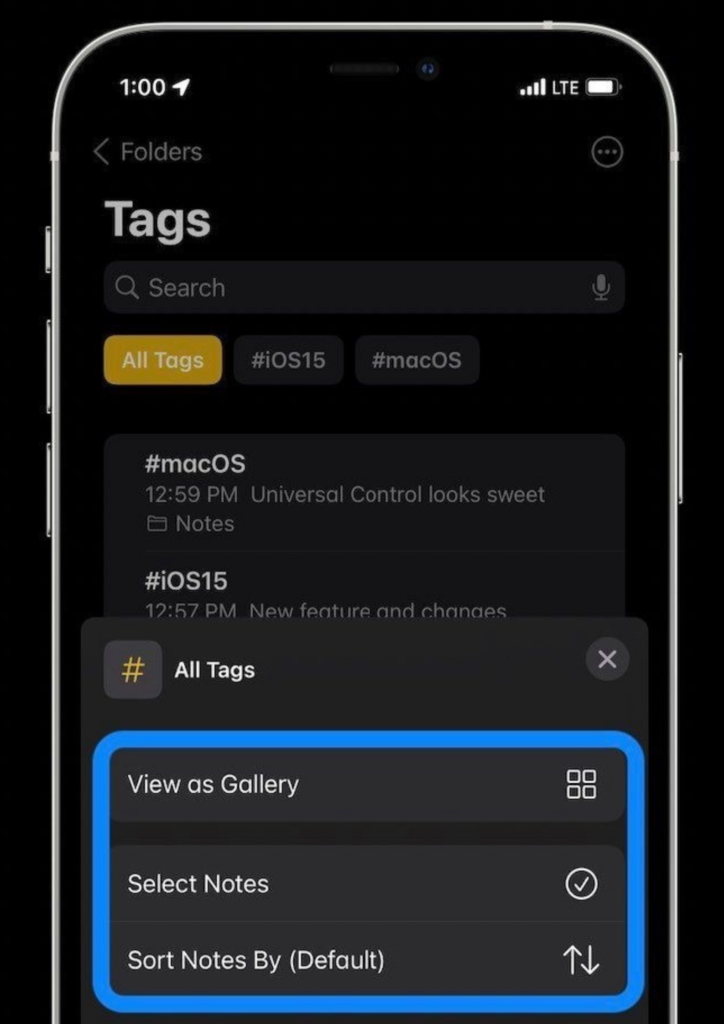
- After tapping the All Tags option, you’ll be directed to a new window. Tap the three-dot icon. You should see that at the top-right corner of the screen.
- Next, a menu will show up on screen. Choose one from the following options:
- View as Gallery: This option displays notes in a gallery-like interface.
- Select Notes: With this option, you can select multiple notes to tag, move, or remove them at once.
- Sort Notes By: This option lets you organize notes by title, date edited, and more.
This guide on how to organize Apple notes with Tags isn’t complete without introducing you to another function that can make your life easier: Smart Folder
4. Use a Smart Folder to Organize Apple Notes with Tags.
Got no extra time and energy to manage tagged notes? Apple has added a brilliant function that can make your note-organizing even more convenient. This is Smart Folder. It organizes your Apple notes automatically into folders by indexing tags.
Here’s how to create a Smart Folder:
- On your device, launch Notes.
- Go to the Folders screen or Notes’ main window.
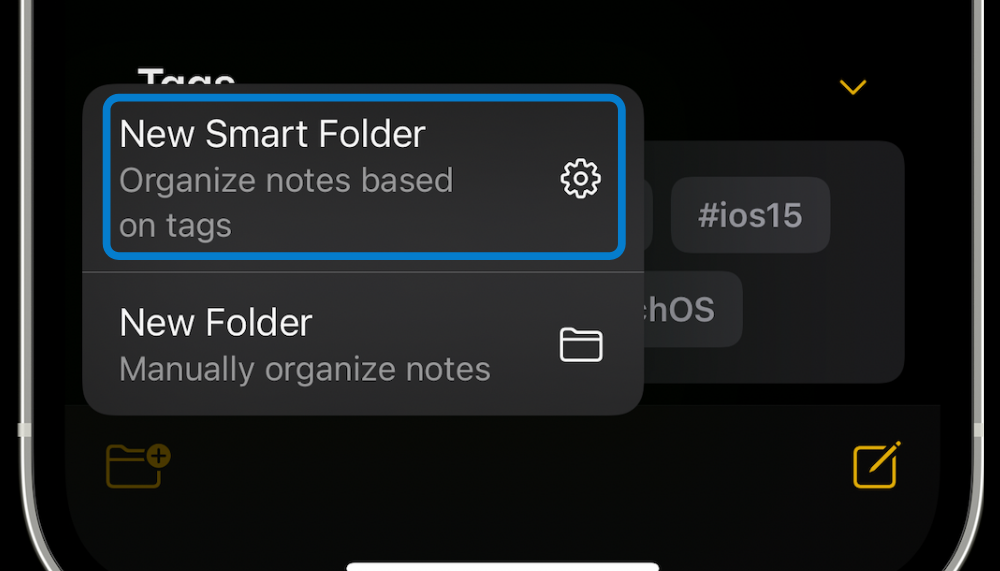
- Next, tap the Folder icon. You’ll see that at the bottom-left corner of the window.
- A pop-up menu will appear. Select New Smart Folder. Alternatively, you can choose a specific tag. Then tap the three-dot icon to select Create Smart Folder.
- Now, type a name for your Smart Folder. Then, select the tags you want to include on this Smart Folder.
- Lastly, hit Done to complete the action.
After following these steps, a new Smart Folder will appear. It lists all the notes with the preferred tags you’ve set for this folder. A Smart Folder is also quick to spot on the Folders screen because you’ll see a settings icon beside it. With this function, you can organize your to-do lists, project details, and other crucial notes more efficiently.
This wraps up this guide on how to organize Apple Notes with Tags. We hope this was helpful. Does this work for you? Got more questions about Tags or iOS or iPadOS in general? Don’t hesitate to leave a comment below. Our team will be happy to guide you.