

Want to password protect the screensaver in Windows 10 on your PC?
Screensavers have several benefits, apart from the obvious entertainment factor. They increase battery life, decrease power consumption, and even protect PCs from being used when you’re not around, thanks to their password protection feature.
If you leave your PC unattended for longer periods of time, enabling the password protection feature on your screen saver is a great way to protect your privacy. By doing so, the screensaver will automatically lock your computer after a few minutes of inactivity.
If you are reading this guide right now, there is a fair chance to assume that you are looking for ways to password protect your screensaver in Windows 10.
You’re in luck since we’ve listed some of the easiest methods of doing so and will walk you through them in detail.
Let’s jump right in!
1. Modify Windows Settings.
In Windows, screensavers can be protected by a password but this feature does not come enabled by default.
One of the easiest ways to enable it and password protect the screensaver in Windows 10 is by modifying the Screen saver settings.
Here is what you need to do:
- Go to the Windows Settings and click on Personalization.
- Select Lock screen from the left panel and in the right pane, locate the Screen saver settings option.
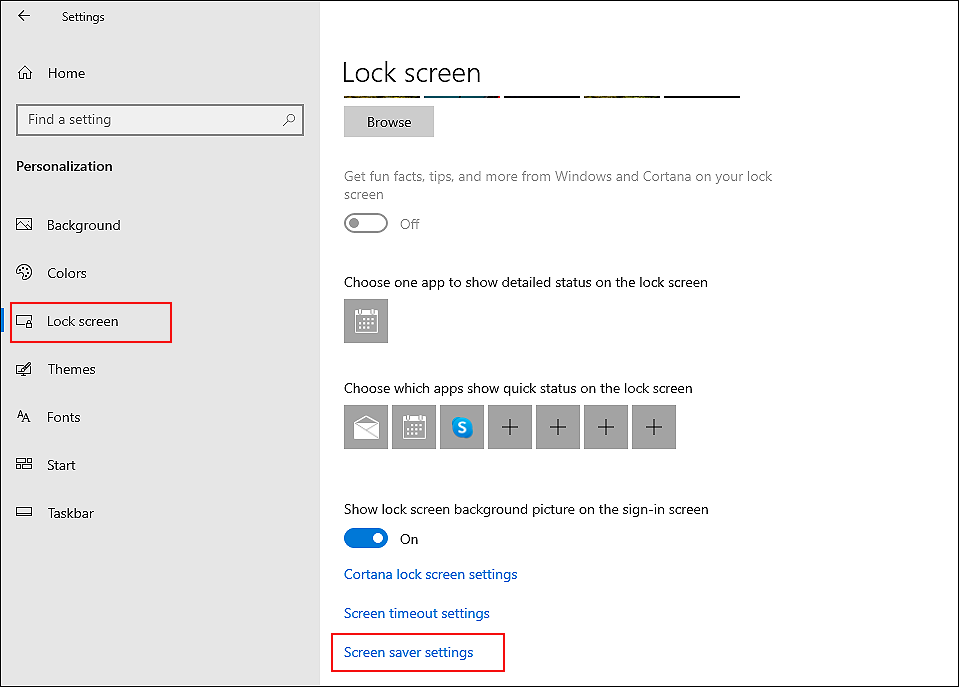
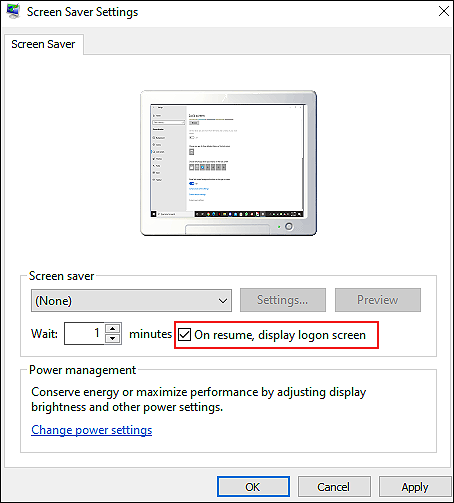
- Click on the hyperlink and select a screensaver.
- Now, checkmark the checkbox associated against On resume, display logon screen and click on Apply to save the changes.
That’s it. Doing so will enable screensaver protection on Windows 10.
2. Use Windows Registry.
Windows 10 also allows users to password protect the screensaver in Windows 10 by modifying the Windows Registry.
If you have ever wanted to gain better control of your operating system, Windows Registry is the database that you should know about. A user with advanced knowledge of Windows Registry can make use of this application to manage and customize their operating system.
Data in the Windows Registry is stored in the form of Registry keys, and in this step, we will alter the key corresponding to our problem.
It is important to be extra careful as you perform these steps, as a slight mistake can cause serious issues within the Registry.
- Open a Run dialogue box by pressing Windows + R keys simultaneously.
- Type ‘regedit‘ in the text field of the dialogue box and hit Enter. Doing so will launch Windows Registry on your PC.

- Inside the Registry Editor, navigate to the location mentioned below.
HKEY_CURRENT_USER\Software\Policies\Microsoft\Windows\Control Panel\Desktop
- If you cannot locate the Desktop key, right-click on the Control Panel key and select the New > Key option.
- Rename this newly created key as Desktop and double-click on it.
- In the right pane, right-click anywhere and select the New > String Value option.
- Rename this key as ScreenSaverIsSecure.
- Double-click on the newly created key and under Value data, type 1.

- Finally, reboot your PC to save the changes.
This should password protect the screensaver. If you want to disable password protection in the future, simply follow the steps mentioned above again and in the 8th step, type 0 under Value data.
3. Try Using CleanMyPC.
There are times when the junk files residing in the system become corrupt and cause issues within the operating system. If you are having issues performing the intended function on your PC by following the steps mentioned in this guide, then there is a chance that your PC is infected with some kind of a corruption error that is preventing you from password protecting the screensaver.
The best way to elimiate these corruption errors is by using an efficient PC cleaning tool, and if you are not already using one, we suggest trying CleanMyPC.

CleanMyPC is a one-stop shop solution for all your PC-related issues. It comes with a wide range of system maintenance tools that can take care of everything from the slow speed of your PC to corruption errors that might be preventing you from performing the desired actions on your PC.
All that you need to do is install CleanMyPC and scan your operating system using it. It will identify all the issues and fix them with little to no user input!
4. Use Group Policy Editor.
The Group Policy Editor is an administrator feature that lets administrators customize an operating system’s features, just like the Windows Registry.
Group Policy Editor stores policies that govern the behavior of programs and processes in the Windows operating system. These policies can be tailored to individual requirements, which is exactly what we are going to do in this method.
However, this method is not compatible with Windows 10 Home Edition.
Here is how you can use the Group Policy Editor to protect the screensaver in Windows 10:
- Press Windows + R keys simultaneously to open a Run dialogue box.
- Type ‘gpedit.msc‘ in the text field of the dialogue box and hit Enter. Doing so will launch Group Policy Editor.

- In the newly launched window, navigate to the location mentioned below.
User Configuration\ Administrative Templates\ Control Panel\ Personalization\
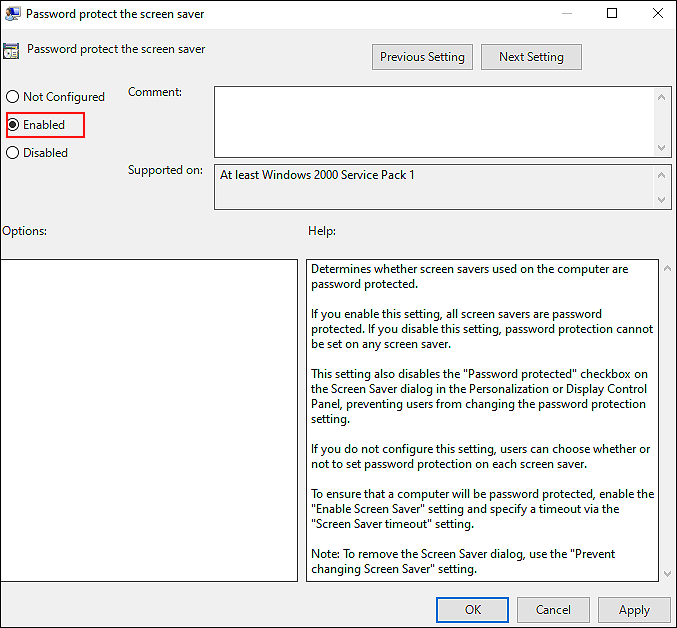
- In the right pane, locate Password protect the screen saver and double-click on it.

- Click Enabled and hit OK to save the changes.
- Now check if required changes have been made. If not, then continue with the 7th step.
- Type cmd in the search bar and click on Run as administrator. This will launch elevated Command Prompt on your screen.
- Inside the Command Prompt window, type the command mentioned below and hit Enter to execute it.
gpupdate /force
Hopefully, following the steps mentioned above will password protect your screensaver without any issues.
This brings us to the end of our guide on password protecting the screensaver in Windows 10. It was our aim to tell you each step in detail, and we hope that one of the methods explained so far was of help to you. In case you still have any confusion about the methods, please let us know in the comment section below!
If this guide helped you, please share it. 🙂
