

Looking for easy ways to prevent users from changing mouse pointers in Windows 10?
The usage of touch devices has increased substantially in the past, but cursors have not lost their importance. They help perform a variety of functions and most operating systems including Windows allows the users to customize the cursors according to their own preferences.
If your computer is used by several users, restricting their access to features you don’t want them to mess with might be a good idea.
Quite possibly, if you are reading this article, you are an administrator who wants to prevent users from changing mouse pointers in Windows 10 and lucky for you, you are in the right place.
This guide will walk you through the methods of performing the task under consideration in detail.
Let’s get started.
1. Use Group Policy Editor.
Group Policy Editor is an administrative-level feature that allows advanced users to customize the functions of their operating system according to their requirements.
The information in Group Policy Editor about Windows programs is stored in the form of policies and by modifying the relevant policies, administrators can customize the working environment of their operating system. In this method, we will be modifying the mouse pointer policy to make the desired changes.
However, this method will not work for the users using Windows 10 Home Edition on their computers. If this scenario is applicable, jump to the next method below.
Here is how you can use the Group Policy Editor to prevent users from changing mouse pointers in Windows 10:
- Press Windows + R keys simultaneously to open a Run dialogue box.
- Type ‘gpedit.msc‘ in the text field of the dialogue box and hit Enter. Doing so will launch Group Policy Editor.

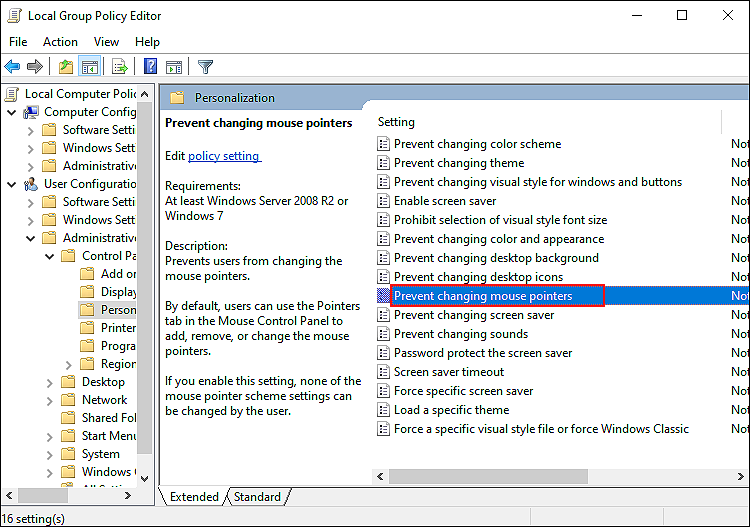
- In the newly launched window, navigate to the location mentioned below.
User Configuration\Administrative Templates\Control Panel\Personalization\
- In the right pane, locate Prevent changing mouse pointers and double-click on it.
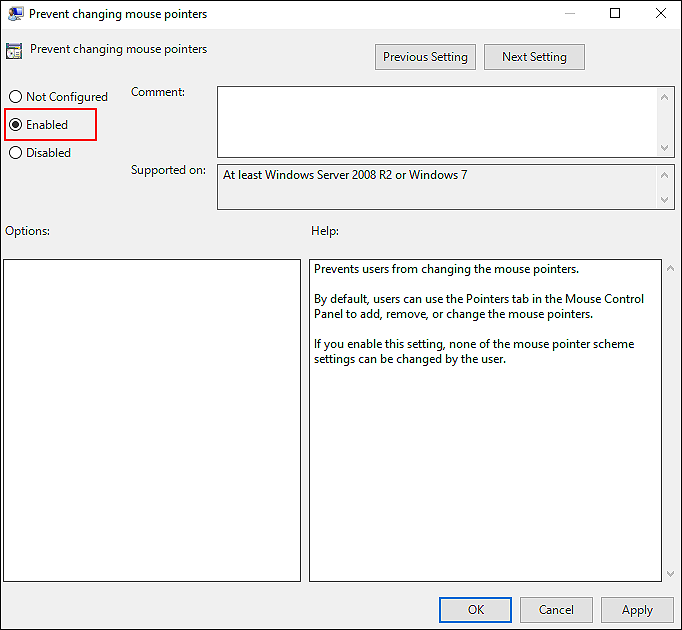
- Select Enabled and click OK to save the changes.
- Now check if required changes have been made. If not, then continue with the 7th step.
- Type cmd in the search bar and click on Run as administrator. This will launch elevated Command Prompt on your screen.
- Inside the Command Prompt window, type the command mentioned below and hit Enter to execute it.
gpupdate /force
This should help you prevent the users from changing mouse pointers on your PC.
2. Try Using CleanMyPC.
If the methods mentioned in this guide are not working for you, then there is a chance that your system is infected with corruption errors that are preventing you from executing certain operations.
In this case, we suggest deep cleaning your PC with an efficient PC cleaner and then continuing with the steps mentioned in this guide.
We recently tested some of the best PC cleaners in the market and found CleanMyPC to be the best, which is why if you are looking for a recommendation, we recommend going for CleanMyPC.

Cleaning the junk accumulated in your PC using CleanMyPC is easy, thanks to its easy-to-use interface. What we like the most about this program is that it comes with a wide range of system maintenance tools, that can take care of your other PC-related issues as well, such as slow speed and sluggish performance.
All that you need to do is install CleanMyPC on your computer and run a scan using it. The rest will be taken care of!
3. Use Windows Registry.
Another easy way of preventing users from changing mouse pointers in Windows 10 is by modifying Windows Registry.
Windows Registry provides advanced users with the same ability to better manage their operating systems as the Group Policy Editor. However, this method is a bit complex, so we recommend being very careful while performing the steps as even a slight mistake can cause serious issues within your operating system.
Here is what you need to do:
- Open a Run dialogue box by pressing Windows + R keys simultaneously.
- Type ‘regedit’ in the text field of the dialogue box and hit Enter. Doing so will launch Windows Registry on your PC.

- Inside the Registry Editor, navigate to the location mentioned below.
HKEY_CURRENT_USER\Software\Policies\Microsoft\Windows\Personalization
- If you cannot locate the Personalization key, right-click on the Windows key and select the New > Key option.
- Rename this newly created key as Personalization and double-click on it.
- Now right-click anywhere in the right pane and select the New > DWORD (32-bit) Value option.
- Rename this value as NoChangingMousePointers and double-click on it.
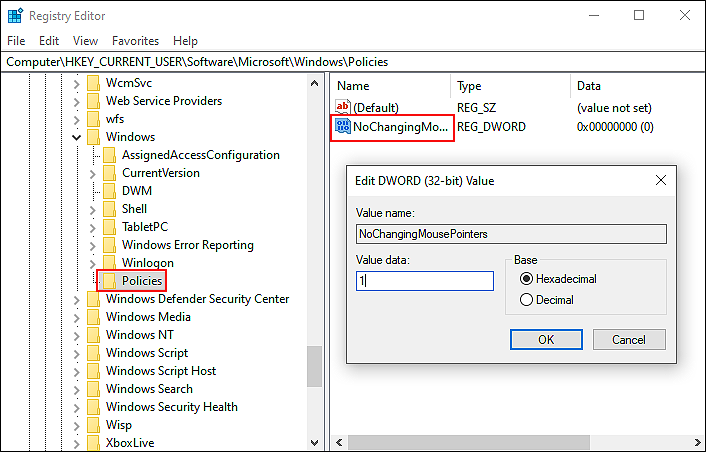
- Under Value data, type 1 and click on OK.
That’s it.
Standard users will no longer be able to change mouse pointers on your PC by doing so.
This brings us to the end of our guide on ways to prevent users from changing mouse pointer in Windows 10. We tried walking you through all the steps in detail and hope that one of the methods mentioned above did the trick for you. In case you still have any confusion about the methods, please let us know in the comment section below!
If this guide helped you, please share it. 🙂
