

Is the protect workbook feature not working on Microsoft Excel?
Working with numbers isn’t an easy task. Fortunately, Microsoft Excel exists. This is a powerful spreadsheet tool developed by Microsoft, which helps students, professionals, and individuals analyze and process numbers and various data.
When processing tons of data and numbers, you’ll probably work on it for hours. Due to this, you don’t want your progress to get messed up by co-workers, friends, or relatives.
Fortunately, Microsoft Excel has a protection feature that allows you to lock your worksheet or workbook. However, the feature doesn’t seem to be working correctly for some users.
If you are reading this, we can assume that you’re one of them.
Most of the time, this issue is caused by a faulty or outdated version of Microsoft Excel. On the other hand, it can also be due to corrupted data, improper user configurations, or wrong file format.
To help you out, we’ve decided to make a guide for fixing the protect workbook feature if it’s not working on Excel.
Let’s dive right in!
1. Restart Microsoft Excel.
Before diving into more complex troubleshooting techniques, we suggest restarting your computer when you encounter problems with Excel. This way, you can ensure that the issue is not caused by a simple bug or error.
Here’s how you can restart your system:
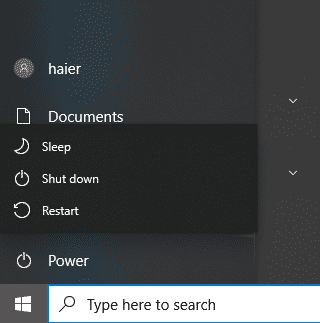
- First, save your progress and ensure that Microsoft Excel is closed.
- After that, access the Start Menu and click on the Power Options tab.
- Lastly, choose Restart and wait for your computer to reboot.
Once done, go back to Microsoft Excel and check if the protect feature is working.
2. Change Your File Format.
Another way to make the protect workbook feature work is to re-save your file with a different name and format.
Check out the steps below:
- On your workbook, click on the File tab and choose Save As.
- After that, assign a new name to your file.
- Finally, click on the format box and choose Excel Workbook (*.xlsx), and hit Save.
Once done, open the new file you’ve saved and turn on Protect Workbook from there.
3. Use Password Encryption.
Normally, users would choose the ‘Always Open Read Only’ option when enabling protection on their files. However, you can try using password encryption to protect your workbook from being changed.
Here’s what you need to do:
- First, open your workbook on Microsoft Excel.
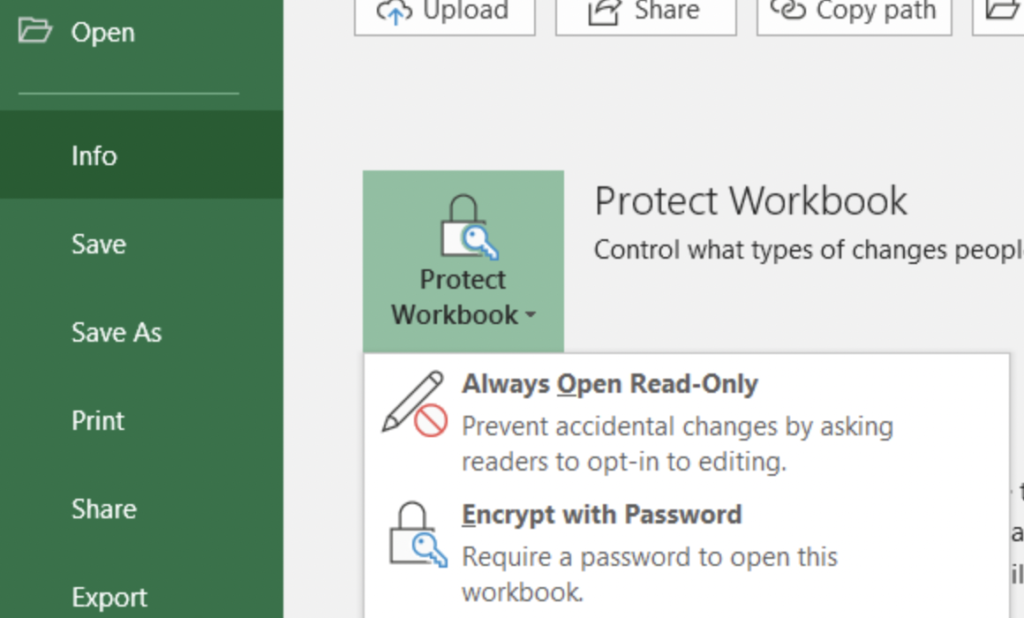
- Now, click on File > Info.
- After that, choose the Protect Workbook option and click on Encrypt with Password.
- Lastly, nominate a password for your file and save the changes.
Restart Microsoft Excel afterward, and your workbook should now be protected.
4. Update Microsoft Excel.
If you still encounter issues while using the protect feature on Excel, we recommend updating the app to the latest version. The build you are using might have an underlying issue that is related to the protect feature.
Check out the guide below to update Excel:
- First, open Microsoft Excel and access the File tab.
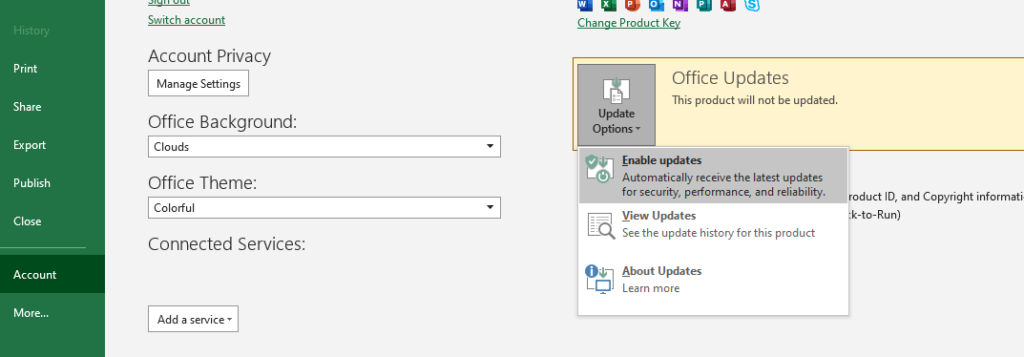
- Now, go to Accounts.
- Lastly, click on Update Options and choose Update Now or Enable Updates.
Go back to Excel and see if the problem is solved.
That ends our guide for fixing the protect workbook feature if it’s not working on Microsoft Excel. For your questions and other concerns, please drop a comment below, and we’ll do our best to answer them.
If this guide helped you, please share it. 🙂
