

Want to resolve high CPU usage caused by Windows Powershell on Windows 10?
If you are a tech pro who does not like putting up with repetitive tasks and manage things via the point-and-click method, PowerShell might be one of the most commonly used utilities on your Windows.
PowerShell is also capable of fixing several Windows issues but with that kind of ‘power’, comes the greater possibility of confusing errors.
Recently, several users reported that the PowerShell process is causing high CPU usage in Windows 10. In some cases, PowerShell keeps appearing and disappearing in the Task Manager. We had a look into the issue and discovered that reasons like pending updates, corruption errors, and application interruptions can cause it.
If you are facing a similar issue, you are in the right place because, in this guide, we will walk you through the relevant troubleshooting steps in detail.
Let’s get right into it!
1. Install Pending Updates.
If your PC has a high CPU usage issue, the first thing you need to do is install the pending updates.
It is common for outdated operating systems to show errors like the one at hand. Since the latest updates are packed with new features and bug fixes, installing them will most likely resolve the issue for you in no time.
However, if updating your operating system and its programs does not resolve the error at hand, then proceed with the next method below.
2. Clean Boot your PC.
It’s also possible that the corrupt local applications on your PC are responsible for causing the high CPU issue. Many users have reported that eliminating the faulty programs fixed their issues, which is why we suggest you give it a shot.
The most effective way to run diagnostic tests to identify the faulty program is to launch your PC in a Clean Boot state. When you launch Windows in Clean Boot state, your operating system runs with the bare minimum of drivers, making it easier to detect the problematic application.
Here is how you can Clean Boot your PC:
- Type System Configuration in the search bar and go to the Services tab.
- Checkmark the Hide all Microsoft services box.
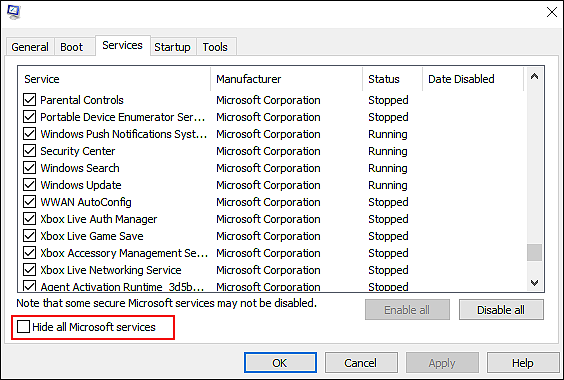
- Now select the first half of the services by clicking on the checkbox against them manually.
- Click on OK and restart your PC.
- Check if doing so resolved the issue. In the event that the error persists, it means that one of the selected services is causing the issue. If you have resolved the issue, move on to the 6th step, but if not, repeat the process with the services you didn’t select in the 3rd step.
- Now repeat the 3rd step again but this time, select half of the previously selected services and click on OK.
- Restart your PC and check if this fixed the problem. If not, keep repeating the process till you identify the one problematic app.
- Once you have identified the faulty application or driver, uninstall it.
This should resolve the issue at hand on your PC.
3. Try Using CleanMyPC.
How often do you thoroughly clean your PC? In case you have not removed corrupt files in a long time, now is the time, as they can do serious damage to your system. Moreover, it is likely that junk files in your PC are causing the high CPU usage issue.
You can get rid of these files and the problems they cause by using a good PC cleaner.
Online cleaners tend to be more effective, as they can scan your computer for errors, and resolve the ones found automatically. We tested some of the best online cleaners and found CleanMyPC to be the best.

The system maintenance tools provided by CleanMyPC allow you to remove all types of junk files and speed up the performance of your computer. Scanning your computer with CleanMyPC is quite straightforward as well. As soon as you run a scan, CleanMyPC will find the problems within minutes and attempt to fix them without requiring much input from you.
Give your PC a performance boost by installing CleanMyPC!
4. Perform an In-Place Upgrade.
In the event that none of the methods mentioned above have worked for you, it implies that you cannot resolve the issue under consideration using conventional troubleshooting methods.
If this is the case, we suggest that you perform an in-place upgrade, since it will repair all the problems within Windows without affecting any of your files.
Here is what you need to do:
- Download Media Creation Tool.
- After successful installation, open the app and click on Upgrade this PC now.
- Follow the instructions on the screen.
- In the Ready to Install window, select the items you want to keep on your PC after installation.
- Click Next and follow the instructions visible on the screen to start Windows installation.
That’s it.
This should resolve the issue once and for all.
This brings us to the end of our guide on resolving high CPU usage caused by Windows PowerShell on Windows 10. We hope that one of the methods mentioned in this guide did the trick for you. If you have any questions about the troubleshooting steps, please let us know in the comment section below.
If this guide helped you, please share it. 🙂
