

Need to Fix Self Assigned IP Address Error on Mac?
There can be various reasons why the internet on your Mac isn’t working properly. One example is the Self Assigned IP Address error, which many Mac users have reported. In this error, although your device is connected to a network, the internet stops working.
In order to recognize this error, simply look below your network connection to find “Self Assigned IP Address”. This issue can arise due to several factors, such as poor internet connection or corrupted Plist files.
The good news is you can easily fix self assigned IP address error on Mac by many practical methods. To help you out, we have gathered some of the most effective solutions below. However, before opting for any troubleshooting fixes, identify the main cause first.
So, let’s begin!
1. Power Cycle Modem/Router.
Before you jump to some serious fixes, determine if the problem is related to your internet connection. Check to see if the Wi-Fi works fine on other devices connected to the same network. If all of them are experiencing poor connectivity or similar issues, we recommend you power cycle the modem.
To do so, follow the steps below:
- Start by unplugging the modem from the power supply.
- Wait for a while.
- Then, reconnect the modem to the power source and press the power button.
This should fix the self assigned IP address error on Mac.
2. Renew the DHCP Lease.
A DHCP lease is an IP address assigned to a device on a network for only a limited period of time. Every time you connect to a wireless network, the DHCP server assigns a new IP address.
So, when you encounter the self assigned IP address error on Mac, you can manually renew the DHCP lease.
Here’s how to do it:
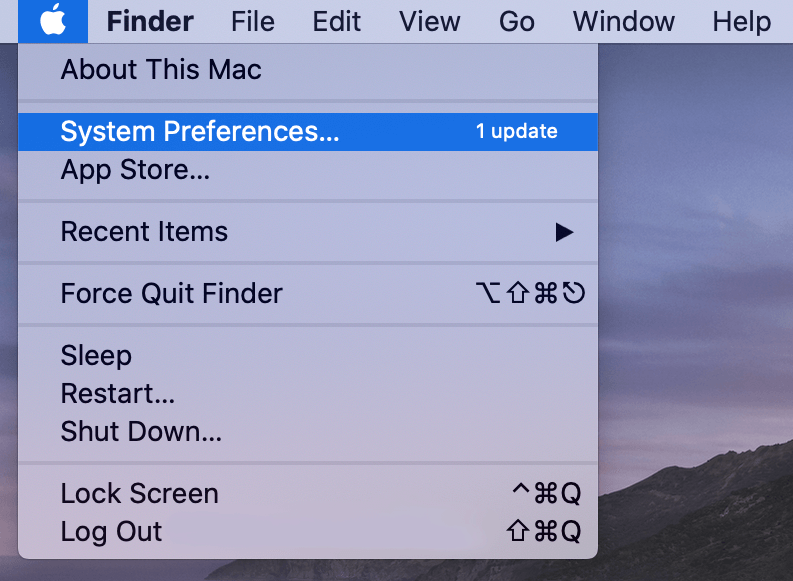
- Go to the Apple menu from the top-right corner.
- Next, click on System Preferences.
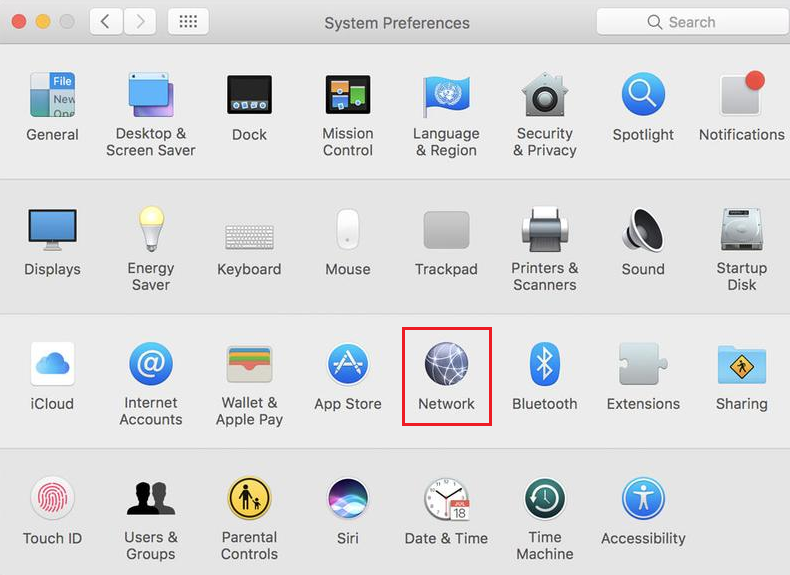
- From the new window that appears, select Network.
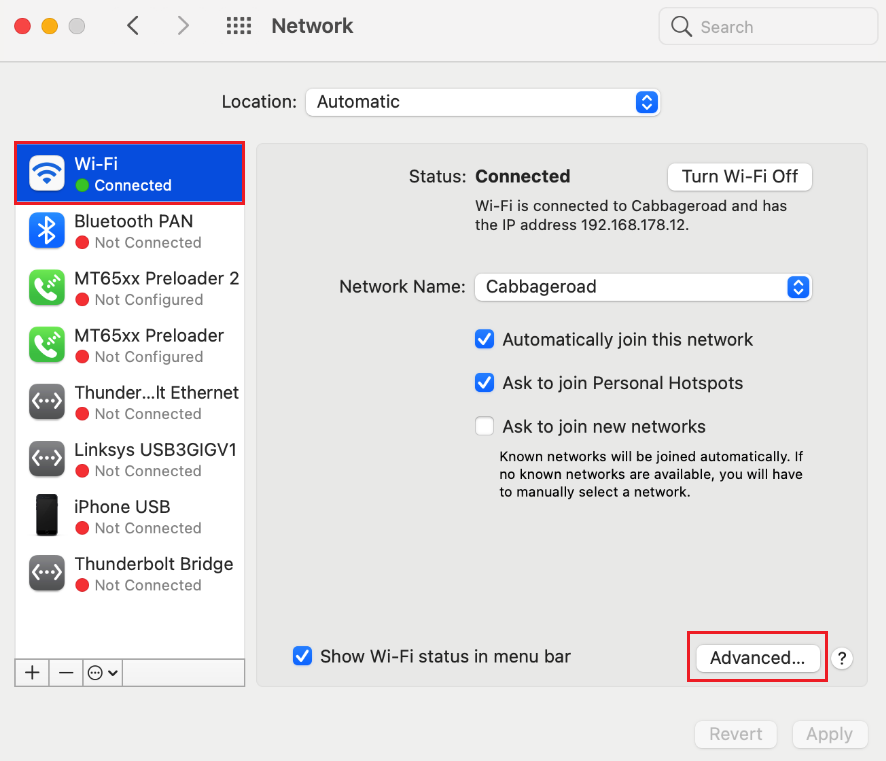
- From the left sidebar, click on your connected Wi-Fi or Ethernet network and select Advanced.
- Now, go to the TCP/IP tab and select Renew DHCP Lease.
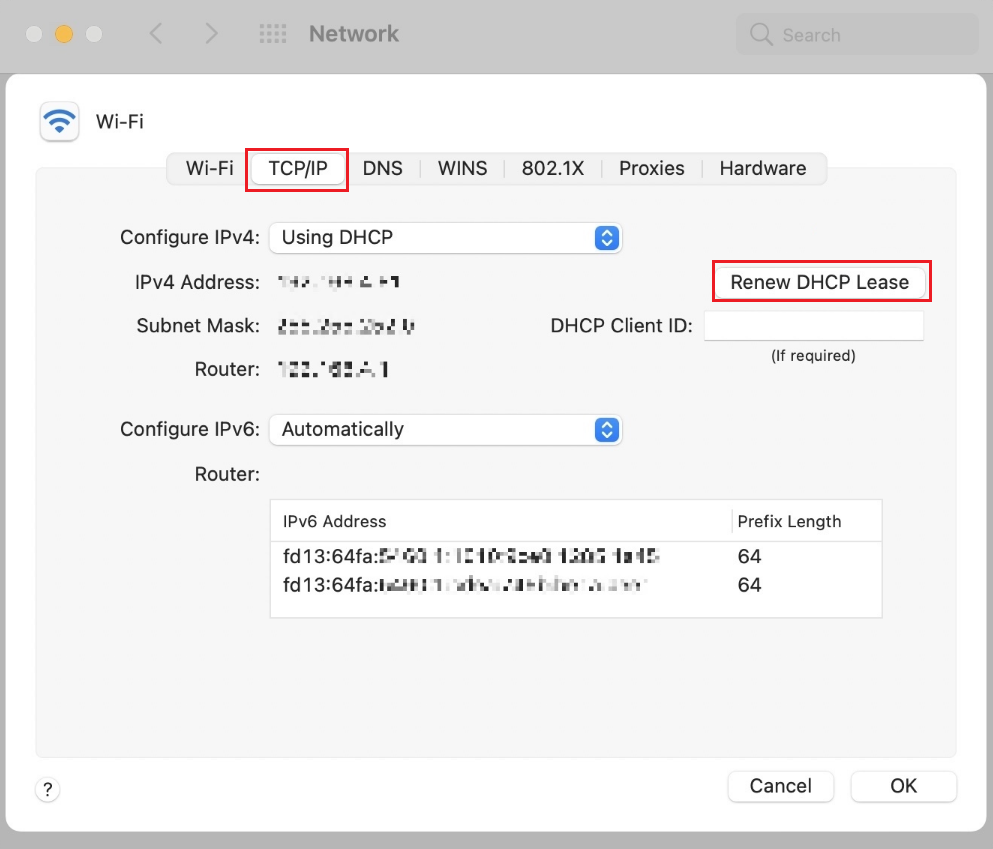
- Finally, click on OK to save these changes.
Once done, the self assigned IP address error on Mac should be solved. If not, follow the next solution from this guide.
3. Create New Network Location.
If directly renewing the DHCP lease was of no use and you’re still encountering the Self assigned IP address error on Mac, then this method is for you. Just create another network location and then reset your Mac’s IP address.
Each network location includes settings for a specific network port. That way, you can easily switch between various network locations without having to reconfigure every time.
Below are the steps you must follow:
- From System Preferences, select Network.
- After that, click on the drop-down menu icon next to Location.
- Click on Edit Locations.
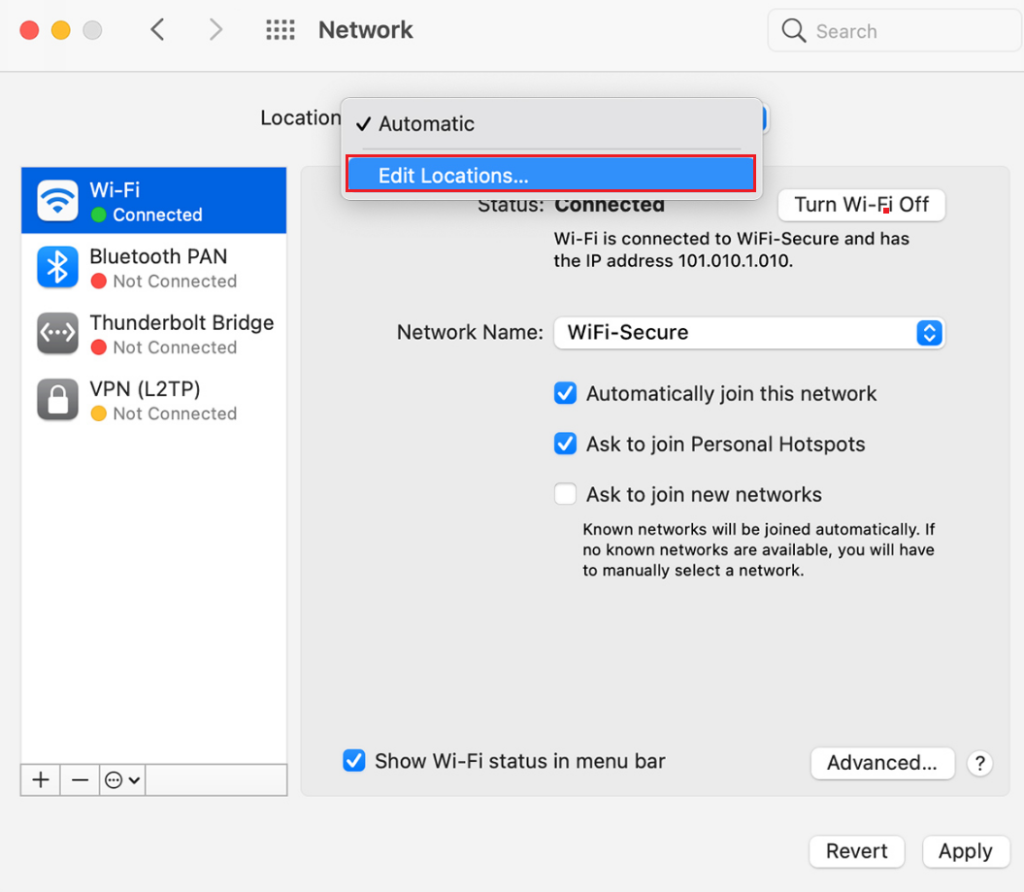
- Then, click on the + icon and enter the name of your network in the text field.
- Click on Done and choose your Wi-Fi network from the left pane.
- Now, choose Advanced.
- Click on the TCP/IP tab and select Renew DHCP Lease.
- At last, select OK to confirm these changes.
4. Delete the PLIST Files.
The Plist files or Preference files contain important data related to configuring apps and services within your macOS environment. Occasionally, these files can become corrupt, damaged, or even get attacked by malware or a virus.
To handle such situations, you can discard the Plist files to eliminate the error. This method will not harm any program or your computer so it is safe to follow.
Use the instructions below to do it:
- Launch Finder from the taskbar.
- After that, click on Go from the top bar and select Go to Folder.
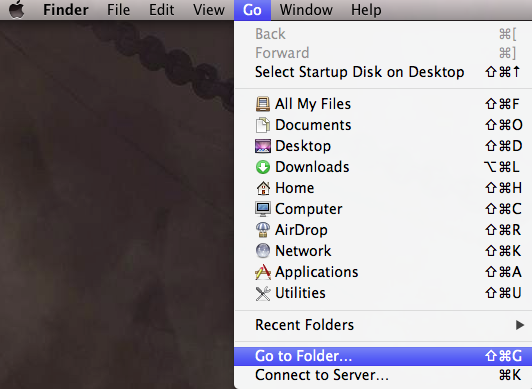
- Now, copy and paste the following in the text field and click on Go:
/Library/Preferences/SystemConfiguration/- From System Configuration, right-click on these folders and select Move to Trash:
com.apple.airport.preferences.plistcom.apple.network.identification.plistNetworkInterfaces.plistPreferences.plist- Finally, reboot your device and check if you’re able to connect to the internet now.
5. Set Service Order.
At times, you may be connected to more than one type of network interface. If you’re getting the self assigned IP address error on Mac when connected to one of them, you can change the service order to prioritize another network type.
Here’s how:
- Head over to the Apple logo and click on System Preferences.
- From there, click on Network.
- Next, click on the gear icon from the bottom-left corner and choose Set Service Order.
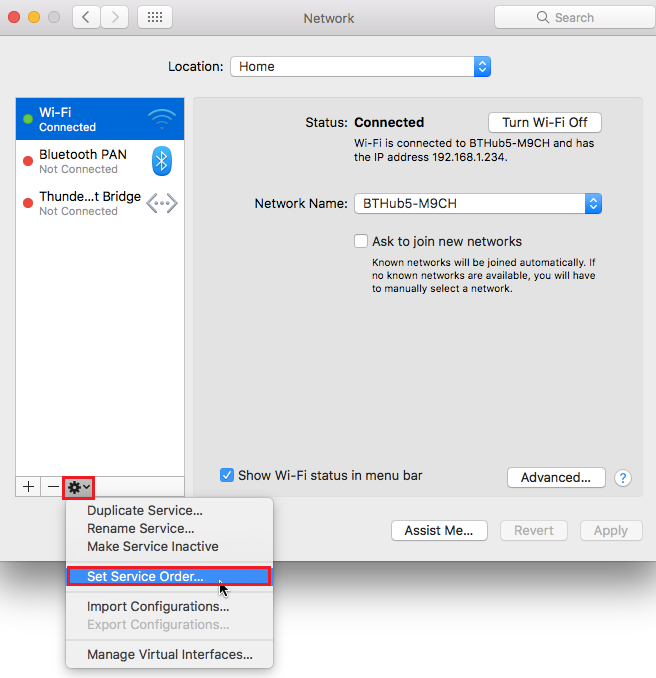
- From the new window that shows up, drag your network to the top.
- Lastly, click on OK.
6. Switch to Google DNS.
Your ISP server could be unreliable when it comes to keeping their servers up and running. It’s also possible that they have restricted access to certain web pages. In this case, you may experience slow service and even encounter self assigned IP address error on Mac.
Switching to a Google DNS might be a good option, not only to load pages faster but to access geo-restricted content.
Follow the steps below to do it:
- From the System Preferences window, go to Network.
- After that, click on the lock icon.
- Provide your login credentials.
- Now, click on your network from the left pane and select Advanced.
- Click on the DNS tab from the top and select ‘+’ from the bottom-left corner.
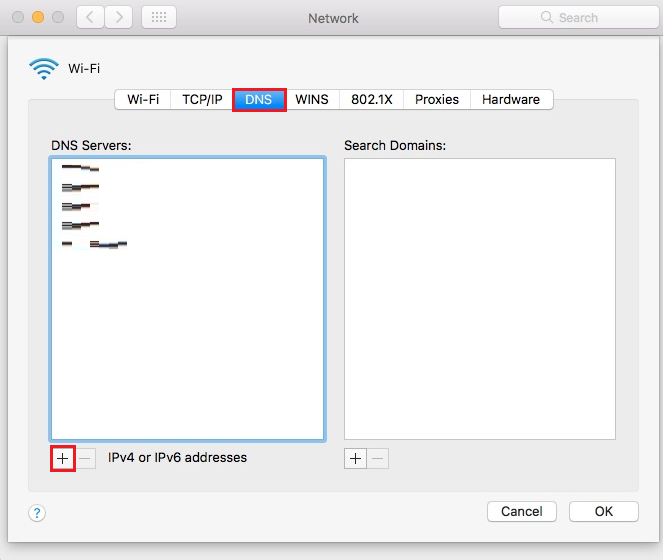
- Type in 8.8.8.8 and 8.8.4.4 in the DNS servers field and select OK.
- Lastly, reboot your Mac.
7. Reset the Firewall on Your Mac.
If you’ve not properly looked into the Firewall settings, it’s high time you do so. This protection program can sometimes show extreme behavior and block sites for safety. When that happens, you may receive the self assigned IP address error on Mac.
To resolve this, simply reset the Firewall to bring back the default configuration of the program. Hopefully, this will allow you to access content that wasn’t visible earlier.
Here’s what you need to do:
- Go to Finder and select Go from the top.
- Click on Go to Folder.
- Next, type in the following in the text field and click on OK:
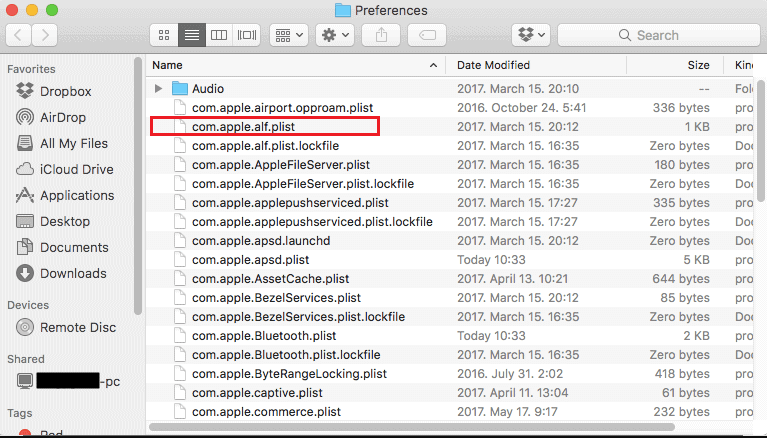
/Macintosh HD/Library/Preferences/- Now, delete the com.apple.alf.plist file.
- Restart your computer, and hopefully, this method will resolve your issue.
That was it! You’ve now made it to the end of our guide on how to fix self assigned IP address error on Mac. for more tips or suggestions, head over to the comment section below and help fellow readers.
If this guide helped you, please share it. 😊
