

Wondering how to set default account picture for all user accounts on Windows 10?
Windows assigns a default avatar with white curves and grey background to every user account. This picture can be changed to a picture of your choice, but if you have several user accounts, the process can be tedious.
Luckily, you do not have to spend hours changing the picture on every single account, since Windows allows you to do so in one go. This feature is especially helpful for large companies that want to set a company logo as the account picture on dozens of computers.
If you are looking for easy ways to do so, you are in the right place. Throughout this guide, we will walk you through some simple methods for setting default account picture for all users on Windows 10.
Let us get started.
1. Use Group Policy Editor.
Advanced users can customize their operating systems by using the Group Policy Editor, which is an advanced Windows feature.
Group Policy Editor maintains information in the form of policies, which can be altered in order to personalize the Windows working environment. In this method, we will be modifying the relevant policies to make the desired changes.
Here is what you need to do:
- Press Windows + R keys simultaneously to open a Run dialogue box.
- In the text field of the dialogue box, type ‘gpedit.msc‘ and hit Enter. This will launch the Group Policy Editor on your PC.

- Once you are inside the Group Policy Editor, navigate to the location mentioned below.
Computer Configuration\ Administrative Templates\ Control Panel\ User Accounts
- Locate and double-click on Apply the default account picture to all users in the right pane and select Enabled.
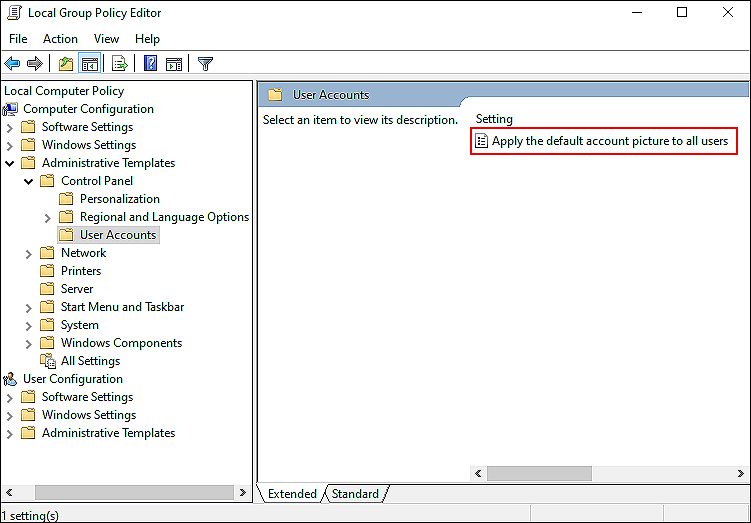
- Hit OK to save the changes you just made.
Hopefully, doing so will set the picture of choice as default account picture for all users.
2. Try Using CleanMyPC.
If the recommended solutions do not work for you, there is a chance that your system is infected with bugs or corrupt files that might be preventing you from carrying out these operations. In this scenario, removing the junk files before attempting to troubleshoot is the best route.
The best way to remove clutter from your computer is by using an efficient PC cleaner and if you are looking for a recommendation, our personal favorite is CleanMyPC.

Apart from removing junk files, CleanMyPC offers a range of system maintenance tools that can address other PC-related problems. After installing the tool and running an initial scan, it will automatically identify and fix problems without any major user input.
Additionally, CleanMyPC is quite easy to use, so even if you’ve never used a PC cleaner before, you should have no trouble using it!
3. Use Windows Registry.
Another simple way to set default account picture for all user accounts on Windows 10 is to edit the Windows Registry.
A Windows Registry function is similar in nature to the Group Policy Editor. It is also a powerful tool that can be used by users to customize the Windows operating system. For those who have difficulty using the Group Policy Editor, you might want to try using the Windows Registry instead.
Here is all that you need to do:
- Press Windows + R keys simultaneously to open a Run dialogue box.
- In the text field of the dialogue box, type ‘regedit‘ and hit Enter. Doing so will launch Windows Registry on your PC.

- Once you are inside the Registry Editor, navigate to the location mentioned below.
HKEY_LOCAL_MACHINE\Software\Microsoft\Windows\CurrentVersion\Policies\Explorer
- Now right-click anywhere in the right pane and select the New > DWORD (32-bit) Value option.
- Rename this newly created value as UseDefaultTile and double-click on it.
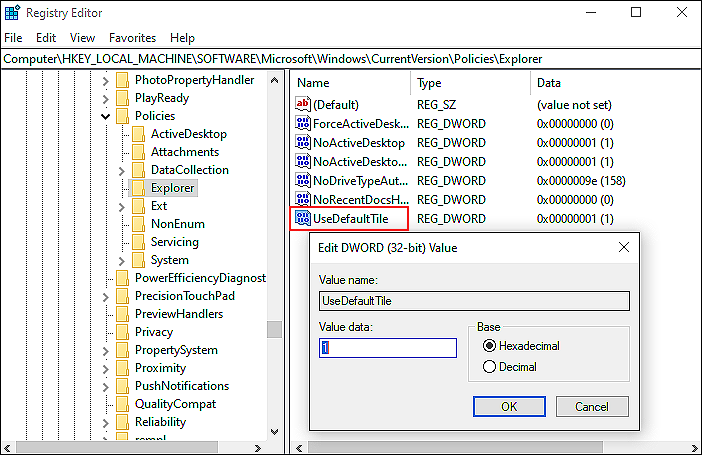
- Under Value data, type 1 and hit Enter.
This should help you make the desired changes in no time.
FAQ: How to Change Default Account Picture with Another Picture?
In case you wish to replace the default account profile image of Windows 10 with a picture of your choice, you can do so by following a few simple steps.
Here is what you need to do:
- Launch File Explorer and navigate to the location mentioned below.
Local Disk (C:)\ProgramData\Microsoft\User Account Pictures\
- You can now replace the default images with an image of your choice. Make sure to replace the user.jpg image with an image of the same name.
- Once you have replaced the images, follow one of the methods mentioned above to set it as the default account picture for all users.
Doing so will allow you to change your default account picture with another picture successfully.
This brings us to the end of our guide on setting default account picture for all user accounts on Windows 10. We hope one of the methods mentioned above did the trick for you. If you still have any confusion, please let us know in the comment section below.
If this guide helped you, please share it. 🙂
