

Looking for easy ways to set up a VPN connection in Windows 10?
This might sound paranoid, but your online privacy is constantly at risk if you haven’t taken considerable measures to protect it. Out there somewhere, someone might be monitoring your online activity as you stalk your crush, who is way out of your league.
And you don’t want that.
VPNs are really popular these days, as they create an encrypted tunnel between you and a remote server. Because of this, the actual IP address is concealed, masking your true location and identity. Additionally, a VPN service whose server is located in another country will allow you to access things you normally cannot.
If you want to set up a VPN connection in Windows 10 and are looking for easy ways to do so, you are in the right place.
We have listed some of the easiest ways to do so that will not take much of your time.
Let’s get started!
1. Use Windows Settings.
One of the easiest ways to set up a VPN connection is via Windows Settings.
Windows Settings tool makes it easy for people to customize their operating system in a few easy steps, and setting up a VPN connection is no exception.
Here is what you need to do:
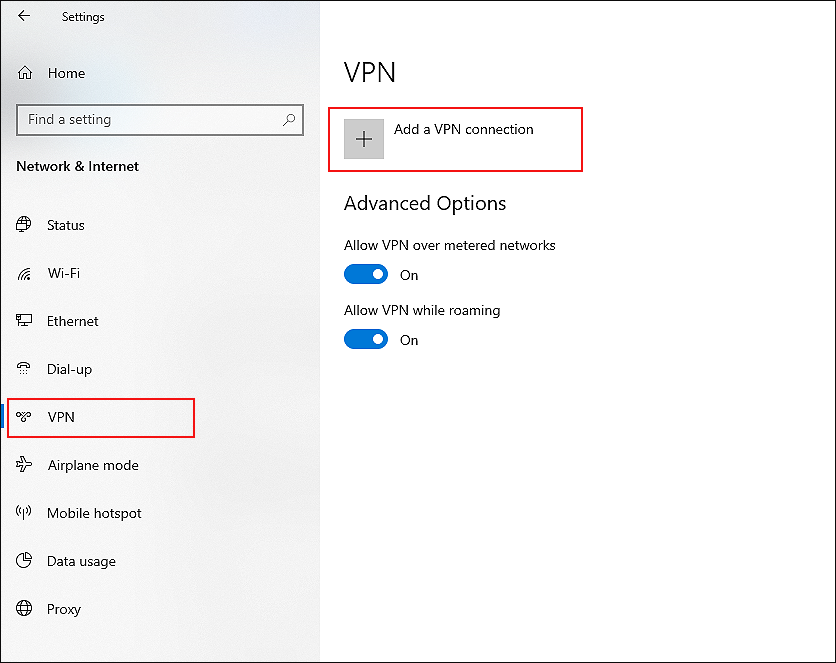
- Go to Settings and click on Network & Internet.
- Choose VPN from the left panel, and in the right pane, click on Add a VPN connection.
- Now click on the dropdown menu under VPN provider and choose the Windows (built-in) option.
- Now name your VPN connection in the Connection name field. We recommend using a name you will remember easily.
- Type the address of the server that you are connecting to in the Server name or address. It will look like a website URL, and you can ask your VPN provider for this information.
- Next, click on the VPN type dropdown menu and choose the protocol that your VPN service uses.
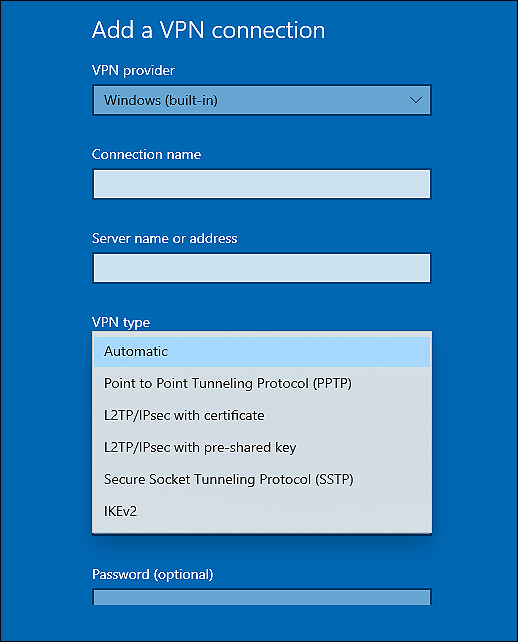
- Similarly, in the Type of sign-in info drop-down menu, select your preferred method of signing in.
- Finally, click Save to save the changes you just made and return to the VPN window in Settings.
- In the right pane, click on the VPN connection you added and click Connect.
As simple as that!
You should now be able to use a VPN without any issues.
2. Try Using CleanMyPC.
If you have issues setting up a VPN connection in Windows 10, then there is a chance that the junk files in your system are causing the problem.
In this case, we suggest eliminating the unwanted junk files first and then proceeding with the methods we have mentioned in this guide. The easiest way to remove junk files is by using a reliable PC cleaner, and if you are looking for recommendations, we highly recommend using CleanMyPC.

CleanMyPC is an efficient cleaner that comes with a wide range of system maintenance tools. These tools can take care of everything from the junk files to the slow speed of your PC. All that you need to do is run a scan using CleanMyPC. It will identify and resolve the issues with little to no user input.
Install CleanMyPC now and give your PC a much-needed performance boost!
3. Use the Control Panel.
Another easy way to set up a VPN connection in Windows 10 is via Control Panel. If the method mentioned above did not help you, you can follow the steps mentioned in this method.
Don’t worry; the method is easy to follow and should not take much of your time.
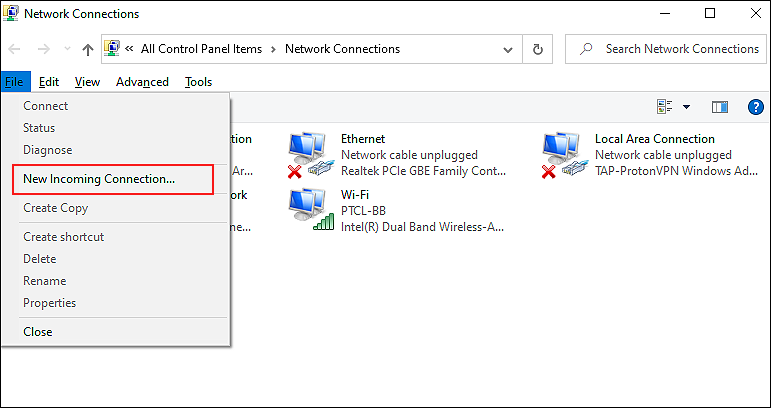
- Type ncpa.cpl in the search bar and click on Open.
- Inside the Network Connections window, click Alt key on your keyboard and then select File in the window.
- Click on New Incoming Connection and choose the user accounts that you want to have access to the VPN connection.
- Click on Next and then select Through the Internet.
- In the next window, choose the network protocols you want to be enabled under the Networking software option.
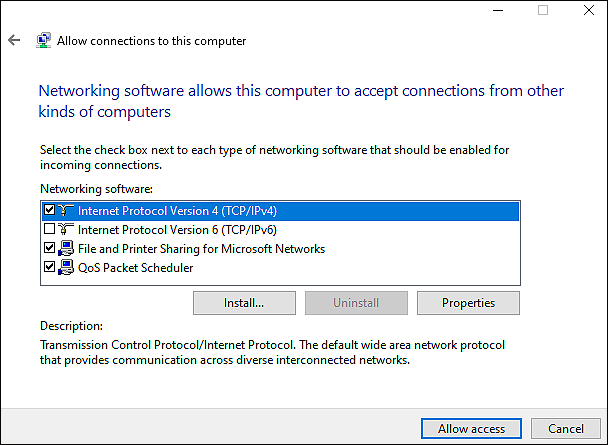
- Once selected, click on Allow access.
Your server is now successfully set up. Once that is done, now is the time to configure the router.
All that you need to do is log into your router’s setup page. It is best to add a port forwarding rule to the router to enhance security.
Create a VPN Profile
The next step is to create a VPN profile. For that, you must know your network’s public IP address or its Dynamic DNS address.
Your network’s IP address is the one that is available on the internet, so it should be easy to find.
Once you have it, here is what you need to do next:
- Type VPN in the search bar and click on Open.
- Choose Add a VPN connection and follow the on-screen instructions to proceed.
- Once done, click on Save.
Following the steps mentioned above will help you create a VPN profile successfully.
Make the Connection
The last step is to connect your VPN to your computer.
For that, here is what you need to do:
- Click on the Network icon on your taskbar and select your recently created VPN profile.
- Now select the Connect button and add the username and the password to proceed.
That’s it.
Doing so will set up a VPN connection in Windows 10.
This wraps up our guide on ways to set up a VPN connection in Windows 10. We tried walking you through each method in detail and hope that one of them did the trick for you. If you have any questions regarding the troubleshooting methods, please feel free to let us know in the comment section below.
If this guide helped you, please share it. 🙂
