

Wondering How to Turn Off Sticky Keys in Windows 11?
Microsoft initiated the sticky keys functionality in Windows 95. Sticky keys is a feature that allows users to enter one key at a time, creating a sequence instead of holding two or more keys simultaneously. That is to say, a user presses and releases a modifier key (Shift, Ctrl, Alt, or Windows key), which remains active till the next key is pressed.
Further, to make a word bold while the sticky keys functionality is enabled, a user would have to press the Ctrl key, then release it, then press B and release it. On the other hand, if the sticky keys functionality is disabled, one would have to press Ctrl + B simultaneously.
Sometimes, a user may turn on the sticky keys unintentionally, for instance, while playing games. Other times, a user may prefer having the sticky keys functionality turned off. In this article, we will go through multiple ways of How to Turn Off Sticky Keys in Windows 11.
So, let’s get started!
Using Keyboard Shortcut.
Sometimes a user wants to quickly turn off sticky keys and carry on with what they were doing. The keyboard shortcut is one of the quickest methods to turn off sticky keys in Windows 11.
Now, let’s look at two common ways to do this:
- Firstly, with the sticky key feature turned on, this method requires you to press the Shift key fast five times to disable it. You will hear a sound from your computer once it is turned off.
- Secondly, this other method turns off the sticky keys by having a user press a modifier key and another key simultaneously. This method will also produce a sound after it is disabled.
Further, to know that the sticky keys have been turned off, the icon below on the taskbar will disappear.

Another way to confirm that it’s turned off, press the Shift key fast five times. If you will get a prompt asking you to turn on the sticky keys, it means that it’s already disabled.
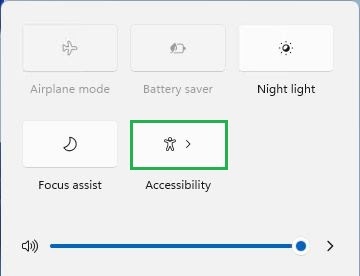
Using Quick Settings.
From its name, this is also a relatively quick method to turn off the sticky keys function.
Here are the steps to follow:
- Begin by pressing Windows + A to open the Quick Settings menu. You can also open it by clicking on the Network, Sound, or Battery icons at the bottom right of your screen.
- Now, click the Accessibility tile.
- Lastly, toggle the Sticky keys option to Off.
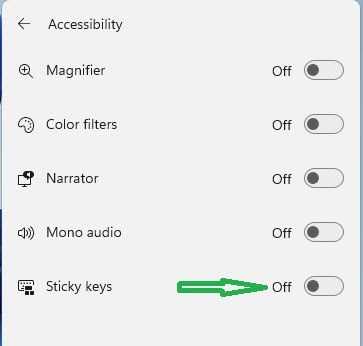
And there you have it! The sticky keys feature is now disabled.
Using the Control Panel.
Another method to use is the Control Panel. Let’s note that the Control Panel is a Windows component that allows a user to change or view the settings of a system.
Here is how you can use Control Panel to turn off sticky keys:
- Start by searching for the Control Panel app. Do this by clicking on the search icon at the bottom of the screen. Now, type ‘Control Panel‘ on the search bar and click on it.
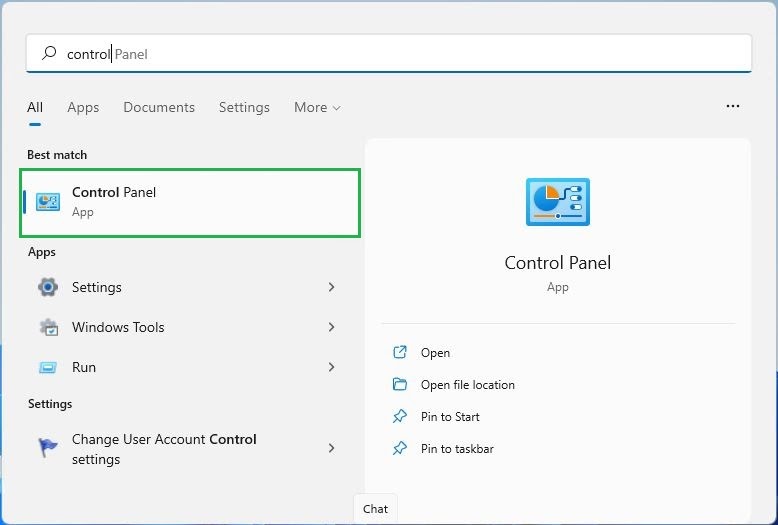
- Next, the Control Panel window will appear. Click on the Ease of Access option.
- Now, select Ease of Access Center.
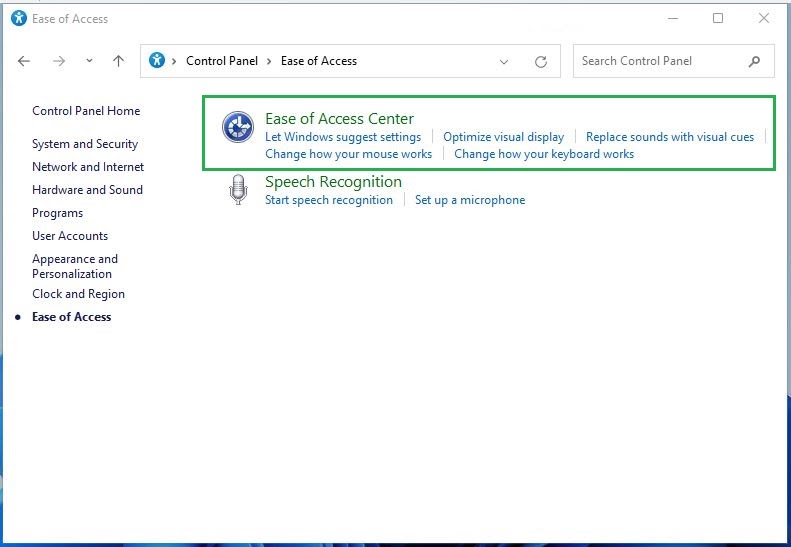
- After that, click on Make the keyboard easier to use.

- A new window will open. Under Make it easier to type, ensure Turn on Sticky Keys is unchecked.
- Further, click on Set up Sticky Keys. A new window opens. Under Keyboard shortcut, uncheck the Turn on Sticky Keys when SHIFT is pressed five times option.
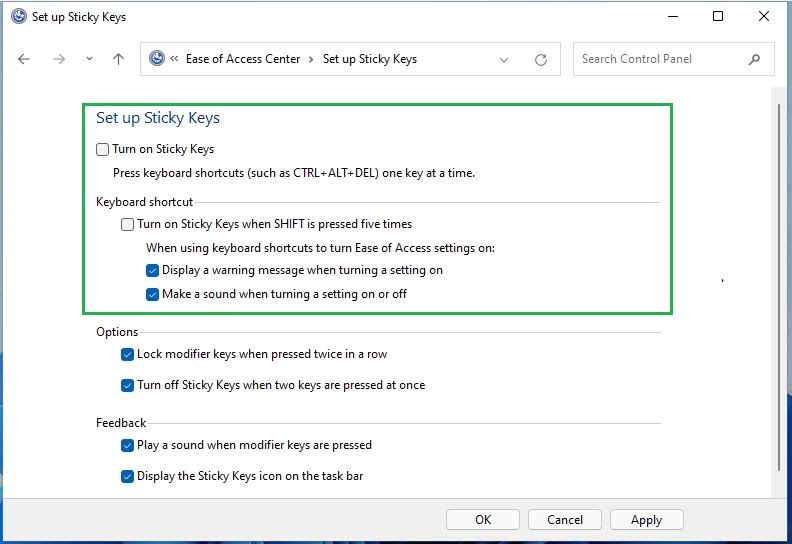
Lastly, click Apply at the bottom of the page, click OK to save your changes.
Great! You have disabled sticky keys in Windows 11 via the Control Panel.
Using the Settings app.
Another method we can use to turn off sticky keys is using the Windows Settings app.
Here is how to go about it:
- Begin by pressing Windows + i or alternatively Windows + X, then scroll down and click Settings. This will open the Settings app window.
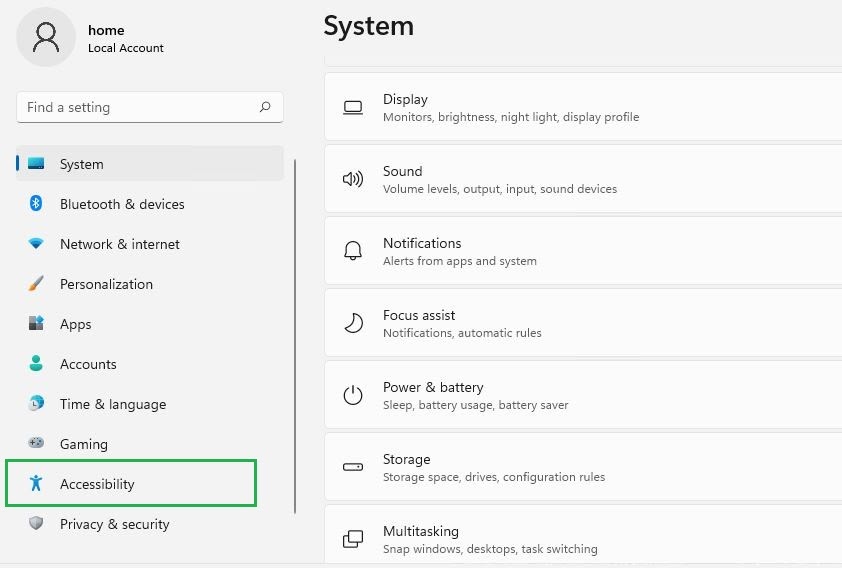
- Now, click Accessibility from the left Navigation pane.
- Then, scroll down, and under Interaction, click Keyboard.
- A window opens on your screen. Toggle Off on the sticky keys section.
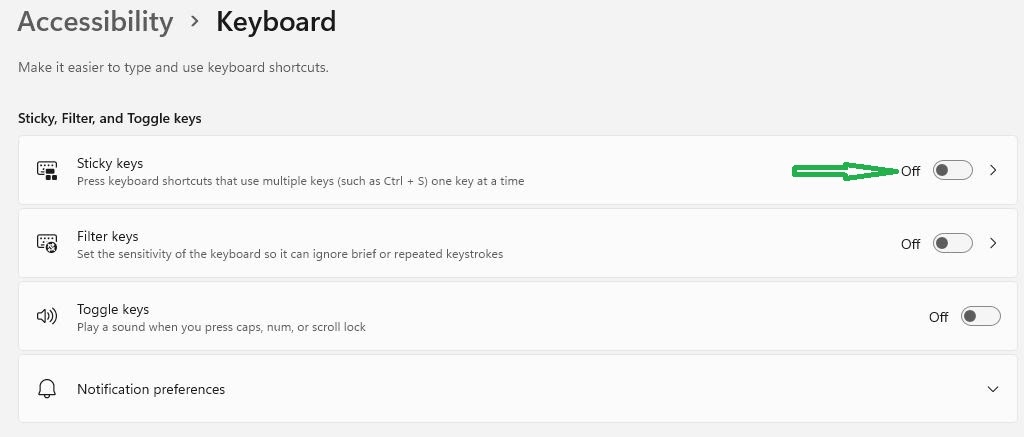
You can now close the Settings window, and the sticky keys function is successfully disabled.
Turn off Sticky Keys via Registry.
If after using the above methods, your sticky keys functionality is still enabled, use the Windows Registry to disable the feature.
It is recommended to carefully follow the steps so as not to make a wrong edit on the Windows Registry, which can result in a system being unstable, or worse, a system may fail to boot.
Here are the steps to follow:
- Go ahead and press Windows + R to launch the Windows Run dialogue box. Now, type
regeditin the textbox, then click OK.
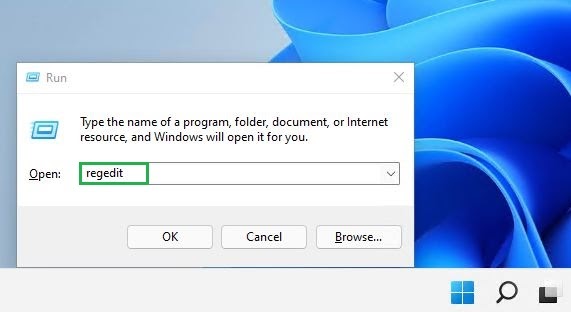
- A User Account Control (UAC) dialog box opens. Click Yes to continue.
- From there, the Registry Editor opens. Navigate the left sidebar by clicking on
HKEY_CURRENT_USER, thenControl Panelfollowed byAccessibility, and thenStickyKeys.
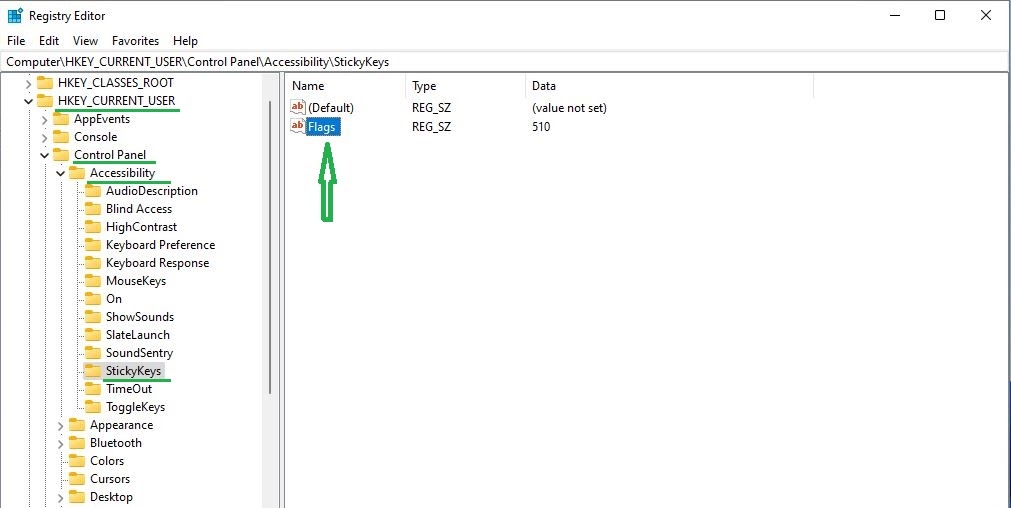
To clarify, the path followed is as shown below. Lastly, double click on Flags on the right side.
Computer\HKEY_CURRENT_USER\Control Panel\Accessibility\StickyKeys
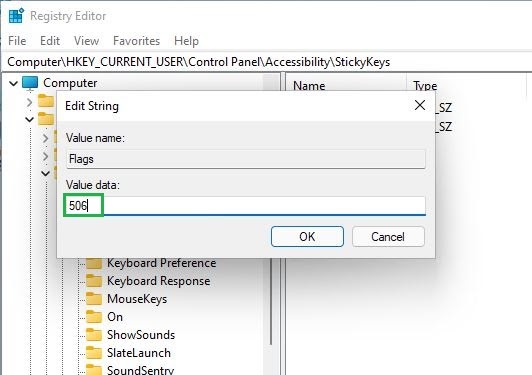
- A pop-up window titled Edit String opens. Now, enter the number 506 in the Value Data text box and then click OK to continue.
Now close the Registry Editor, and that’s it! It is also advisable to restart your machine if you do not see the changes you have just implemented.
So, we have learned that sticky keys are helpful to users who may have difficulty holding down two or more keys simultaneously. However, we’ve also learned that some users may prefer to have the sticky keys feature disabled.
In conclusion, we have discussed the sticky keys feature and multiple ways of How to Turn Off the Sticky Keys in Windows 11. If you have any questions or suggestions, let us know in the comment section below.
Here are more Windows 11 features that you can go through if you would want to enable or disable more functionalities.
If this guide helped you, please share it. 🙂
