

Wondering how to view hidden folders and files in Windows 11?
Any file that has the hidden attribute enabled is classified as a hidden file. Files with this attribute are invisible to you as you browse through the folders, and their content can only be viewed if you explicitly allow it.
Microsoft Windows operating systems are configured by default to not display hidden files. The reason these files are hidden is that they are critical system-related files, and Windows does not want you to be messing around with them. By moving or deleting a system file, you may adversely affect the system’s critical functions, resulting in the impossibility to use it in the worst case.
However, there are times when you may need to view hidden folders and files in Windows 11. For example, if you’re updating software, or if you’re troubleshooting a specific problem related to a hidden file, you will need to view that file.
In this guide, we will walk you through several ways of viewing hidden folders and files in Windows 11. All the methods we have discussed below are easy to perform, and should not take much of your time.
Let’s get started!
1. Use the Show Hidden Files, Folders, and Drives Option via File Explorer.
In this method, we will modify the folder options via File Explorer.
This option is already included in the File Explorer, which means you only have to discover and enable it. As simple as that!
Here is what you need to do:
- Click on the File Explorer icon on the taskbar to launch the File Explorer window.
- In the newly launched window, click on the three dots from the ribbon menu and select Show.
- Now click on Hidden items to view hidden files.
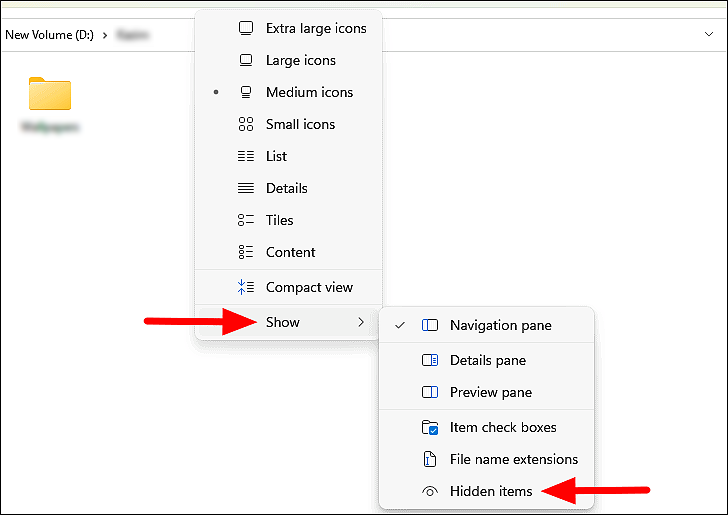
- In case you cannot view the Show option, click on Options as shown below.

- Now go to the View tab and under Advanced settings, expand Hidden files and folders.
- Uncheck Don’t show hidden files, folders or drives and checkmark the box associated with Show Hidden Files, folders and drives.
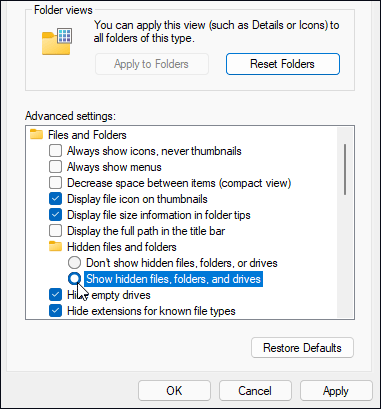
- Finally, click on Apply and then OK to save the changes.
This should display the hidden files on your PC.
2. Try Using CleanMyPC.
There could be a corruption error on your computer, preventing certain features from working, so the steps outlined here may not work. In this case, you do not need to be concerned as a simple fix exists.
You can use a reliable PC cleaner to scan your computer for issues, identify them, and have them automatically repaired. You can do all of this with CleanMyPC with very little or no input from you!

CleanMyPC comes with a variety of system maintenance tools. These tools are capable of fixing most of your PC-related issues like slow performance. The only thing you need to do is download CleanMyPC and run a scan. If any issues are identified, the cleaner will resolve them automatically, leaving your PC up and running like new!
3. Uncheck the Hide Protected Operating System Files Option.
Another way of viewing hidden folders and files in Windows 11 is by modifying the advanced settings in File Explorer.
With the steps listed below, you can view the protected operating system files on your PC. However, we highly recommend enabling the protection back again once you are done accessing the required information. This will keep your essential files private and away from prying eyes.
Here is what you need to do:
- Click on the File Explorer icon on the taskbar to launch the File Explorer window.
- In the newly launched window, click on the three dots from the ribbon menu and select Options.
- Next, go to the View tab and under Advanced settings, uncheck the Hide protected operating system files (Recommended) option.
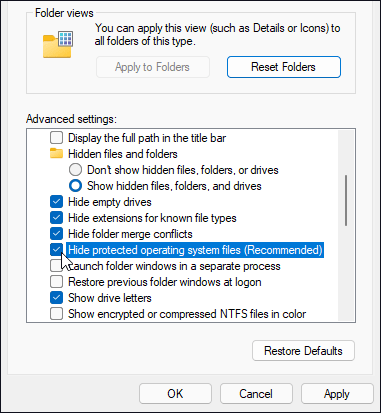
- Click on Apply and hit OK to save the changes.
You should now be able to view the hidden files and folders.
This brings us to the end of our guide on ways to view hidden files and folders on Windows 11. We tried walking you through all the steps in detail and hope that one of the methods mentioned in this post did the trick for you. In case you still have any confusion about the troubleshooting steps, please let us know in the comment section below!
If this guide helped you, please share it. 🙂
