

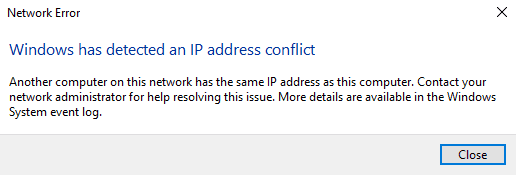
Want to fix the ‘Windows has detected an IP address conflict’ issue on your computer?
The ‘Windows has detected an IP address conflict’ is a common issue that occurs when two devices on your network have been assigned the same IP address.
As a result, you may encounter connectivity problems on Windows.
In the worst cases, you’ll see the ‘Windows has detected an IP address conflict’ message appears on your screen.
If you are having a hard time solving this issue, we got you covered.
Today, we’ll show you how to fix the ‘Windows has detected an IP address conflict’ issue on your computer.
Let’s get started!
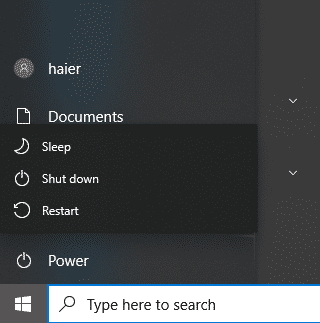
1. Restart Your Computer.
IP address conflicts can be resolved by simply restarting your computer. This should renew the connection on your router, forcing it to assign a new IP address to your PC.
See the steps below to restart your PC:
- Press the Windows key on your keyboard to open the Start Menu.
- Now, access the Power Options tab.
- Choose Restart from the options.
Wait for your computer to reboot. Try accessing any website to see if you’ll encounter connection issues.
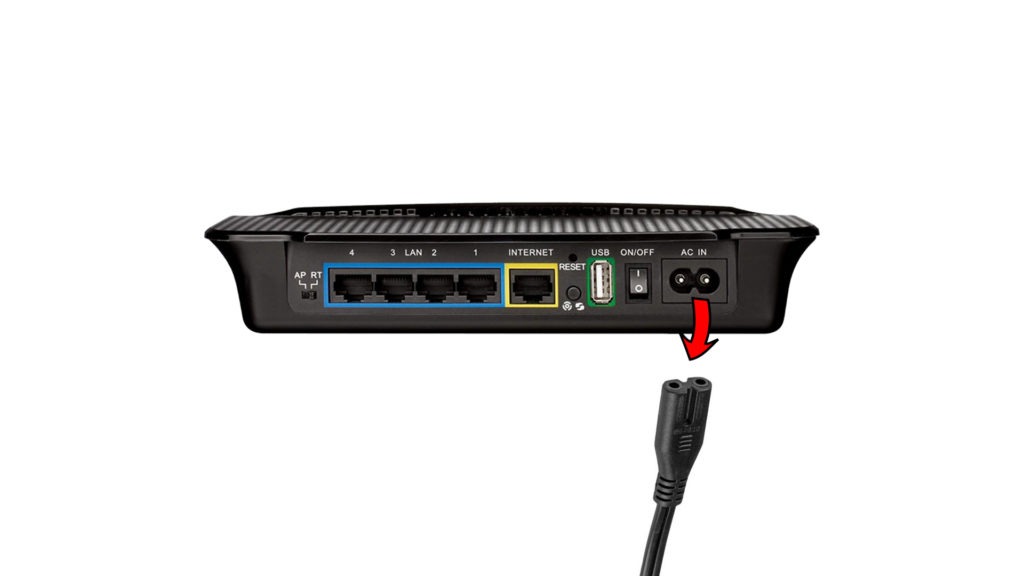
2. Restart Your Router.
If restarting your system was not able to solve the issue, try restarting your router.
Similar to restarting your computer, this should refresh the connection between your modem and your devices. Hopefully, your router will assign different IP addresses to all your devices.
Here’s what you need to do:
- Locate the power cable of your router.
- Now, unplug it from the outlet and wait for 5 to 10 seconds.
- Reconnect the power cable afterward.
Wait for your router to initialize and see if the ‘Windows has detected an IP address conflict’ issue would still occur.
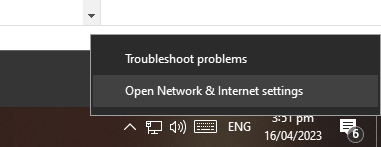
3. Disable and Enable Your Network Adapter.
Disabling and enabling your network adapter should refresh your network configurations and solve any IP address conflicts.
Check out the steps below to guide you through the process:
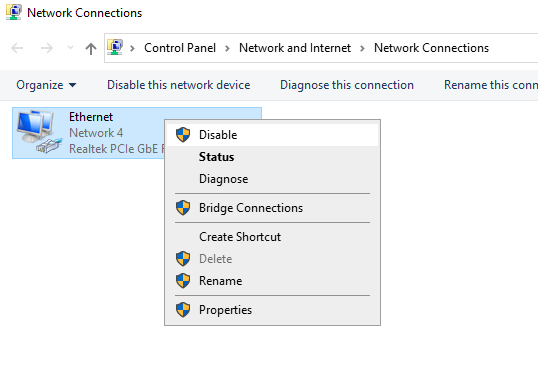
- Right-click on the Network icon in the lower right corner of your screen.
- Choose Open Network & Internet Settings.
- Under Advanced Network Settings, click on Change Adapter Options.
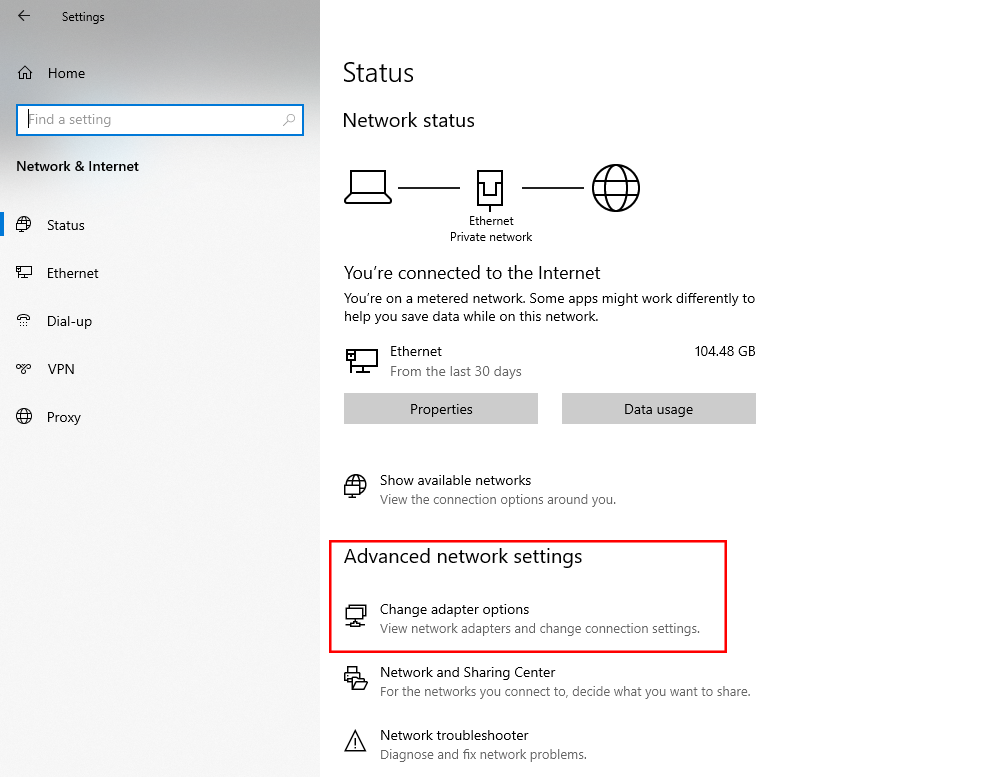
- Now, right-click on your network and choose Disable. Enable your network controller after several seconds.
Restart your system afterward and see if you’ll still encounter the network conflict error.
4. Renew Your IP Address.
As we have mentioned, this issue on Windows occurs when another device on your network is assigned with the same IP address your computer is using.
To fix this, you can renew your computer’s IP address to force your router to generate a new one.
Here’s what you need to do:
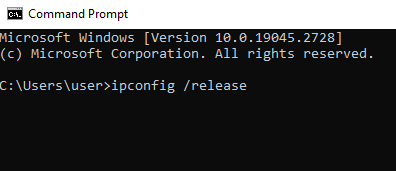
- Go to the Start Menu and look for Command Prompt.
- Click on Run as an Administrator.
- Inside CMD, execute the following commands one by one:
ipconfig /release

ipconfig /renew- Close the Command Prompt and restart your system.
Try browsing the internet to see if you’ll encounter connectivity problems.
5. Assign A Static IP Address.
Assigning a static IP address for your computer shall prevent this issue from happening again.
Setting a static IP address on your system will ensure that your computer will have the same IP address even if you restart your network.
Check out the steps below to setup a static IP address:
- On your Taskbar, right-click on the Network icon.
- Next, click on Open Network & Internet Settings.
- Click on Change Adapter Options and right-click on your network controller.
- Go to Properties and double-click the Internet Protocol 4 tab.
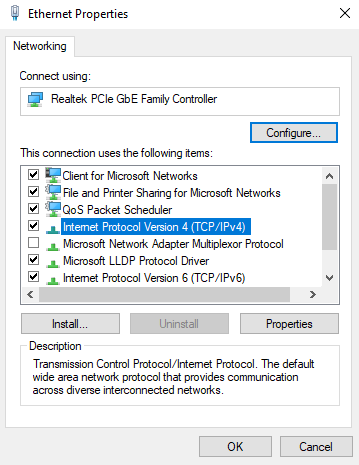
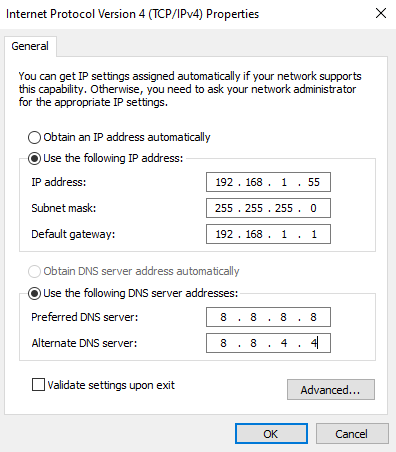
- Enable the ‘Use the following IP address’ option and input the following values:
- IP Address: 192.168.1.X (any value from 2-255)
- Subnet Mask: 255.255.255.0
- Default Gateway: 192.168.1.1
- Preferred DNS: 8.8.8.8
- Alternate DNS: 8.8.4.4
- Click OK to save the changes.
Note
The values shown above apply to our network parameters. If you are unsure about your network configuration, contact your ISP or network admin for assistance.
Restart your computer and check if the problem is solved.
6. Check Your Router’s Capacity.
Another reason why you encounter IP address conflict on Windows is if your router reached its supported number of devices. Every router has a limit on how many devices it can handle at the same time.
If this limit is reached, it may assign the same IP address to multiple devices, causing conflict and network issues.
Consider upgrading to a better router or disconnecting other devices you are not using from your network.
7. Update Windows.
Updating Windows can also prevent this issue from happening in the future. There might be a problem with your operating system that causes IP address conflicts and connectivity issues.
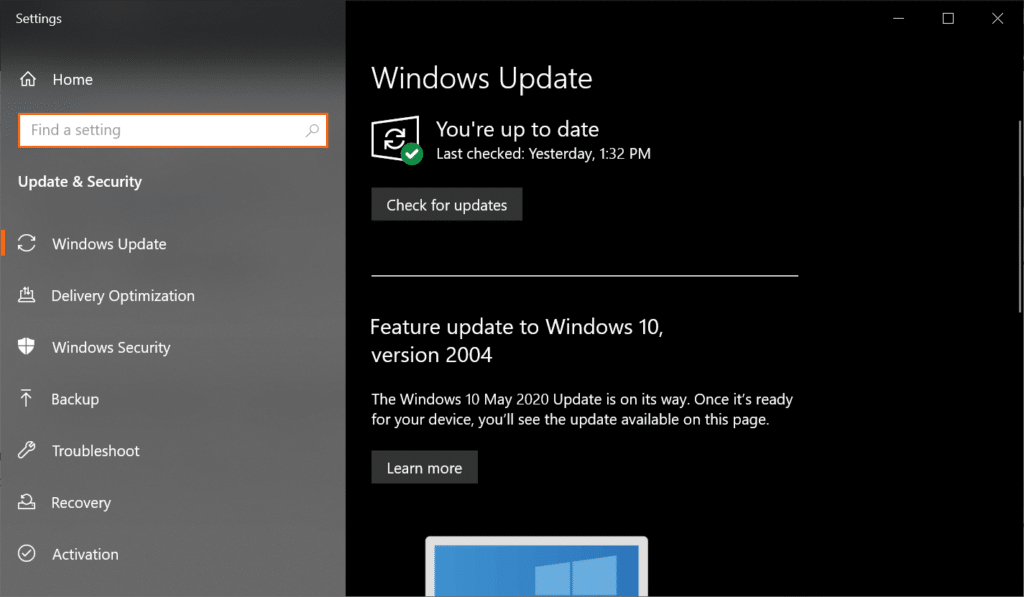
See the steps below to update Windows:
- Press the Windows + I keys on your keyboard to open Windows Settings.
- Go to the Update & Security tab.
- Click on Windows Update and wait for your system to check for updates.
- Lastly, click on Download and Install if there’s an available update.
Restart your computer after the update to apply the changes. Connect to your network to see if the ‘Windows has detected an IP address conflict’ issue would still occur.
8. Contact Your Network Admin.
If you have tried all solutions mentioned above, it may be time to seek help from a network administrator. Network admins are responsible for managing and maintaining computer networks.
Here are some points you can ask your admin to check:
- Network Configuration – if your network is misconfigured, it can assign the same IP address to multiple devices.
- DHCP Server Issues – if the DHCP server is not functioning properly, it can cause IP address conflicts.
- Network Security – if your network is under attack by a virus or hacker, it can trigger IP address issues. Your network admin should be able to identify this and implement security measures.
That ends our guide on how to fix the ‘Windows has detected an IP address conflict’ issue. If you have questions or other concerns, please let us know in the comment section, and we’ll do our best to help.