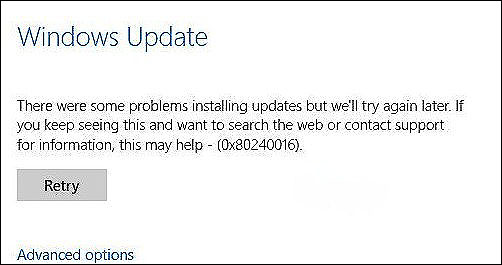
Wondering how to fix Windows Update error 0x80240016 on your computer?
Maybe you have a big presentation in a few minutes. Maybe you have an online test that you pulled an all-nighter for. Or maybe you have a tight deadline and just need to finish some work.
Windows doesn’t care.
It will force-feed your computer updates which usually results in unknown errors, leaving you clueless and perplexed.
A similar situation was faced recently by several users, when their screens displayed Windows Update error 0x80240016 upon an attempt to install critical, cumulative, or feature updates.
We had a look into this matter and discovered that the said error can be caused by a number of reasons, including corrupt Windows Update cache, Windows Update glitch, system file protection, and an overprotective firewall.
If your screen is displaying the error code 0x80240016 too, you are in the right place. In this guide, we will walk you through the relevant troubleshooting steps in detail.
Let’s get started.
1. Run Windows Update Troubleshooter.
It is not uncommon for Windows users to face issues while installing the latest updates now and then. Luckily, Windows comes with several built-in troubleshooting utilities that are specifically designed to handle issues like the one at hand.
One such handy utility is Windows Update Troubleshooter that scans the operating system for issues that might be preventing Windows from installing the required updates.
Here is how you can use the Troubleshooter to resolve the error code 0x80240016:
- Press Windows + R keys simultaneously on your keyboard to open a Run dialogue box.
- Inside the text field of a dialogue box, type ‘control.exe‘ and hit Enter.

- Doing so will take you to the control panel window. Inside the window, type Troubleshooting and the search bar and hit Enter.
- Click on Troubleshooting, and inside the troubleshooting window, click on System and Security.
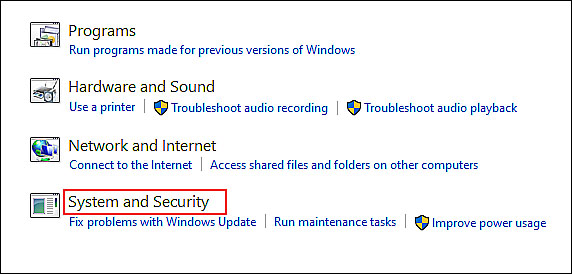
- Now select Windows Update and then click on Advanced hyperlink in the next window.

- Checkmark the box against Apply repairs automatically, and then click on Next.
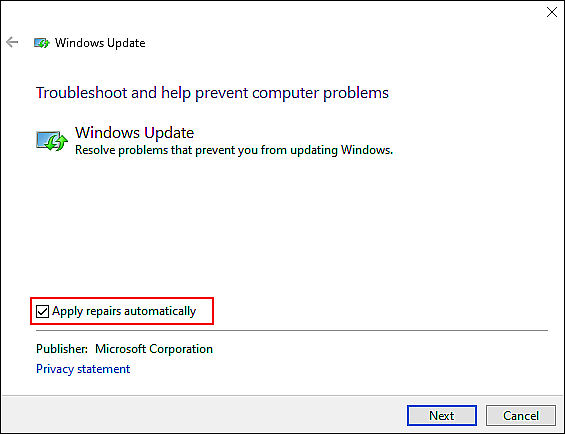
- Now, wait for the troubleshooter to complete the scanning. If the troubleshooter detects any issues, it will suggest fixes. Click on Apply the fixes to complete the process.
That’s it.
Troubleshooting will resolve the issue if it was caused by a corruption error or a bug in the system. We also have listed another easy method of removing corruption errors from your system in Method 4. Don’t forget to check it out.
2. Disable Windows Defender Firewall Temporarily.
If you are using Windows Defender Firewall or any other third-party security program on your PC, there is a high chance that it is the reason behind the error at hand.
In some cases, overly protective security programs prevent legitimate users from executing certain tasks and thus, cause the error. If this scenario is applicable, then the easiest way to resolve the issue is by disabling the security programs temporarily.
Once you have performed the desired task successfully, you can enable them back on Windows.
We have discussed the process of disabling the Windows Firewall below. In different third-party applications, the steps for performing the same function may differ, but the basic principle remains the same.
Here is what you need to do:
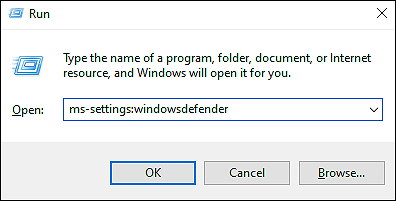
- Press Windows + R keys simultaneously on your keyboard to launch a Run dialogue box.
- Type ‘ms-settings:windowsdefender‘ in the text field of the dialogue box and hit Enter.
- Click on Firewall & network protection.
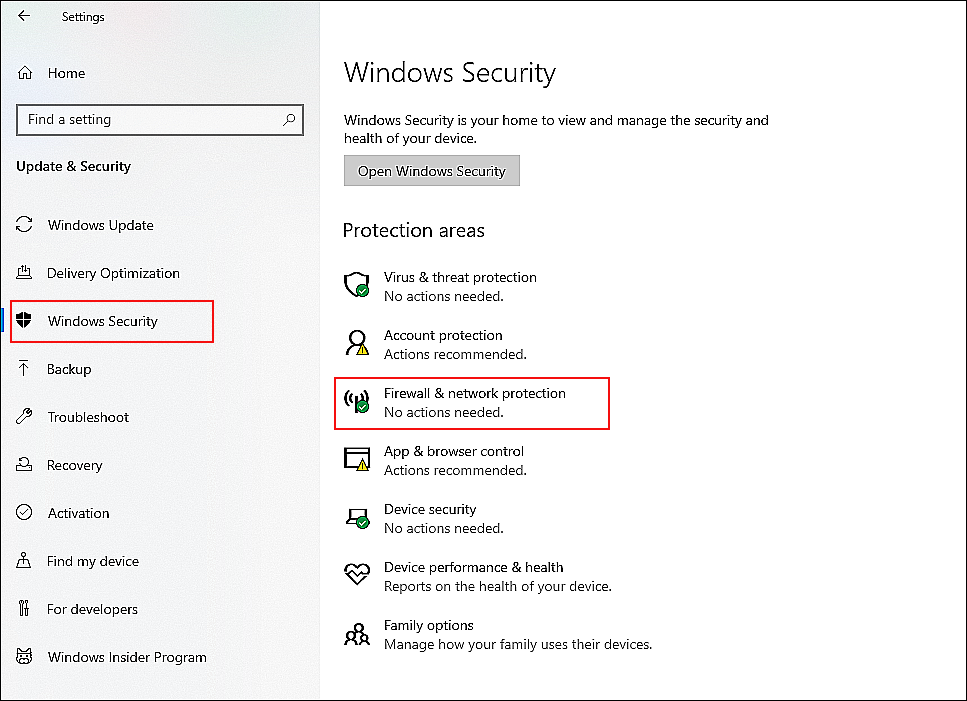
- In the new window, click on the Private network hyperlink and turn off the toggle under Windows Defender Firewall.
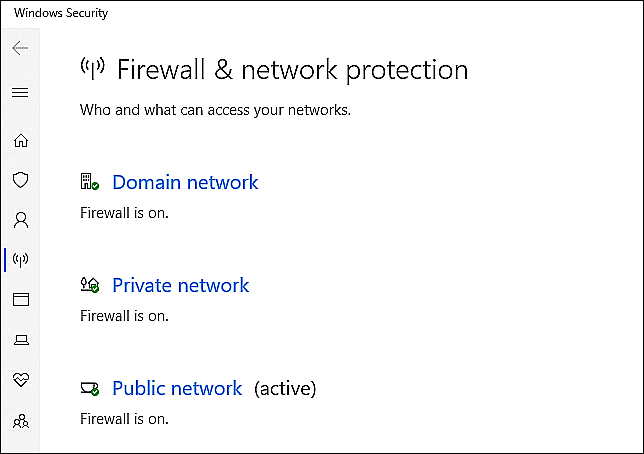
- Repeat the same process for the Public network and once done, try installing the required update again.
If Windows Defender Firewall or any other security program was preventing the operating system from installing updates on your PC, disabling it temporarily will resolve the issue. You can enable Windows Firewall back by following the steps mentioned above again.
3. Run SFC and DISM Scans.
Aside from the Windows Update Troubleshooter, Windows has several other efficient built-in scanners that can detect and fix corruption errors inside the operating system.
In case running the troubleshooter didn’t help, try running scans using System File Checker (SFC) and the Deployment Image Servicing and Management (DISM.exe) tool. They are both command-line tools, which means you can use them through command prompt.
Here is how you can run SFC and DISM scans on your PC to resolve the issue at hand:
- Type cmd in the search bar and click on Run as administrator.
- In elevated Command Prompt, type the command listed below and hit Enter to execute it.
sfc /scannow
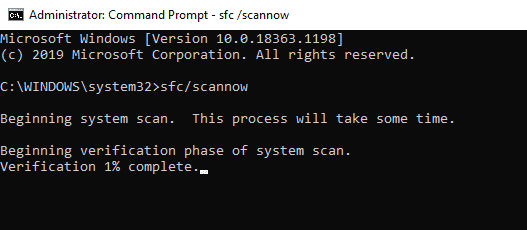
- Once the command is executed, restart your PC and check if the error is resolved. If not, then open the elevated Command Prompt again.
- Type the command mentioned below and hit Enter.
Dism /Online /Cleanup-Image /RestoreHealth
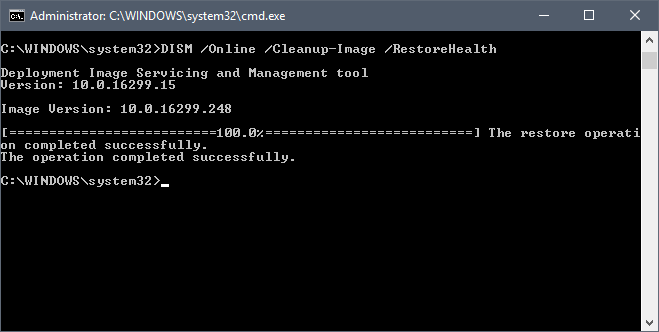
- Finally, restart your PC again.
Hopefully, doing so will fix the error code 0x80240016 on Windows 10.
4. Try Using CleanMyPC.
Additionally, 0x80240016 errors can also be caused by viruses and malware in the system, which is why locating and eliminating corrupt files is crucial.
A reliable PC cleaner is the best method for finding and eliminating corrupted files, by which you both save time and energy. If you don’t already have one installed on your system, we advise you to check out CleanMyPC.

CleanMyPC scans your system files and detects corrupt ones so your computer can be cleaned within minutes. It comes with a range of tools that can handle almost all your PC-related issues, and does so by using the least amount of resources.
Install CleanMyPC now to give your PC a much-needed performance boost!
5. Restart Windows Update Components.
If none of the methods mentioned above works for you, then try restarting Windows Update Components. It is possible, on occasion, for the Windows Update component to become corrupted, preventing the system from installing the current updates.
These corrupt components can be repaired by restarting them, as doing so will return them to their initial, error-free state.
According to a number of users, restarting Windows Update components helped fix the issue at hand, which is why we encourage you to give it a shot.
Here is what you need to do:
- Type cmd in the search bar and click on Run as administrator to launch Command Prompt with administrative rights.
- Now type the commands mentioned below and hit Enter after each to execute them. These commands will stop all the Windows Update Services.
net stop wuauserv
net stop cryptSvc
net start bits
net stop msiserver
- Once done, type the commands mentioned below one by one.
net start wuauserv
net start cryptSvc
net start bits
net start msiserver
- Finally, restart your PC and check if resetting the update components resolved the error.
That’s it.
This should resolve the issue once and for all.
This brings us to the end of our guide on fixing the Windows Update error 0x80240016. We hope that one of the methods mentioned in this guide did the trick for you and the issue is resolved by now. If you have any questions about the troubleshooting steps, please let us know in the comment section below.
If this guide helped you, please share it. 🙂


