

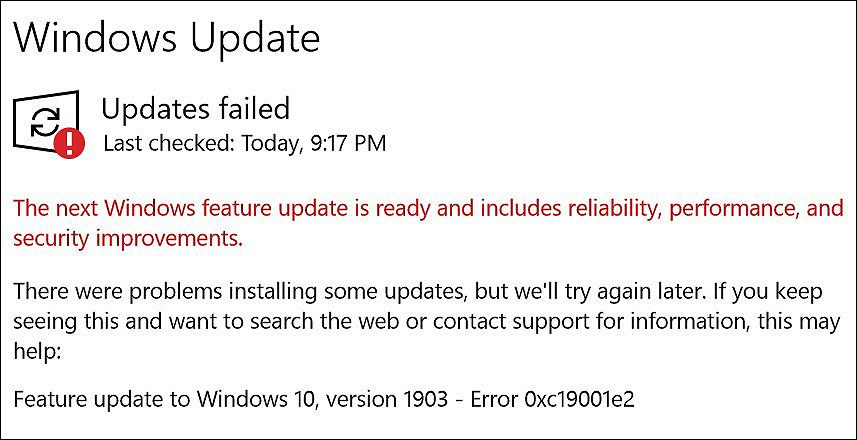
Looking for easy yet effective ways to fix the Windows Update error 0XC19001E2 in Windows 10?
Slow, frozen, stopped, stuck, and frustrating – these are some of the words Windows users use when describing their experience with installing Windows updates. You’ll almost always find a thread about it on different forums, but Windows doesn’t care.
Recently, several users reported that their screens display error code 0XC19001E2 when they attempt to install certain updates (version 1903 and version 1909) on their PC. We had a look into this issue and discovered that it can be caused by a number of reasons, including corruption errors, BitLocker interference, and security interference.
If you are facing a similar issue, you are in the right place. In this guide, we will walk you through the relevant troubleshooting steps in detail.
Let’s get right into it!
1. Run Windows Update Troubleshooter.
As we mentioned earlier, it is fairly common for the users to see errors like the one at hand while installing new Windows updates.
Luckily, Windows comes with several built-in utilities that are specifically designed to handle such issues, and one such handy utility is the Windows Update Troubleshooter. The troubleshooter will scan the Windows update database for issues and if any issues are identified, it will attempt to resolve them with little to no user input.
If your screen is displaying the error code 0XC19001E2 upon your attempt to install the latest Windows 10 feature update, then the first thing that you should do is run a scan using the Windows Update troubleshooter.
If a corruption error within the system is preventing you from installing the latest feature update, Windows Update Troubleshooter will fix it. However, if the issue persists after running the troubleshooter, proceed to the next method below.
2. Restart Windows Update Components.
There are times when Windows Update components get corrupt and prevent the system from installing the latest updates.
The easiest way to fix the corrupt Windows Update components is by restarting them, as doing so will revert them back to their initial, error-free state.
Several users managed to fix the issue at hand by restarting Windows Update components, and so we encourage you to do the same. Hopefully, it will fix Windows Update error 0XC19001E2 in Windows 10.
Here is what you need to do:
- Type cmd in the search bar and click on Run as administrator to launch Command Prompt with administrative rights.
- Now type the commands mentioned below and hit Enter after each to execute them. These commands will stop all the Windows Update Services.
net stop wuauserv
net stop cryptSvc
net stop bits
net stop msiserver
- Once done, execute the commands mentioned below one by one.
net start wuauserv
net start cryptSvc
net start bits
net start msiserver
- Finally, restart your PC and check if resetting the update components resolved the error.
If corrupt Windows Update components were causing the issue, resetting them will resolve it in no time.
3. Run SFC and DISM Scans.
As the Windows Update Troubleshooter, there are several other efficient built-in scanners that help users detect and fix corruption errors within their system.
If running the troubleshooter did not do the trick for you, then try running scans using the System File Checker (SFC) and Deployment Image Servicing and Management (DISM.exe) tool. Both of these are command-line tools, which means that you can use them via Command Prompt.
They will scan your system for issues, and attempt to fix them automatically.
Here is how you can do that:
- Type cmd in the search bar and click on Run as administrator.
- In elevated Command Prompt, type the command listed below and hit Enter to execute it.
sfc /scannow
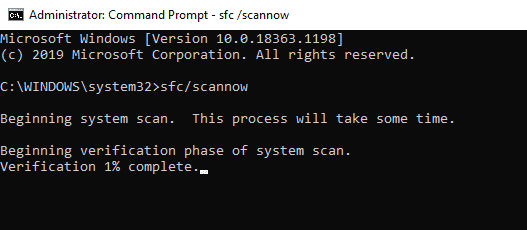
- Once the command is executed, restart your PC and check if the error is resolved. If not, then open the elevated Command Prompt again.
- Type the command mentioned below and hit Enter.
Dism /Online /Cleanup-Image /RestoreHealth
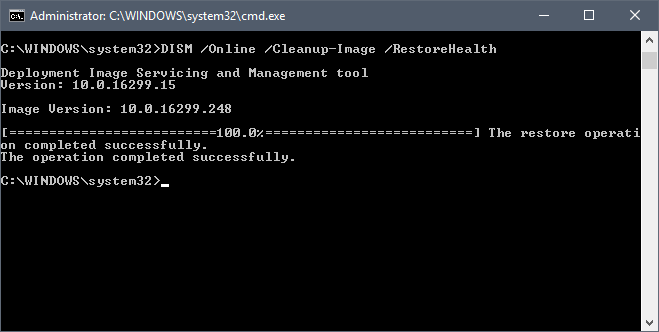
- Finally, restart your PC again.
Hopefully, this will fix the error code 0XC19001E2 on your PC. We have also listed another easy way to scan your PC in method, and if you find this method complex, jump to that.
4. Use the Offline Update Setup File.
If running the troubleshooting utilities is not working for you, then you can try downloading the required update using the Microsoft Update Catalog.
Microsoft Update Catalog is a huge repository of Windows Updates that comes in handy when you want to install individual updates manually. All that you need to do is search for the required update and hit the Download button.
Here is how you can do that:
- Navigate to Microsoft Update Catalog.
- Use the search bar to look for the update that you want to install. You can use a keyword, KB article, and classification.
- Once you find the download, click on the Download button against it and wait for the operation to complete.
- Finally, double-click on the download file to install it on your PC.
That’s it.
This should install the required update without any issues.
5. Try Using CleanMyPC.
You may also encounter errors like the Windows Update error 0XC19001E2 if your computer is infected with bugs and or viruses. In this case, decluttering your PC using a reputable PC cleaner can resolve the issue.
PC cleaners detect and fix corrupted or damaged files on your computer, including in the Windows Registry, without the user having to do anything. Nonetheless, it is crucial that the PC cleaner you use can perform these advanced functions.
For those who have trouble finding an effective cleaner, we recommend CleanMyPC.

With CleanMyPC’s range of system-maintenance tools, you can resolve even the most complex PC problems. The only step you need to take is to install the tool and run a scan. The rest will be taken care of!
If this is something your PC is in desperate need of, install CleanMyPC now and give your PC a much-needed performance boost.
6. Pause Bitlocker.
In case you are using the Bit-Locker feature on your Windows 10, there is a high chance that the said feature is the culprit behind the error under consideration.
It is common for Bitlocker to interfere with the installation processes, which is why we encourage you to pause it and then try installing the required update.
Here is how you can do that:
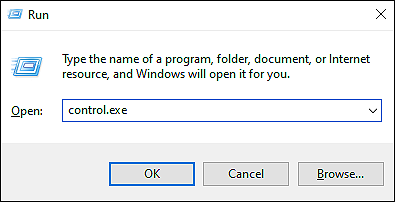
- Press Windows + R keys simultaneously on your keyboard to open a Run dialogue box.
- In the text field of the dialogue box, type ‘control.exe‘ and hit Enter. This will open the Control Panel.
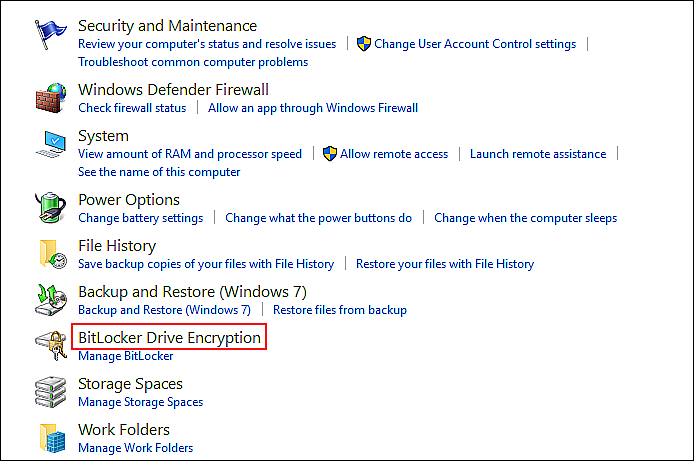
- Inside the Control Panel window, click on System and Security and then select BitLocker Drive Encryption.
- In the next window, click on the Turn off Bitlocker hyperlink and select Yes in the UAC prompt that pops up.
- Close the Control Panel window and check if doing so resolved the issue.
If Bitlocker was preventing the system from installing new updates, pausing it will resolve the issue. Once you have installed the update, you can enable the feature back on.
This brings us to the end of our guide on fixing the Windows Update error 0XC19001E2 in Windows 10. We hope that one of the methods mentioned in this guide did the trick for you and the issue is resolved by now. If you have any questions about the troubleshooting steps, please let us know in the comment section below.
If this guide helped you, please share it. 🙂
