

Having trouble trying to zip a folder in Ubuntu & Other Linux?
Whether you want to compile different sorts of files or reduce their storage space, it’s a good idea to make use of the Zip application. With its help, you will easily be able to convert one or multiple files into a single file with the .zip format.
When it comes to Linux distributions, it is possible to zip your folders using either the terminal or the graphical user interface. With that being said, if you’re only getting started with Linux, you might still come across issues trying to use Zip.
If that’s the case with you as well, then this article is sure to be of help. Today, we will be discussing everything from installing Zip to using it to compress files using both the terminal and GUI of Linux.
So, let’s cut to the chase and get to zipping!
- Step 1: Installing Zip on Linux.
- Step 2: Using Zip on Linux [Terminal].
- Step 3: Using Zip on Linux [GUI].
- How to Unzip a Folder in Linux.
Step 1: Installing Zip on Linux.
Whether you’re using Linux, Windows, or macOS, you’d need to have the Zip application installed in order to convert your files and folders into .zip format. Accordingly, the first step to zipping your files would be to install this application.
It is normally the case that this application comes pre-installed on most Linux distributions. However, if your computer doesn’t have it for some reason, you need not worry as installing it is pretty easy.
Follow these steps to install Zip on Linux:
- First of all, you’d have to press the Ctrl + Alt + T keys on the keyboard to open the Linux terminal.
- Afterward, we recommend running this one command, which would be sufficient for both checking whether Zip is installed and installing it if it already isn’t:
sudo apt-get install zip unzip -y
- With this, the system should either tell you that Zip is already on your system or that the installation has completed.
Now that you have Zip installed on your Linux distro, we can now get to zipping your files and folders.
Step 2: Using ZIP on Linux [Terminal].
Even if you’re new to Linux, there’s no reason why you should shy away from using the Linux terminal. After all, it gives you a lot more control over what you’re doing just at the expense of running a few commands.
Here, we will have a look at how you can compress your files and folders in the .zip format using the Linux terminal. Just follow our instructions carefully and you shouldn’t come across any issues—that’s for sure!
Zip your files and folders by following these steps:
- The first step is to open the Linux terminal by pressing the Ctrl + Alt + T keys.
- Once the terminal opens, you need to head to the directory where resides the file or folder you want to zip. You can change directories by using the cd command as follows:
cd <folder-name>
- You can also go up one directory level with the following command:
cd ..
- After going to that directory, the following commands should suffice for zipping your files or folders (or both):
zip <output-file-name> <file1> <file2>
Or
zip -r <output-file-name> <folder1> <folder2> #where -r is used for compressing directories
Or
zip -r <output-file-name> <file1> <folder1>
- Plus, if you want your zip file to be password-protected, using the -e option would do:
zip -e <output-file-name> <file1>
As you could probably tell, it’s not that difficult to zip your files using the command-line interface in Ubuntu and other Linux-based operating systems. With that being said, if you don’t want to delve into commands at all, you can opt for the GUI route instead.
Step 3: Using ZIP on Linux [GUI].
It is true that using the Linux terminal to zip files and folders is completely possible. However, we do understand that it may not be everyone’s cup of tea. Considering this, if you don’t feel like using the terminal, let’s see how you can use the ZIP software with its graphical user interface.
Before we get started, it’s worth noting that there are multiple desktop environments available on the Linux platform. However, we’re only going to be covering GNOME and KDE graphical interface since most Linux users seem to be using them.
If you’re using another desktop environment, you need not worry at all. The good news is that the process shouldn’t be much different for you either. Make sure to read our guidelines carefully and you’ll be all set to zipping your files and folders.
For GNOME users, the following steps should be taken:
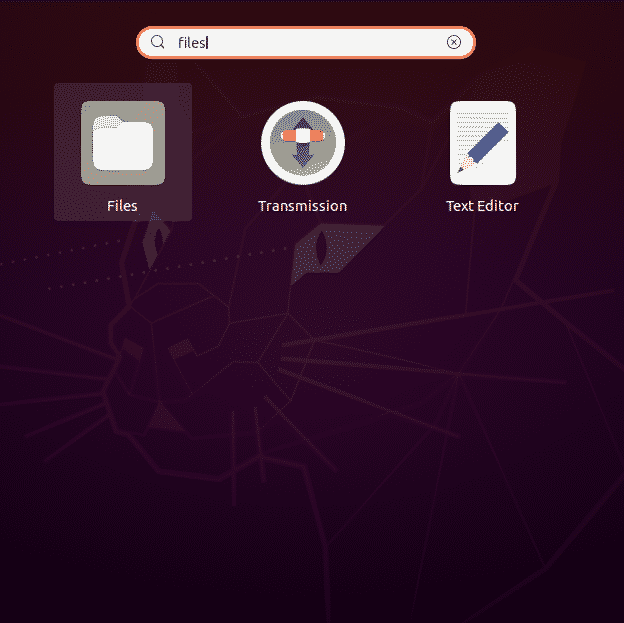
- Firstly, enter ‘files’ in the search box and open the Files application.
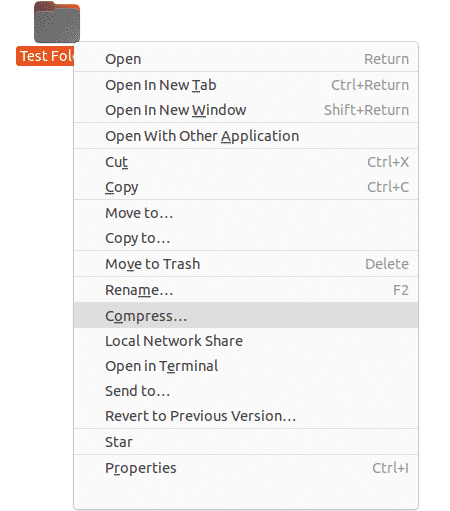
- Once the application opens, you need to navigate to the folder where resides the file/folder you want to zip.
- Next, right-click on that file/folder and click the Compress option.
- With this, a window should open asking you the name of the output file and its file format, which you can choose from .zip, .tar.xz, and .7z.
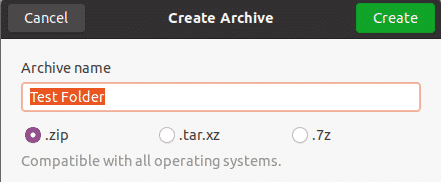
- Lastly, you need to click the green Create button and the zip file should be created.
KDE users should follow these steps:
- Start by clicking the Application Launcher button located at the bottom-left side of the desktop and typing ‘Dolphin’ in the search bar.
- Next, open the Dolphin file manager and navigate to the file or folder you want to compress.
- Once you get there, you need to right-click on that file/folder and hover over the Compress option.
- From there, you will be able to convert your file/folder into the .zip or .tar.gz format.
- Moreover, you can also save the compressed file to another location by opting for the Compress to option.
If you’re using another desktop environment, the process of zipping and unzipping your file/folder shouldn’t be much different.
How to Unzip a Folder in Linux.
The Zip application hasn’t been made only for zipping files. You can also unzip the compressed files/folders of your choice both the GUI and terminal way.
Follow these steps if you want to go the terminal route:
- Start by opening the Linux terminal by pressing the Ctrl + Alt + T keys on your keyboard.
- Afterward, navigate to your file/folder destination with the help of the cd command.
- Once you get there, you need to run the following command to unzip the file/folder of your choice:
unzip <file-name.zip>
- With this, the contents of that zip file should be extracted to that location.
If you want to unzip files/folders graphically, then following these steps should do:
- The first step is to open the Files application by searching for it in the Applications menu.
- Next, you have to go to the folder where resides the file/folder you want to unzip.
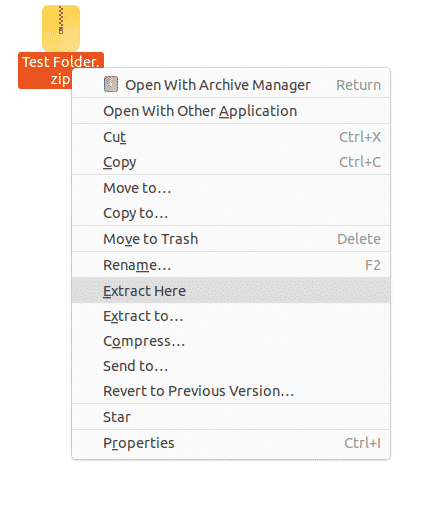
- From there, you have to right-click on that file/folder and opt for either Extract Here (if you want to store the unzipped contents in the same folder) or Extract to (if you want to store them in another location).
- With this, the file/folder of your choice should be unzipped.
We really hope that you will now be able to successfully zip/unzip your files and folders, regardless of whether you’re going for the GUI or CLI route. These methods should also work for different Linux distributions, so need not worry about trying them out on your system. Lastly, if you want to get a taste of networking on Linux, we recommend giving this article a read.
If this guide helped you, please share it. 🙂
