

Confused about how to install the Wike Wikipedia reader on Ubuntu?
We all know about Wikipedia, it is arguably the largest encyclopedia available online. You can get highly detailed articles on pretty much everything there is. It is the type of resource one visits often. The information provided on it can be relied upon, and you can get relevant information from the articles easily.
Imagine that you have a desktop application that gives you access to all Wikipedia articles. You just need to install it, and you can read the article you want on a proper reading interface.
The application we are talking about is called “Wike” and is an open-source project available on Github. It was developed using Python and used the MediaWiki API to feed content from Wikipedia.
The most praiseworthy feature of Wike is that it is highly customizable. You can set the font size and other things, such as margins, so the text is viewed according to your preference. It also has an offline mode where you can save articles to read later when you are not connected to the internet.
If you use Ubuntu and are interested in knowing how to install the Wike Wikipedia reader on Ubuntu, then you are at the right place, as we will be looking at all the steps that you need to follow to get this useful application on your desktop.
So, let’s get going!
Installing Wike.
The steps for installing Wike are simple. You should have no trouble executing these commands.
- Open the Command Terminal.
- The first step is to update your Ubuntu system repositories so you can get the latest versions of the packages available. Update using this command.
$ sudo apt update

- The Wike repository is not available in Ubuntu repositories, so you need to add it first by using the following command.
$ sudo add-apt-repository ppa:apandada1/wike

- Once you are done with the steps above, you are ready to install Wike. Use the following command for this purpose.
$ sudo apt install wike

The installation should start, and you should be able to track the progress.
This was one of the methods of installing Wike on your Ubuntu desktop. Let’s take a look at another method.
Installing Wike Using Flatpak.
Flatpak, just like snaps, is a package manager for Linux and its distributions. You can use Flatpak to install most of the applications available for Linux, which is also available on Ubuntu.
- Open the Command Terminal.
- You must first install the Flatpak package manager before installing Wike. Use the following command for this.
$ sudo apt install flatpak

- After you have installed Flatpak, reboot the system so that you can integrate the Flatpak packages.
$ sudo reboot
- After rebooting, install Wike using Flatpak through this command.
$ flatpak install flathub com.github.hugolabe.Wike
These were the steps on how to install the Wike Wikipedia reader on Ubuntu.
Using Wiki.
Once the application is installed, you can choose to open the application from either the “application launcher” or by searching for it in the applications tab. Once it is open, you should see the following interface.

You can use the search tool to search for an article of your choice. For example:

You should see the following pop-up screen by clicking on the options button and then selecting the preferences option. You can choose the desired font size and font style. If you want to see the article in another language, you can also change that.

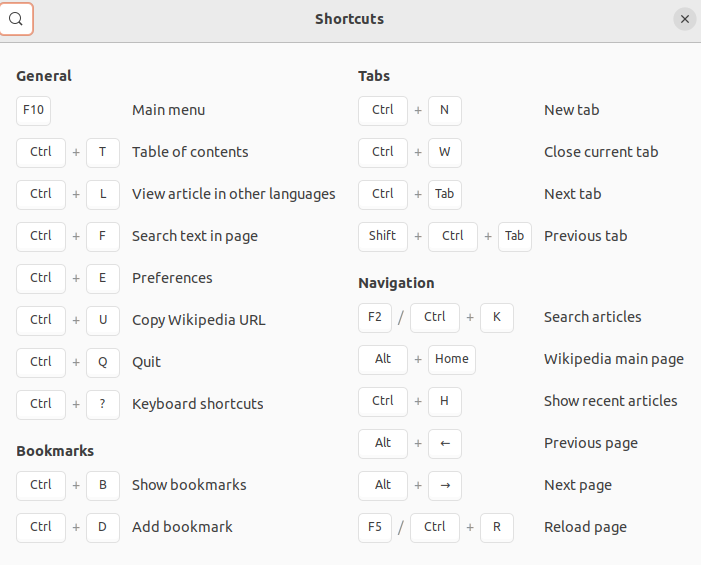
Again, if you click on the options button and navigate to the keyboard shortcuts tab, you should see the following on your screen. You can see the keyboard shortcuts you can use while reading an article to make changes according to your liking.
Furthermore, you can also change the color mode of the application by clicking on the options button. You should see the following three color options on your screen. The black one is for dark mode, and it looks like this.

Updating and Uninstalling Wike.
If you figure that an update is available for Wike, you can update the application using the following two commands.
If you have installed it using the Ubuntu repository.
$ sudo apt update
Also, if you installed it using Flatpak manager.
$ flatpak update
Moreover, if you feel like you don’t want to use the application anymore, you can delete it using the following command.
$ sudo apt autoremove --purge wike
Now that we have covered Wike, let’s talk about the Prestashop application. As you may know, setting up online shops has arguably become the best way to open up a new business or promote a business, all owing to the increased e-commerce activities in the past few years.
There are millions of online virtual shops available, and hundreds are added every day. People use multiple online platforms, and one of the most popular online shop platforms is Prestashop.
Several reasons suggest why Prestashop is a popular online shop platform, including great features for customizing your shop according to your liking and accepting payment from all major payment companies.
If you are interested in learning more about Prestashop and want help installing it, then go to this link. It will take you to a guide showing you the steps of installing Prestashop and providing info related to the app.
This was an article on how to install the Wike Wikipedia reader on Ubuntu. We first introduced and described the application. Then we looked at the two methods of installing the application, i.e., through the Ubuntu repository and Flatpak manager. In the end, we introduced some features of the application.
We hope we can help you out and for further queries, please let us know in the comments below.
If this guide helped you, please share it. 😊
